Preparing models for multi-material FDM prints used to be a fairly complicated and time-consuming process. Starting with PrusaSlicer 2.4, coloring an object for multi-material printing requires just a handful of bucket fills and brushstroke operations.
Painting tools
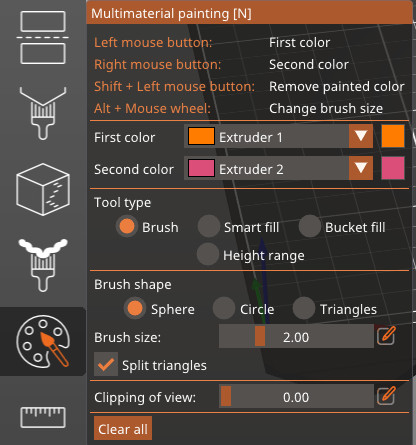
Brush
Like the support or seam painting tool, hold down your left mouse button to paint with the primary color and the right mouse button to paint with the secondary color.
There are three shapes of brushes: sphere, circle, and triangle. For the sphere and circle brushes, you can choose the brush size as well as if you want to split bigger facets into smaller ones while the object is painted. The triangle brush used the triangles of the object itself.
Smart fill
With the Smart Fill tool selected, hovering the mouse above the model gives you a real-time preview of the automatically detected region to paint. The paint fills a region below the mouse cursor up to a sharp edge, and the threshold angle is adjustable.
Bucket fill
Replace a patch of one color with another. You can choose the angle the bucket fill will select.
Height range
Paint objects between two horizontal lines. You can choose the distance between the two lines.
Color selection
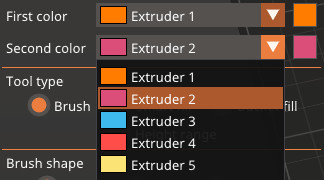
The combo boxes First color and Second color in the panel allow mapping different extruders to the left and right mouse buttons. The number and color of the selected extruder are shown for clarity. The color that is used for visualization can be overridden by clicking the colored square next to the selected extruder. This visualization color is not saved anywhere and will be lost when the application closes.
Segmenting colors
During slicing, the painted regions are cleverly extended inwards, giving the different colors/polymers the best chance of binding together.
The object surface is segmented into patches of the same material and the patches are extended inwards. The regions painted at the top resp. bottom surfaces are extended by the number of top_solid_layers resp. bottom_solid_layers (configurable in Print Settings - Layers and Perimeters). The regions painted at the side walls are expanded inwards up to maximum mmu_segmented_region_max_width (which is a new configuration parameter accessible in Print Settings-> Multiple Extruders-> Advanced).
The painting only affects the slicing result, the model itself is not altered and the colored "parts" cannot be exported separately.
Notes
Please note that thin features are not printable with FDM technology, thus for example painting a thin wall with two distinct colors will not make the thin wall printable. Such thin non-printable regions created during segmentation are thus detected and merged with the neighboring region, changing its color. PrusaSlicer will print thinner features with "detect thin walls" enabled, thus it is advised to try to enable "detect thin walls" if painting over thin features.
There are two extra limitations arising from technical reasons:
The multi-material painting is limited to 16 extruders. If your printer uses more extruders, only the first 16 will be available in the painting tool.
Multi-material painting cannot be combined with XY size compensation. The XY size compensation will be ignored during slicing if the object is also multi-material painted. The user is informed by notification in both cases.
Examples of painted models

9 comments
MK3.5, MK3.9, MK4, XL printers have this option, after you start a print.
Hello. Currently, the only option for changing colors on the printer UI is how to do it easily. The only other way is to change colors on the PrusaSlicer, but changing spools on the printer is more convenient.
Hi! It is explained briefly in the last chapter of the assembly guide. Apart from the knowledge base, read the printed Handbook. There is probably everything you need to know.