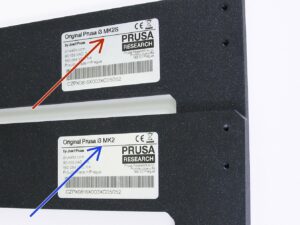
DE
  • English
Login

1. Introduction

1. Introduction
Relevant für:
Zuletzt aktualisiert 4 years ago
1. Introduction
 Schwierigkeit
Sehr leicht
 Schritte
8
 Verfügbare Sprachen
EN
Original Prusa i3 MK2 vs MK2S
Take a look at the aluminium frame (Z-axis), there is a sticker with the name of the printer. In case of a text "Original Prusa i3 MK2S" you need to use another version of this manual - Original Prusa i3 MK2S kit assembly
If your sticker contains "Original Prusa i3 MK2" you can continue using this manual.
Labels guide
Labels guide
All the boxes and bags including parts for build are labeled.
Number (or numbers) in the header tells you for which chapter you'll need that bag (or box).
Critical parts include spares back-up
Critical parts, like zipties, have a spare included as a back-up option. How much we included as spare is written in the bracket.
No need to worry if you mess up during the assembly with the extras added.
Spare bag
Spare bag
Every type of fastener is included in a separate special bag.
If you lose a screw when building, use one from this bag.
Nut insertion tip
Nut insertion tip
Nut insertion tip
Nut insertion tip
If you're experiencing troubles with getting nuts into correct places, just follow these simple steps.
Screw M3 nut a bit on some long screw (M3x40 from Extruder bag works in most cases).
Push the screw with the nut into the hole where it is supposed to be.
Grab the screw with pliers and gently hammer the nut in place using a wrench.
If you use a screw from a different bag then you are using at the moment, don't forget to return it back into the bag.
War diese Anleitung hilfreich?

Kommentare

Sie haben noch Fragen?

Sie haben noch Fragen?

Wenn Sie eine Frage zu etwas haben, das hier nicht behandelt wird, sehen Sie sich unsere zusätzlichen Ressourcen an.
Und wenn das nicht ausreicht, können Sie über die Schaltfläche unten oder an die [email protected] eine Anfrage senden.

Kontakt