EN
  • Čeština
  • Español
  • Italiano
  • Deutsch
  • Polski
  • Français
  • 日本語
Login

5. Preflight check

5. Preflight check

5. Preflight check
Relevant for:
Last updated 3 years ago
5. Preflight check
 Difficulty
Moderate
 Steps
29
 Available languages
CSPLESDEITFRJA
Printer calibration
Printer calibration
In the following steps, we will go through the entire process of the calibration.
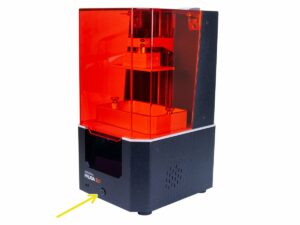
Plug the printer in, ensure the PSU switch is on and press the button on the front to turn the printer on.
Follow the instructions on the touchscreen and use this chapter to get extra information regarding each step.
DON'T POUR THE RESIN in the tank until you are asked to by the printer!
Never service the printer with the resin inside!
Spilling the resin inside the printer will most probably end up damaging the SL1. Be careful!
Never look inside the printer during the calibration of the screen or UV LED. There is a risk of PERMANENT DAMAGE to your eye(s).
Unboxing Wizard
Unboxing Wizard
Unboxing Wizard
Unboxing Wizard
Please make sure you have removed the protective film.
Confirm and then end this short unboxing Wizard by pressing "Continue"
Setup Wizard 1-2
Setup Wizard 1-2
Setup Wizard 1-2
Setup Wizard 1-2
Welcome to the initial Setup Wizard, which will guide you through the basics of the initial setup.
Open the acrylic lid all the way up.
If the resin tank is present, please unscrew the screws, remove them and then remove the tank.
Click on Continue.
Setup Wizard 3
Setup Wizard 3
Setup Wizard 3
In this step, it is time to remove the printing platform.
Loosen the black knob and remove the platform.
Place the platform on a soft piece of fabric! You can use the same as during the assembly. Never place the platform directly on the table!
Press "Continue" and wait until all the checks are done.
Setup Wizard 4
Setup Wizard 4
Setup Wizard 4
MAKE SURE THERE IS NO TANK AND NO RESIN inside the printer!!!
We are going to the test the UV LED, any resin present in the tank will be hardened. This test takes around 2 minutes.
Before you continue, close the lid.
Press "Continue"
Display test
Display test
Display test
Display test
Don't open the lid under any circumstances, keep it closed! There is a UV light inside, which will cause damage to your eyes.
Take look from above the printer. Your eye level needs to be above, not in front. Otherwise, you won't be able to judge the result correctly.
Check the entire screen, you must be able to see our company logo in full. No parts (letters) should be missing.
Setup Wizard 5
Setup Wizard 5
Setup Wizard 5
Open the acrylic lid to get access to the printer.
Insert the resin tank in and tighten it using the screws. Make sure the tank is clean and empty (no resin inside)!
Click "Continue" to proceed.
Setup Wizard 6
Setup Wizard 6
Setup Wizard 6
Now, the tower axis check will take place.
Close the lid and press "Continue" and wait until the process is finished, then proceed to the next step.
Setup Wizard 7
Setup Wizard 7
Setup Wizard 7
Open the cover to get access inside the printer.
Insert the platform, but for this step rotate it at 60° angle. See the picture.
When ready hit "Continue".
Setup Wizard 8
Setup Wizard 8
Setup Wizard 8
Close the orange lid.
Hit "Continue" and avoid touching the printer for now!
Behind the scene: The printer needs to test the resin sensor conductivity, therefore the platform will lower down and almost touch the tank to close electronic circuit. That is why for now, you need to rotate the platform. Don't touch the printer during the procedure.
Setup Wizard 9
Setup Wizard 9
Setup Wizard 9
To fully utilize the printer's features, we recommend setting your local timezone.
Set the values and hit "Continue"
Setup Wizard 10
Setup Wizard 10
Setup Wizard 10
Right now, you should hear a sound coming from the speaker near the touchscreen.
Congrats! The setup part is finished. Now, let's calibrate the printer.
Calibration 1
Calibration 1
Calibration 1
Now it is time to rotate the printing platform, so it fits in the resin tank.
Release the black knob slightly and pull the platform out.
Insert the platform back in, but this time according to the picture. Edges of the platform should be parallel with the edges of the tank.
Tighten the knob again.
Press "Continue"
Calibration 2
Calibration 2
Calibration 2
Carefully release the screw(s) on the cantilever. Two turns are enough. Make sure not to unscrew them completely.
Press "Continue"
Calibration 3
Calibration 3
Calibration 3
Release and remove both screws on the resin tank. Place them outside the printer.
Rotate the tank by 90° on the printer.
Behind the scenes: We will use the tank to calibrate the tilting mechanism. The tank will work as a levelling tool to set the tilt horizontal.
Press "Continue"
Calibration 4
Calibration 4
Calibration 4
See the pictures in the Wizard to set the tilting mechanism correctly.
Actual setting will be in the next step, for now just learn the correct position.
Behind the scenes: The tank must be placed on both sides of the printer which doesn't move and in the middle is the tilt mechanism with the screen. Your goal is to set all surfaces to the same level.
Press "Continue"
Calibration 5
Calibration 5
Using the "Up" and "Down" button move the tilt mechanism until you align it with the bottom edge of the resin tank.
Recommended setup: using the tilt, raise the tank slightly above the printer and then return down till you touch the surface of the printer again.
The value will differ for each printer.
As soon as you finish this step, you can remove the tank from the printer. Make sure you won't damage (punch through) the FEP film.
Calibration 6
Calibration 6
Calibration 6
Before you continue to the next step, make sure all the parts are perfectly clean. No resin or dirt should be present on the:
Resin tank
Printing display
Printing platform
Press "Continue"
WARNING: Do not clean the FEP film with isopropyl alcohol! Use a combination of warm water and a dishwashing product.
Calibration 7
Calibration 7
Calibration 7
After you ensure, that everything is clean, place the tank back in its original position and secure it with the screws.
Press "Continue"
Calibration 8
Calibration 8
Calibration 8
Check, whether the platform is properly secured on the printer. If not, tighten the black knob.
Since the screw(s) in the cantilever isn't/aren't tightened, the eccentric might wobble, but that is ok for now.
By gently pressing on the platform, ensure it is all the way down in the cantilever.
Press "Continue"
Calibration 9
Calibration 9
Calibration 9
Close the orange acrylic lid and continue with the next step.
Press "Continue"
Calibration 10
Calibration 10
Calibration 10
Open the lid and take a look inside the printer, make sure the edges of the platform and the tank are parallel.
Press "Continue"
Calibration 11
Calibration 11
Calibration 11
Calibration 11
Tighten firmly one or both screws on the cantilever to finish the adjustment.
Press "Continue"
Grasp the platform in both hands like in the picture and try tilting the platform up and down. The platform must not move!
If the platform is moving, return to the beginning of the calibration and repeat the whole procedure. Don't forget to use more force to tighten the screw(s) in the cantilever.
Finalising the calibration
Calibration is finished! Check the final screen.
For advanced users, values for PrusaSlicer are included, to make the print time estimation more precise. Note you have to switch PrusaSlicer to the Expert mode.
Haribo time!
Haribo time!
The calibration was easy compared to the previous chapters. Eat the last row, read the remaining steps and enjoy your new printer.
Printable 3D models
Printable 3D models
Printable models are included with the printer, you can download them directly from our servers using the printer's menu.
List of the models for the SL1 is available on PrusaPrinters.org. Look for collection "SL1 Sample Objects" by Prusa Research.
Join PrusaPrinters!
Join PrusaPrinters!
Join PrusaPrinters!
Join PrusaPrinters!
Don't forget to join the biggest Prusa community! Download the latest models in STL. Register at PrusaPrinters.org
Looking for inspiration on new projects? Check our blog with weekly updates.
If you need help with the build, check out our forum forum.prusaprinters.org with great community :-)
All services share one account.
Was this guide helpful?

Comments

Still have questions?

Still have questions?

If you have a question about something that isn't covered here, check out our additional resources.
And if that doesn't do the trick, you can send an inquiry to [email protected] or through the button below.

Contact us