English
Login
3D printers
Materials
Parts & Accessories
For Business
Software
3D Models
Community
Help
Courses
Blog
Company
Support
Original Prusa MMU2S
Original Prusa i3 to MMU2S upgrade
7. Spool holder and buffer assembly | Tools necessary for this chapter
1. Tools necessary for this chapter
Step 1 of 22 (Chapter 11 of 14)
Contents
Comments
⬢
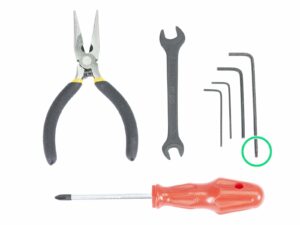
Please prepare tools for this chapter:
⬢
2.5mm Allen key for M3 screws
Loading...
Next
Contents
Original Prusa i3 to MMU2S upgrade
1. Introduction
2A. MK3S+ extruder disassembly
2B. MK3S/MK2.5S extruder disassembly
2C. MK3/MK2.5 extruder disassembly
3A. MK3S+ extruder upgrade
3B. MK3S/MK2.5S extruder upgrade
3C. MK3/MK2.5 extruder upgrade to MK3S/MK2.5S
4. Idler body assembly
5. Pulley body assembly
6. Electronics and MMU2S unit assembly
7. Spool holder and buffer assembly
Tools necessary for this chapter
Cleaning the spool holder base (optional)
Sticking foam pads
Assembling the spool shafts
Assembling the spool shafts
Assembling the spool holder (part 1)
Assembling the spool holder (part 2)
Buffer parts preparation
New buffer parts
Buffer parts preparation (new version)
Buffer assembly - printer part (new version)
Buffer assembly - spools part (new version)
WARNING: tightening the parts (new version)
Adding the spacers and hooks (new version)
Buffer parts preparation (old version)
Buffer assembly - printer part (old version)
Buffer assembly - spools part (old version)
WARNING: tightening the parts (old version)
Adding the spacers on both sides (old version)
Adding the PTFE tubes (both versions)
It's Haribo time!
Final check
8. Preflight check & Calibration
9. First flight
Manual changelog MMU2S
Comments
Log in
to post a comment
No comments