I would suggest skipping ahead to step 5. Turning on the printer, do step 6, step 7 (connect to your WiFi, add your printer to the Prusa app), and at step 8. Wizard: Intro select cancel. Then scroll to the LCD Menu > Settings > Manual Belt Tuning and follow the on-screen instructions. This will run the Belt Tuning Wizard which uses stroboscopic feedback to very accurately read the upper and lower belt resonant frequencies (accurate to 0.5 Hz) and recommend exact adjustments to the belt tensioner screws. This was much easier than all the other options. See https://help.prusa3d.com/article/adjusting-belt-tension-core-one-l-core-one_845048 for detailed info.
When you are finished adjusting the belt tensioner screws, you can return to Step 9 in this guide and complete the rest of the self-tests and calibrations. On the LCD Menu navigate to Control > Calibrations & Tests and select 1 Fan Test. I found that after this test completed, the printer software asked if I wanted to continue the calibrations and tests, and it proceeded through the rest of the tests in sequence automatically.
This is confusing. The procedure described in 'Adjusting belt tension (CORE One)' assumes that the printer is powered up, but if you'll power it up, it will guide you through the entire calibration process from the start without allowing you to go to menu and run tensioning process. I assume that should be tuned by acoustic natural frequency using the app here.
This should state that the belts need to be a bit tight, since they should be quite loose at this point in the process. Tighten them just a bit so there is no slack before moving to the tension process. This step should also note that the app should be used since there is no power to the printer yet.
Beelt tuning was an interesting process, and frustrating. I ran through the tuning process several times, I could not get the belts to both fall into the proper frequencies. What i found in this process was that the belts would streatch a little. If I moved the head from right to left and back again, then the frequency would change. I did this several times and could not get it right, but I could get close. then i noticed that the when the belts had streatched it also moved them out of alignment. So i adjusted them again to not have any gaps on either side when pulled forward. I then did one last tuning and It worked. The belts streatched about 4 times during this process. so moving the head from right to left and back was done multiple times. After this I ran into the same z axis issue, which was fixed as described by DHFG
I found finding the initial tension to be difficult. When the machine tried to home either axis it would knock against the stops, making extra noises (maybe the belts slipping?), until it timed out. This was way too loose. When the instructions say to check for play in the gantry, mine seemed square but pulled away from the stops on both sides when I let off pressure. Same for the X-axis. I tightened the belts until this went away. Then I could do the tensioning procedure.
I tried the app with the microphone but all that did was tell me that I have a constant 120hz background hum where I am.
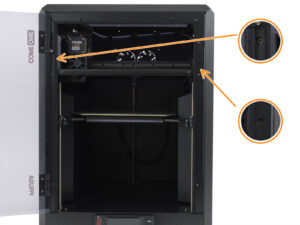
The belt tuning wizard is what did it for me. It seemed unclear until I looked at the belts from an angle rather than at a level height. Made sense when I realized that.
A side note. It took me a moment to realize what a "2/8" turn is. A "2/8 th" or "1/4" (without suffix) would be more clear for me. A "1/8" without suffix would also read clearly to me. Might be because I'm in a US Customary unit world.
Another note. The tuning wizard is pretty slick :-)

When you are finished adjusting the belt tensioner screws, you can return to Step 9 in this guide and complete the rest of the self-tests and calibrations. On the LCD Menu navigate to Control > Calibrations & Tests and select 1 Fan Test. I found that after this test completed, the printer software asked if I wanted to continue the calibrations and tests, and it proceeded through the rest of the tests in sequence automatically.
I assume that should be tuned by acoustic natural frequency using the app here.
Tighten them just a bit so there is no slack before moving to the tension process.
This step should also note that the app should be used since there is no power to the printer yet.
After this I ran into the same z axis issue, which was fixed as described by DHFG
I tried the app with the microphone but all that did was tell me that I have a constant 120hz background hum where I am.
The belt tuning wizard is what did it for me. It seemed unclear until I looked at the belts from an angle rather than at a level height. Made sense when I realized that.
A side note. It took me a moment to realize what a "2/8" turn is. A "2/8 th" or "1/4" (without suffix) would be more clear for me. A "1/8" without suffix would also read clearly to me. Might be because I'm in a US Customary unit world.
Another note. The tuning wizard is pretty slick :-)