JA
  • English
  • Čeština
  • Español
  • Italiano
  • Deutsch
  • Polski
  • Français
Login

1. はじめに

1. はじめに
Relevant for:
Last updated a year ago
1. はじめに
 Difficulty
Very easy
 Steps
10
 Available languages
ENCSPLESDEITFR

Step 1 アップグレードキットの準備

アップグレードキットの準備
アップグレードキットの準備
アップグレードキットの準備
Welcome to the tutorial how to upgrade your Original Prusa i3 MK3 to Original Prusa i3 MK3S
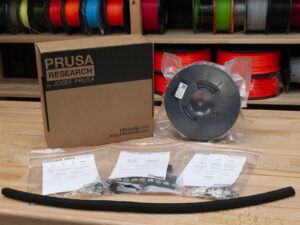
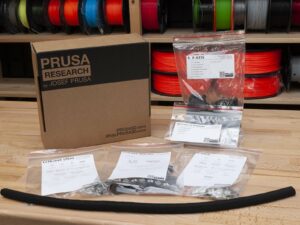
Prusa Researchから届いたアップグレードキットを準備してください。
警告:この組み立てガイドは、シングル材料の MK3Sに対してのみ有効です!!!! MK3S MMU2Sについては、こちらのガイドに従ってください Original Prusa i3 MK3SからMMU2S 。違うパーツが必要です!
This MK3 to MK3S upgrade focuses only on the new Extruder design. Other parts of the printer can differ from yours, but there is no need to upgrade them.

Step 2 Getting the necessary tools

Getting the necessary tools
For this upgrade you will need:
ラジオペンチ (1本)
Allen key 2.5 mm (1x)
Allen key 2.0 mm (1x)
Allen key 1.5 mm (1x)
Slotted screwdriver for the belt insertion (optional)
No soldering is required. No wire crimping is required.
Tools are not included.

Step 3 Labels guide

Labels guide
Labels guide
All the boxes and bags including parts for the build are labelled.
This bag is used as an example.

Step 4 Use labels for reference

Use labels for reference
Most of the labels are scaled 1:1 and can be used to identify the part :-)
最も一般的なネジ、ナット、PTFEチューブの識別には、裏面にPrusa Cheatsheetが記載されている同封のペーパーもご利用ください。
You can download Prusa Cheatsheet from our site. Print it at 100 %, don't rescale it, otherwise it won't work.

Step 5 高画質な画像を見る

高画質な画像を見る
高画質な画像を見る
manual.prusa3d.com で組み立てガイドをご覧の場合には、高画質なオリジナルの画像をご利用いただけます。
カーソルを画像の上に移動し、左上に表示されている拡大鏡のアイコン ("View original") をクリックします。

Step 6 Printed parts - versioning

Printed parts - versioning
Most of the 3D printed parts on Original Prusa i3 MK3S most are marked with their version.
Cx series (e.g. C1) - those parts are printed on Prusa Research farm and are distributed with the kit.
Rx series (e.g. R4) - those parts are available for download and printing by the user. They are identical to the factory ones.
もしプリンターの組み立て途中で、プリント部品に問題を見つけた場合には、このラベルを探し、サポートチームに連絡してください。
Printed parts in the picture are used as an example, yours might be different.

Step 7 Printed parts - self printing

Printed parts - self printing
Before we start disassembly, you need to print (or purchase) all the necessary parts. If you already have the parts, you can skip to the next step.
For MK3 to MK3S upgrade you need to print the extruder parts, which are separated into more G-codes. Use enclosed BLACK PETG or similar material. The colour should be black to avoid issues.
G-codes and STL files are available on our website: prusa3d.com/prusa-i3-printable-parts
For printing individual parts it is recommended to use Slic3r PE with 0.2 mm layer height, GRID infill at 20%, no supports!
Fan-shroud must be printed from ABS only!!! We include this part in the upgrade package.
No need to print the Y-axis parts, their main purpose is easier assembly.

Step 8 私たちはいつでもお待ちしております!

私たちはいつでもお待ちしております!
私たちはいつでもお待ちしております!
私たちはいつでもお待ちしております!
マニュアルで不明な点がありましたか? ネジが紛失していたり、プリント部品にクラックが入ってしまっていたりしましたか? 是非教えてください!
以下の方法よりご連絡いただけます。
それぞれのステップの下部からコメントする。
shop.prusa3d.com のライブチャットを使う。
メールを [email protected] へ送る。

Step 9 Pro tip: inserting the nuts

Pro tip: inserting the nuts
3D printed parts are very precise, however, there still might be a tolerance in the printed part and same goes for the size of the nut.
Therefore it might happen, that the nut won't fit easily in or might be falling out. Let's see, how to fix it:
Nut won't fit in: use a screw with a thread along its entire length (typically: M3x10, M3x18) and screw it from the opposite side of the opening. While tightening the screw, the nut will be pulled in. Remove the screw afterwards.
Nut keeps falling out: Use a piece of tape to fix the nut temporarily in place, as soon as you insert the screw in, you can remove the tape. Using glue isn't recommended as it can partly reach into the thread and you won't be able to tighten the screw properly.
Every time we recommend to use the "screw pulling technique", you will be reminded with Joe's avatar ;)
Parts in the pictures are used as an example.

Step 10 How to successfully finish the assembly

How to successfully finish the assembly
To successfully finish the assembly please follow all these:
Always read all the instructions at current step first, it will help you to understand, what you need to do.
Don't follow pictures only! It is not enough, the written instructions are as brief as they could be. Read them.
Read the comments from the other users, they are great source of ideas. We read them too and based on your feedback improve the manual and the entire assembly.
Use a reasonable force, the printed parts are tough, but not unbreakable. If it doesn't fit, check your approach twice.
Most important: Enjoy the build, have fun. Cooperate with your kids, friends or wives. However, we take no responsibility for possible fights ;)
READY? You can start by 2. Extruder disassembly
Was this guide helpful?

Comments

Still have questions?

Still have questions?

If you have a question about something that isn't covered here, check out our additional resources.
And if that doesn't do the trick, you can send an inquiry to [email protected] or through the button below.

Contact us