- Čeština
- Español
- Italiano
- Deutsch
- Polski
- Français
- 日本語
- Home
- Troubleshooting
- Printer troubleshooting
- Blown Fuse (MK4)
Blown Fuse (MK4)
- Print Quality Troubleshooting
- Printer troubleshooting
- A64 Overheat #10207 (SL1/SL1S)
- Ambient temperature check (MK3/MK3S)
- Ambient temperature too cold #10703 (SL1/SL1S)
- Ambient temperature too high #10702 (SL1/SL1S)
- An unexpected error has occurred #10701 (SL1)
- Another action is already running #10506 (SL1/SL1S)
- BBF Allocation Failed #13531 (MK4) #21531 (MK3.9) #23531 (MK3.5)
- BBF Allocation Failed #17531 (XL)
- BBF Initialization Failed #13532 (MK4) #21532 (MK3.9) #23532 (MK3.5)
- BBF Initialization failed #17532 (XL)
- Bed maxtemp error #13205 (MK4) #21205 (MK3.9) #23205 (MK3.5)
- Bed mintemp error #13207 (MK4) #21207 (MK3.9) #23207 (MK3.5)
- Bed preheat error #13201 (MK4) #21201 (MK3.9) #23201 (MK3.5)
- Bed thermal runaway #13203 (MK4) #21203 (MK3.9) #23203 (MK3.5)
- Blown Fuse (MINI)
- Blown Fuse (MK2S/MK2.5/MK2.5S)
- Blown Fuse (MK3/MK3S/MK3S+)
- Blown Fuse (MK4)
- Checking the fuses
- PSU fuse
- Replacing blown fuses
- Boost board problem #10320 (SL1S)
- Bricked printer (SL1/SL1S)
- Calibration project is invalid #10543 (SL1/SL1S)
- Can't copy project #10704 (SL1/SL1S)
- Cannot get update channel #10514 (SL1)
- Cannot read project #10539 (SL1/SL1S)
- Cannot remove project #10545 (SL1/SL1S)
- Clogged hotend (MK4)
- Clogged hotend (XL)
- Clogged nozzle/hotend (MINI/MINI+)
- Clogged nozzle/hotend (MK3.5, MK3S+, MK2.5S)
- Connect Registration Failed
- Connect Registration Failed #12401 (MINI)
- Connect Registration Failed #13401 (MK4)
- Connect Registration Failed #17401 (XL)
- Connect Registration Failed #21401 (MK3.9)
- Connect Registration Failed #23401 (MK3.5)
- Directory not empty #10546 (SL1/SL1S)
- Disconnected UV LED panel #10321 (SL1/SL1S)
- Display test failed #10120 (SL1/SL1S)
- Dwarf error #17502 (XL)
- Dwarf error #17503 (XL)
- EEPROM I2C Receive Busy #13316 (MK4) #21316 (MK3.9) #23316 (MK3.5)
- EEPROM I2C Receive Busy #17316 (XL)
- Emergency stop #12510 (MINI)
- Emergency stop #13510 (MK4) #21510 (MK3.9) #23510 (MK3.5)
- Emergency stop #17510 (XL)
- ESP Error #13504 (MK4) #21504 (MK3.9) #23504 (MK3.5)
- ESP Error #13505 (MK4) #21505 (MK3.9) #23505 (MK3.5)
- ESP Error #13506 (MK4) #21506 (MK3.9) #23506 (MK3.5)
- ESP error #17504 (XL)
- ESP error #17505 (XL)
- ESP error #17506 (XL)
- Expect overheating #10714 (SL1/SL1S)
- External SPI flash W25X20CL/xFLASH not responding - error
- Extruder blob
- Extruder Maxtemp error #17206 (XL)
- Extruder Mintemp error #17208 (XL)
- Extruder noises
- Extruder preheat error #17202 (XL)
- Extruder temp not matching #17210 (XL)
- Extruder thermal runaway #17204 (XL)
- Extrusion stopped mid-print (Heat creep)
- Factory reset (MINI)
- Factory reset (MK2S/MK2.5S/MK3S)
- Factory reset (MK4/XL)
- Factory Reset (MMU)
- Factory reset (MMU2S pre firmware 1.0.6)
- Factory reset (SL1/SL1S)
- Failed to read the configuration file #10505 (SL1)
- Failing Z calibration (MK3S/MK2.5S)
- Fan failure #10106 (SL1/SL1S)
- Fan warning #10713 (SL1/SL1S)
- Filament failed to unload (MINI/MINI+)
- Filament Not Loading
- Filament not loading (MK4)
- Filament not loading (XL)
- Filament sensor (MK4, MK3.9, XL)
- File already exists! #10520 (SL1)
- File not found #10518 (SL1/SL1S)
- File system error #12613 (MINI/MINI+)
- File system error #13613 (MK4) #21613 (MK3.9) #23613 (MK3.5)
- FINDA setup and troubleshooting
- FINDA: Filament Stuck #04102 (MMU)
- Firmware in the internal flash corrupted! #12608 (MINI)
- Firmware missing #17612 (XL)
- Firmware Update Required #13701 (MK4) #21701 (MK3.9) #23701 (MK3.5)
- Firmware updating issues (MK2.5S/MK3S+/MMU2S/MMU3)
- First layer does not stick (SL1/SL1S)
- Flash erase error #12605 (MINI/MINI+)
- Flash erase error #13605 (MK4) #21605 (MK3.9) #23605 (MK3.5)
- Flash erase error #17605 (XL)
- FW in internal flash corrupted #13608 (MK4) #21608 (MK3.9) #23608 (MK3.5)
- FW in internal flash corrupted #17608 (XL)
- Hash verification failed #12607 (MINI/MINI+)
- Hash verification failed #13607 (MK4) #21607 (MK3.9) #23607 (MK3.5)
- Hash verification failed #17607 (XL)
- Heatbed not heating up properly
- Heatbed Port Overcurrent #13309 (MK4) #21309 (MK3.9) #23309 (MK3.5)
- Heatbreak MAXTEMP Error #13212 (MK4) #21212 (MK3.9)
- Heatbreak Maxtemp error #17212 (XL)
- Heatbreak MINTEMP Error #13211 (MK4) #21211 (MK3.9)
- Heatbreak Mintemp error #17211 (XL)
- Homing Error #12301 (MINI)
- Homing error X #13304 (MK4) #21304 (MK3.9) #23304 (MK3.5)
- Homing error X #17304 (XL)
- Homing error Y #13305 (MK4) #21305 (MK3.9) #23305 (MK3.5)
- Homing error Y #17305 (XL)
- Homing error Z #13301 (MK4) #21301 (MK3.9)
- Homing error Z #17301 (XL)
- Homing Error Z #23301 (MK3.5)
- Hotend fan is not spinning
- Hotend maxtemp error #23206 (MK3.5)
- Hotend mintemp error #13208 (MK4) #21208 (MK3.9)
- Hotend mintemp error #23208 (MK3.5)
- Hotend preheat error #13202 (MK4) #21202 (MK3.9)
- Hotend preheat error #23202 (MK3.5)
- Hotend temp not matching #23210 (MK3.5)
- Hotend thermal runaway #13204 (MK4) #21204 (MK3.9)
- Hotend thermal runaway #23204 (MK3.5)
- I2C Receive Failed #13315 (MK4) #21315 (MK3.9) #23315 (MK3.5)
- I2C Receive failed #17315 (XL)
- I2C Receive Timeout #13317 (MK4) #21317 (MK3.9) #23317 (MK3.5)
- I2C Receive Timeout #17317 (XL)
- I2C Receive undefined #13318 (MK4) #21318 (MK3.9) #23318 (MK3.5)
- I2C Receive undefined #17318 (XL)
- I2C Send busy #13312 (MK4) #21312 (MK3.9) #23312 (MK3.5)
- I2C Send Busy #17312 (XL)
- I2C Send failed #13311 (MK4) #21311 (MK3.9) #23311 (MK3.5)
- I2C Send Failed #17311 (XL)
- I2C Send Timeout #13313 (MK4) #21313 (MK3.9) #23313 (MK3.5)
- I2C Send Timeout #17313 (XL)
- I2C Send Undefined #13314 (MK4) #21314 (MK3.9) #23314 (MK3.5)
- I2C Send Undefined #17314 (XL)
- Imposter! Fake signature #17606 (XL)
- Incorrect printer model #10705 (SL1/SL1S)
- Internal memory full #10516 (SL1/SL1S)
- Invalid API key #10405 (SL1/SL1S)
- Invalid FW size on USB #12603 (MINI/MINI+)
- Invalid FW size on USB #13603 (MK4) #21603 (MK3.9) #23603 (MK3.5)
- Invalid FW size on USB flash drive #17603 (XL)
- IR filament sensor calibration (MMU2S)
- IR Filament Sensor Troubleshooting (MINI/MINI+)
- IR Filament Sensor Troubleshooting (MK2.5S, MK3S)
- LCD screen not working
- LED Memory Error #13529 (MK4) #21529 (MK3.9) #23529 (MK3.5)
- LED Memory Error #17529 (XL)
- Live Z adjust not saving
- Load to extruder failed #04108 (MMU)
- Loadcell Bad Configuration #13527 (MK4) #21527 (MK3.9)
- Loadcell Bad Configuration #17527 (XL)
- Loadcell Measure Failed #13526 (MK4) #21526 (MK3.9)
- Loadcell measure failed #17526 (XL)
- Loadcell Not Calibrated #13523 (MK4) #21523 (MK3.9)
- Loadcell not calibrated #17523 (XL)
- Loadcell Tare Error #13524 (MK4) #21524 (MK3.9)
- Loadcell tare error #17524 (XL)
- Loadcell Tare Failed #13525 (MK4) #21525 (MK3.9)
- Loadcell tare failed #17525 (XL)
- Loadcell Timeout #13528 (MK4) #21528 (MK3.9)
- Loadcell timeout #17528 (XL)
- Logging data over serial line (MMU2S)
- Loud noises from printer (SL1/SL1S)
- M.I.N.D.A./SuperPINDA sensor testing (MINI/MINI+)
- Marlin Request Timeout #13530 (MK4) #21530 (MK3.9) #23530 (MK3.5)
- Marlin Request Timeout #17530 (XL)
- Mask noavail warning #10709 (SL1/SL1S)
- Maxtemp error bed #12205 (MINI)
- Maxtemp error print head #12206 (MINI)
- MCU Maxtemp Error #17213 (XL)
- Mintemp error bed #12207 (MINI)
- Mintemp error print head #12208 (MINI)
- Misaligned PINDA Sensor (MK2/S)
- Missing parts (SL1/SL1S)
- MK3S keeps prompting filament change
- MMU MCU Underpower #04307 (MMU)
- MMU Overcurrent #13310 (MK4) #21310 (MK3.9) #23310 (MK3.5)
- MMU2S idler unable to move freely
- MMU2S LEDs meaning
- MMU2S Selector not moving
- Modular bed error #17250 (XL)
- Modular bed error #17251 (XL)
- Modular bed error #17252 (XL)
- Modular bed error #17253 (XL)
- Modular bed error #17254 (XL)
- Modular bed error #17255 (XL)
- Modular bed error #17256 (XL)
- Modular bed error #17257 (XL)
- Modular bed error #17302 (XL)
- Modular bed error #17303 (XL)
- Modular Bed Error #17319 (XL)
- Modular Bed Error #17320 (XL)
- Modular bed error #17501 (XL)
- Multimeter usage
- No file on USB #12604 (MINI/MINI+)
- No file to reprint #10508 (SL1)
- No FW in internal flash #12612 (MINI/MINI+)
- No FW in internal flash #13612 (MK4) #21612 (MK3.9) #23612 (MK3.5)
- No FW on USB #13604 (MK4) #21604 (MK3.9) #23604 (MK3.5)
- No FW on USB flash drive #17604 (XL)
- Not connected to network #10402 (SL1/SL1S)
- Not enough layers #10540 (SL1/SL1S)
- Not enough resin #10706 (SL1/SL1S)
- Nozzle Cleaning Failed (XL)
- Nozzle crashed into the heatbed
- Nozzle Heater Overcurrent #13308 (MK4) #21308 (MK3.9)
- Nozzle Heater Overcurrent #23308 (MK3.5)
- Object cropped warning #10710 (SL1/SL1S)
- Opening project failed #10504 (SL1/SL1S)
- Out of Memory #13507 (MK4) #21507 (MK3.9) #23507 (MK3.5)
- Out of memory #17507 (XL)
- P.I.N.D.A./SuperPINDA Sensor testing
- Parameters out of range #10707 (SL1/SL1S)
- Pin not reached #17107 (XL)
- PNG Buffer Full #13508 (MK4) #21508 (MK3.9) #23508 (MK3.5)
- PNG Buffer Full #17508 (XL)
- Preheat error bed #12201 (MINI)
- Preheat error print head #12202 (MINI)
- Preload failed #10503 (SL1/SL1S)
- Print examples missing #10523 (SL1/SL1S)
- Print fan is not spinning
- Printer does not turn on or keeps turning off
- Project analysis failed #10542 (SL1/SL1S)
- Project is corrupted #10541 (SL1/SL1S)
- PrusaLink Troubleshooting
- Puppy error #17511 (XL)
- Puppy error #17512 (XL)
- Puppy error #17513 (XL)
- Puppy error #17514 (XL)
- Puppy error #17515 (XL)
- Puppy error #17516 (XL)
- Puppy error #17517 (XL)
- Puppy error #17518 (XL)
- Puppy error #17519 (XL)
- Puppy error #17520 (XL)
- Puppy error #17521 (XL)
- Puppy error #17522 (XL)
- Remote API error #10407 (SL1/SL1S)
- Resin low #10712 (SL1/SL1S)
- Resin measuring failed #10124 (SL1/SL1S)
- Resin sensor error #10307 (SL1/SL1S)
- Resin too high #10109 (SL1/SL1S)
- Resin too low #10108 (SL1/SL1S)
- Sample G-codes
- Saving log file (SL1/SL1S)
- SD card not working
- SD cards and USB drives
- Selftest failed (XL)
- Signature verification failed #12606 (MINI/MINI+)
- Signature verification failed #13606 (MK4) #21606 (MK3.9) #23606 (MK3.5)
- SL1 Tilt-mechanism error
- Spaghetti monster
- Squaring your MINI
- Status LED explained (MK4/XL)
- Status LED explained (MMU3)
- Stuck filament detection #13101 (MK4) #21101 (MK3.9)
- Tangled filament
- Temp not matching heatbed #12209 (MINI/MINI+)
- Temp not matching print head #12210 (MINI/MINI+)
- Temperature out of range #10208 (SL1/SL1S)
- Thermal runaway bed #12203 (MINI)
- Thermal runaway print head #12204 (MINI)
- TMC driver shorted #04304 (MMU)
- TMC driver shorted #04314 (MMU)
- TMC driver shorted #04324 (MMU)
- Tool offset out of bounds #17104 (XL)
- Toolchanger error #17101 (XL)
- Tower check failed #10118 (SL1/SL1S)
- Unauthorized #10406 (SL1/SL1S)
- Unexpected error #10501 (SL1/SL1S)
- Unexpected MC error #10306 (SL1/SL1S)
- Unknown printer model #10323 (SL1/SL1S)
- Unsupported BBF version #12614 (MINI/MINI+)
- Unsupported BBF version #13614 (MK4) #21614 (MK3.9) #23614 (MK3.5)
- Unsupported Buddy FW #17611 (XL)
- Unsupported firmware BBF file #17614 (XL)
- Unsupported printer model #17610 (XL)
- Unsupported printer type #12610 (MINI/MINI+)
- Unsupported printer type #13610 (MK4) #21610 (MK3.9) #23610 (MK3.5)
- Unsupported printer version #12611 (MINI/MINI+)
- Unsupported printer version #13611 (MK4) #21611 (MK3.9) #23611 (MK3.5)
- USB Device Overcurrent #13307 (MK4) #21307 (MK3.9) #23307 (MK3.5)
- USB Device Overcurrent #17307 (XL)
- USB drive not detected #10528 (SL1/SL1S)
- USB flash drive not connected #17602 (XL)
- USB flash error #17613 (XL)
- USB not connected #12602 (MINI/MINI+)
- USB not connected #13602 (MK4) #21602 (MK3.9) #23602 (MK3.5)
- USB Port overcurrent #13306 (MK4) #21306 (MK3.9) #23306 (MK3.5)
- USB Port Overcurrent #17306 (XL)
- UV LED temperature error #10209 (SL1/SL1S)
- UV led voltage error #10309 (SL1)
- Vibration when printing (MK3S+/MK2.5S)
- Wrong printer model #10544 (SL1/SL1S)
- Wrong revision of motion controller #10301 (SL1)
- XY position invalid #17106 (XL)
- XY probe unstable #17105 (XL)
- QR Error codes
- Print Error Messages
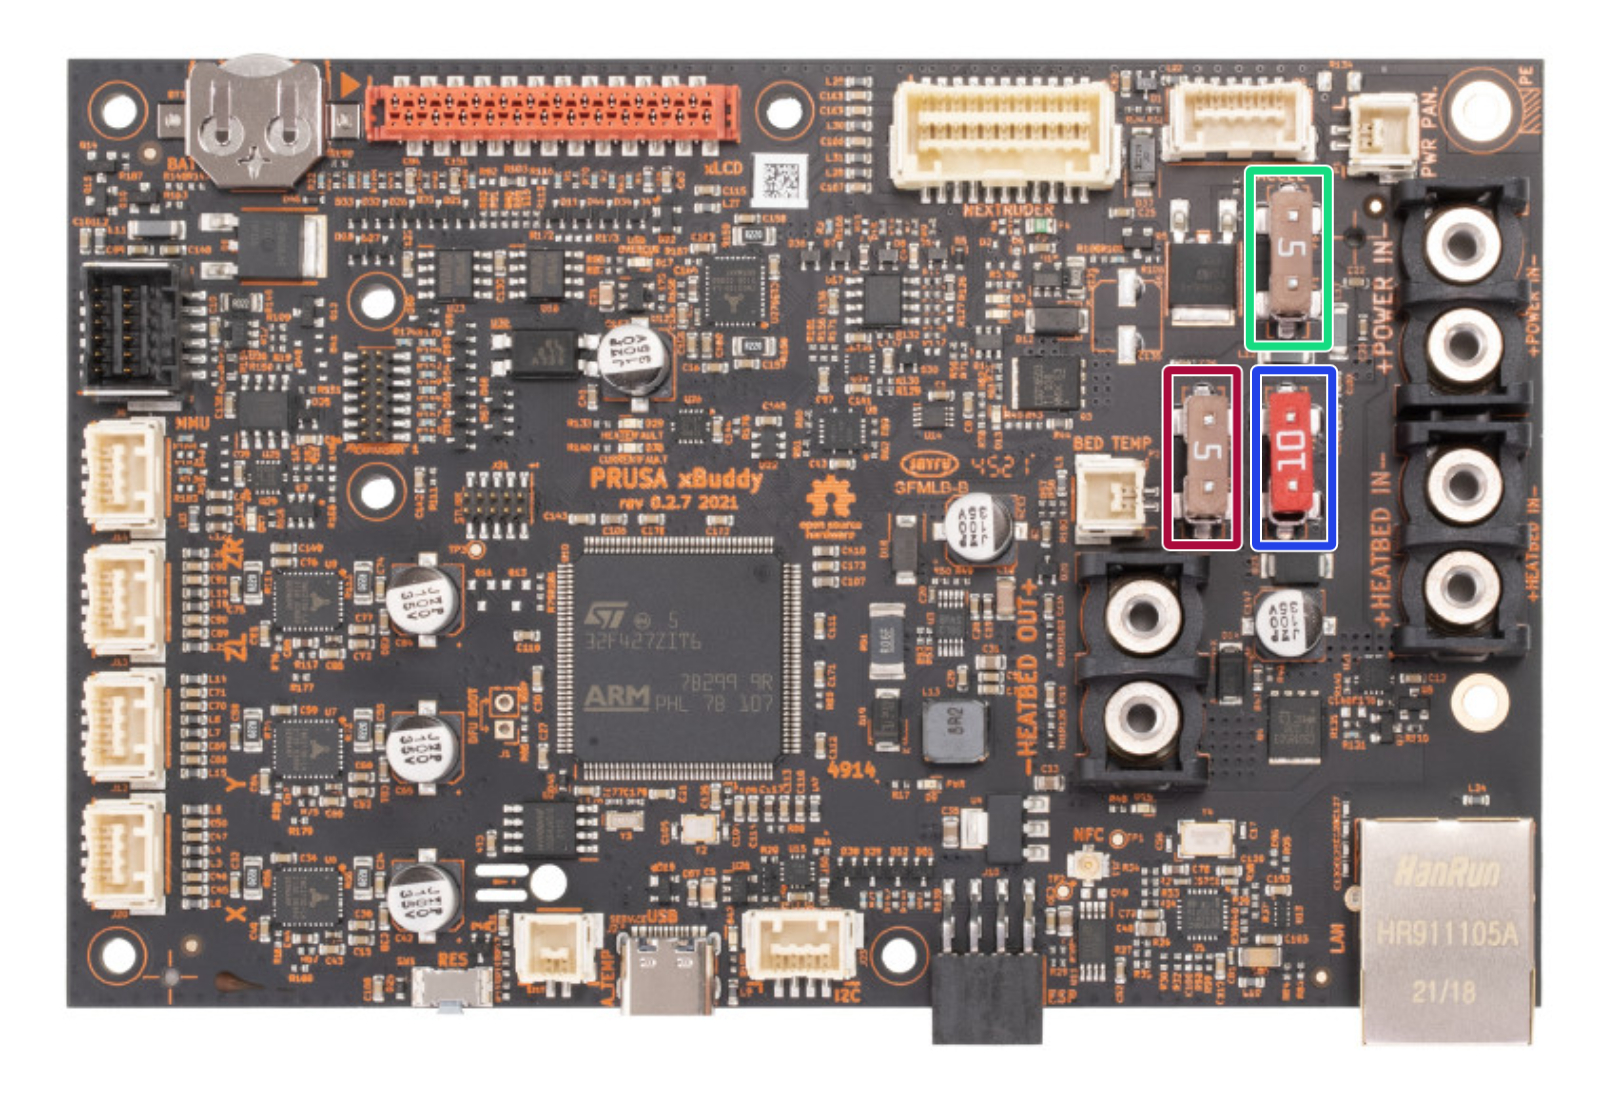
The Original Prusa MK4 series is equipped with a 24V xBuddy mainboard. This 32-bit logic board has three removable automotive fuses protecting the crucial components. If your printer or some of its components suddenly stopped working, it is recommended to check these fuses and replace them if necessary.
Each fuse protects a different part of the board:
- F1 (10A fuse): Heatbed heating
- F2 (5A fuse): Motors + logic unit + fans
- F3 (5A fuse): Extruder heater
Checking the fuses
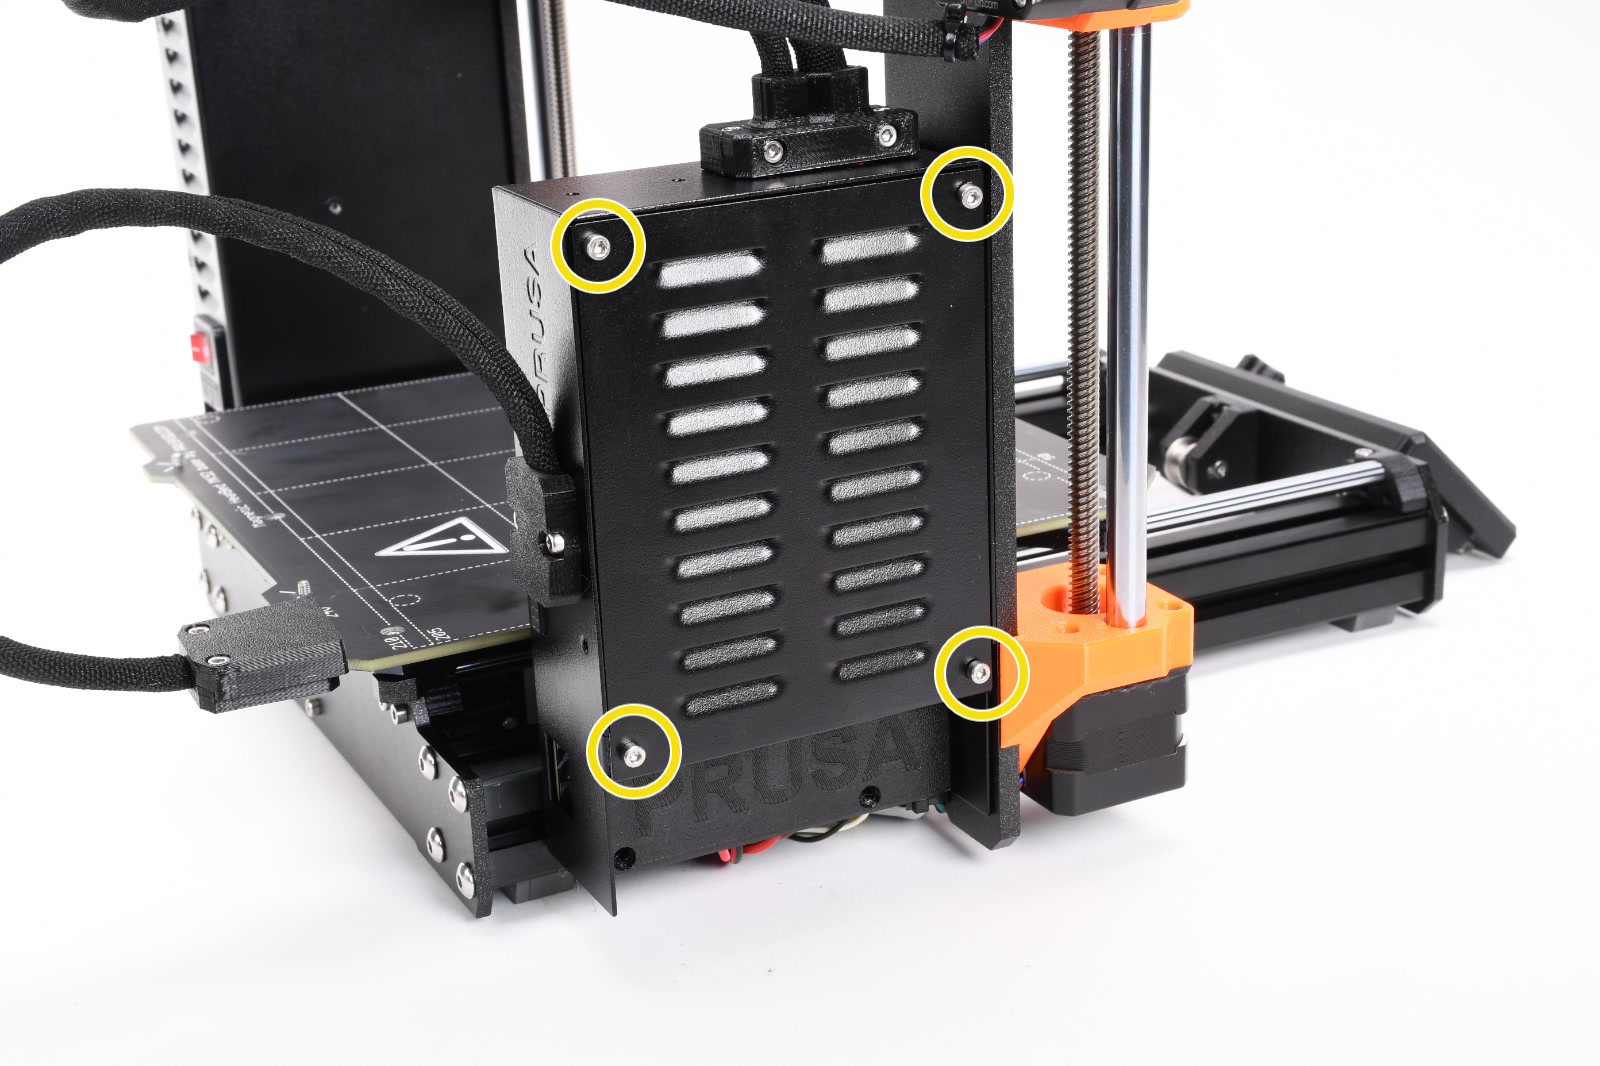
Before checking the fuses, turn the printer off and disconnect the power cord.
Open the xBuddyBox-cover and the el-box-cover by opening the screws indicated below. Then pull out the fuses and inspect them.
 |  |
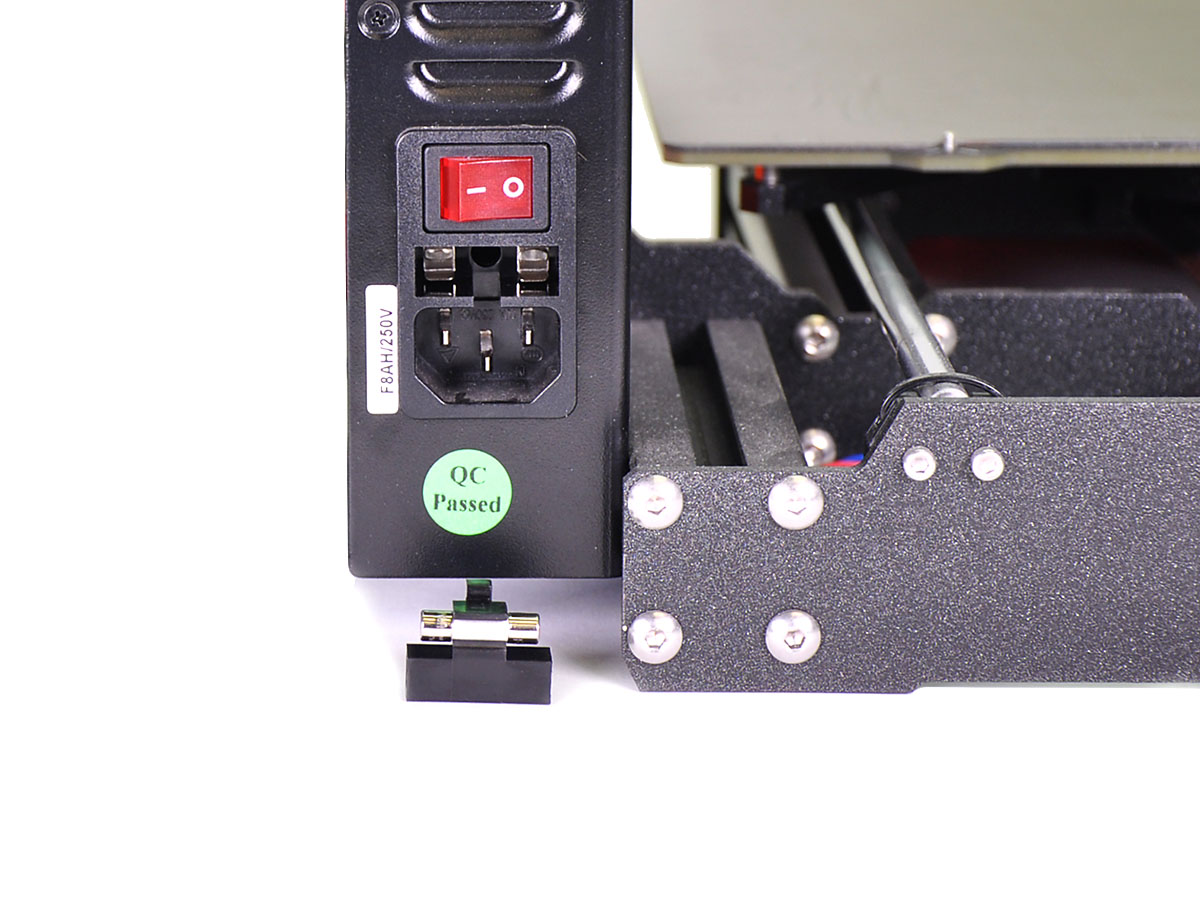
PSU fuse
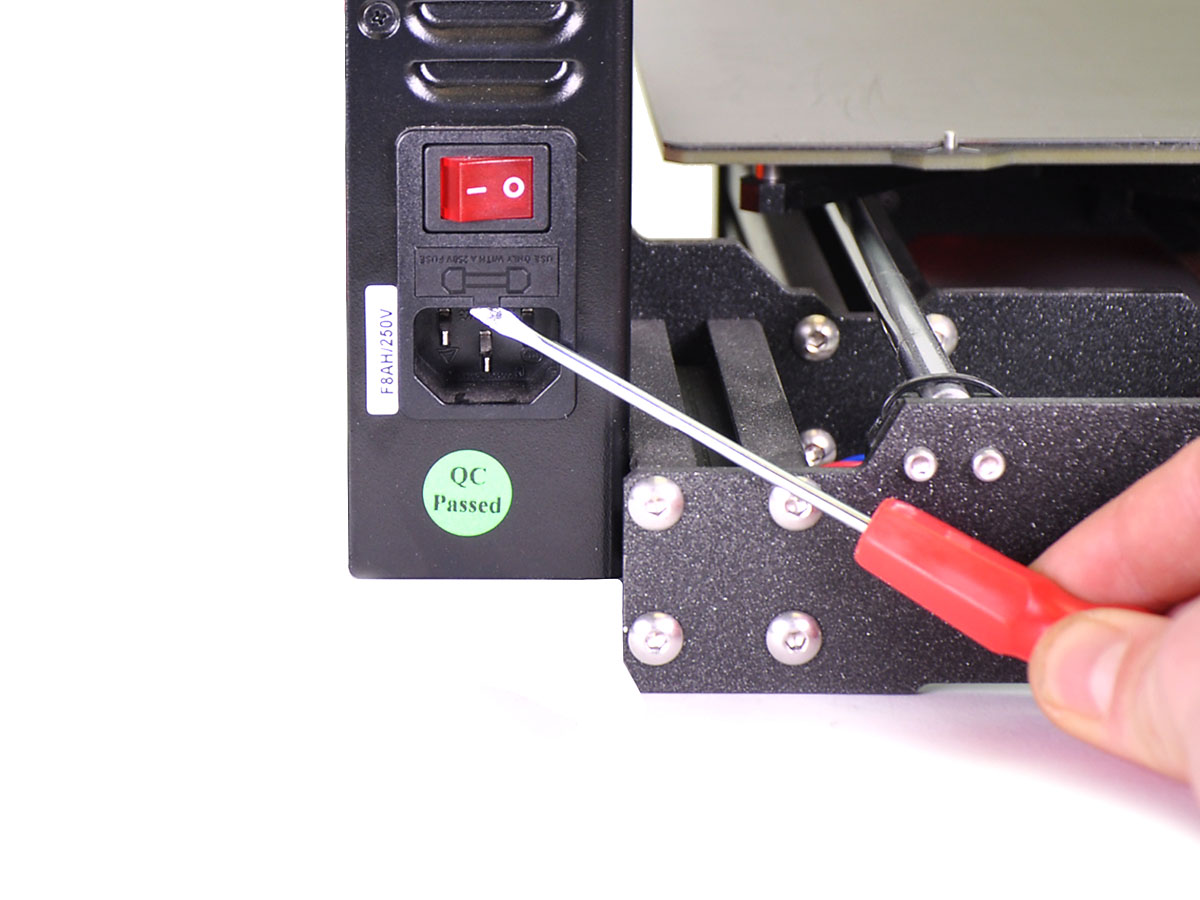
The MK4 PSU uses an F8AH250V 20mm fuse (fast). You can check the pictures below for how to find the fuse in your PSU.
When you are replacing the fuse, make sure that the printer is turned off and disconnected from the power source.
- Find the PSU fuse, which is located just above the PSU's power plug.
- Remove the cover of the PSU fuse, the best tool for that is the screwdriver that comes bundled with our printer.
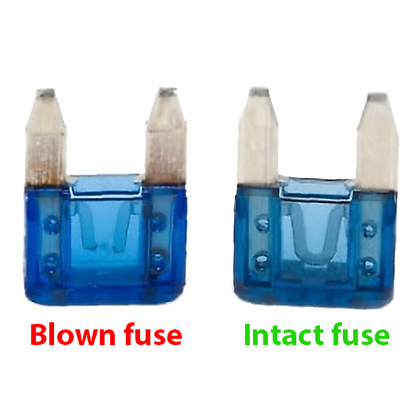
- Inspect if the wire inside of the fuse is intact. If it is damaged, then it must be replaced.
 |  |
Replacing blown fuses
If you find out that any of the fuses are blown, you can easily replace them. The fuses can be found at any local car parts/hardware store or ordered online. It's a good practice to bring the blown fuse with you so that you can get the exact same one.
- Turn the printer off, disconnect the power, and remove the blown fuse(s) from their sockets.
- Place the new fuse in the correct slot - Double-check that you are replacing 5A for 5A or 15A for 15A if changing it on the xBuddy.
- Unplug any components connected to the previously blown fuse and try to turn on your printer. Check for any kind of unwanted behavior.
- Once again, turn off the printer and remove the power cord. Then reconnect all the disconnected components.
Comments


Still have questions?
If you have a question about something that isn't covered here, check out our additional resources.
And if that doesn't do the trick, you can send an inquiry to [email protected] or through the button below.