Español
Login
Impresoras 3D
Materiales
Piezas y accesorios
Software
Modelos 3D
Aplicaciones
Comunidad
Ayuda
Academy
Blog
Empresa
Soporte
Original Prusa MK4S
Actualización de Original Prusa i3 MK4/MK3.9 a MK4S/MK3.9S (1.01)
3. Upgrading the xLCD | Herramientas necesarias para este capitulo
1. Herramientas necesarias para este capitulo
Step 1 of 25 (Chapter 3 of 8)
Modo pantalla completa
Contenidos
Comentarios
⬢
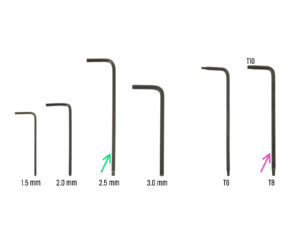
Para este capítulo, prepara por favor:
⬢
Llave Allen de 2.5mm
⬢
Llave Torx T8/10
Loading...
Siguiente
Contenidos
Actualización de Original Prusa i3 MK4/MK3.9 a MK4S/MK3.9S (1.01)
1. Introducción
2. Actualizando el eje Y
3. Actualizando la xLCD
Herramientas necesarias para este capitulo
Removing the xLCD assembly
Disassembling the xLCD
MK4: xLCD versions
Montaje del xLCD: preparación de las piezas (parte 1)
Montaje del xLCD: preparación de las piezas (parte 2)
Instalando la pegatina xReflector
Covering the xLCD (xLCD A)
Instalando el Faston PE
Attaching the knob (xLCD A)
Connecting the assembly (xLCD A)
Mounting the assembly (xLCD A)
What's left... (xLCD A)
xLCD B
xLCD B: parts preparation (part 1)
xLCD B: parts preparation (part 2)
Installing the xReflector sticker (xLCD B)
Installing the M3n nut (xLCD B)
xLCD-support assembly (xLCD B)
xLCD-support-left assembly (xLCD B)
Attaching the knob (xLCD B)
Connecting the assembly (xLCD B)
Attaching the assembly (xLCD B)
Haribo time!
Well...
4. Actualizando el Nextruder
4B. Actualizando el Nextruder (MMU3)
5. Mejorando la conectividad
6. Comprobación preliminar
Lista de cambios del manual
Comentarios
Inicia sesión
para publicar un comentario
Sin comentarios