Español
Login
Impresoras 3D
Materiales
Piezas y accesorios
Para Empresas
Software
Modelos 3D
Comunidad
Ayuda
Cursos
Blog
Empresa
Soporte
Prusa CORE One+
Ensamblaje del Kit de Prusa CORE One+ (1.00)
5. CoreXY assembly | Tools necessary for this chapter
1. Tools necessary for this chapter
Paso 1 de 83 (Capítulo 5 de 10)
Contenidos
Comentarios
⬢
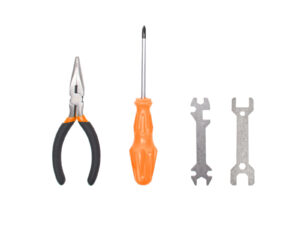
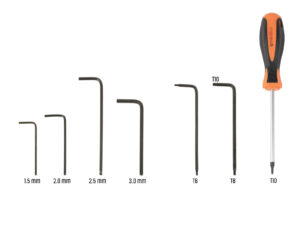
For this chapter, please prepare:
⬢
Alicates de punta fina
⬢
Llave Allen de 2.0mm
⬢
Llave Allen de 2.5mm
⬢
T10 torx key / T10 torxy screwdriver
Loading...
Siguiente
Contenidos
Ensamblaje del Kit de Prusa CORE One+
1. Introducción
2. Montaje de la base
3. Montaje trasera
4. Montaje de la base calefactable
4. Montaje CoreXY
Tools necessary for this chapter
Rod holders: parts preparation
Assembling the rod holders
Preparing the front rod holders
Installing the front rod holders
XY carriage: parts preparation
Montando los XY-carriages
Assembling the linear holder left
Assembling the linear holder right
Attaching the linear holder assemblies
INFO varillas lisas
Mounting the smooth rods
Securing the rear rod holders
Securing the front rod holders
Motor mounts: parts preparation
Motor mounts: part preparation
Assembling the XY-motor-mount-right I.
Assembling the XY-motor-mount-right II.
Assembling the XY-motor-mount-left I.
Assembling the XY-motor-mount-left II.
Belt tensioners: parts preparation I.
Belt tensioners: parts preparation II.
Preparando las poleas tensoras
Assembling the belt tensioner left I.
Assembling the belt tensioner left II.
Assembling the belt tensioner right
Installing the belt tensioners: parts preparation
Installing the motor mount left
Installing the motor mount right
Instalando el belt-tensioner-left
Instalando el belt-tensioner-right
Linear rail: parts preparation
Attaching the linear rail
Securing the linear rail
Installing the linear rail: parts preparation
Installing the linear rail assembly
Linear rail: removing the safety pins
Bed-stop: preparación de las piezas
Montando el bed-stop
Montando el bed-stop
X&Y motors: parts preparation
Installing the X-axis pulley
Installing the Y-axis pulley
XY belts: parts preparation
INFO correas XY
Y belt guiding: Y motor pulley
Securing the Y-axis motor
Y belt guiding: Y motor mount
Y belt guiding: belt tensioner
Y belt guiding: X motor mount
Y belt guiding: securing the belt
X belt guiding: X motor pulley
Securing the X-axis motor
Y belt guiding: X motor mount
X belt guiding: belt tensioner
X belt guiding: Y motor mount
X belt guiding: securing the belt
Checking the belt guidance
Bowden guide: parts preparation
Securing the Nextruder holder
Securing the Y motor cable
Securing the X motor cable
Installing the bowden guide
White LED strip: parts preparation
Sticking the White LED strip
Installing the white LED assembly
Door sensor & White LED strip: parts preparation
Inserting the zip ties
Installing the door sensor
Securing the door sensor cable
Guiding the cables: LED and door sensor
Nota Cámara Buddy3D
Smooth rods: parts preparation
Installing the CoreXY assembly
Securing the smooth rods
Aligning the linear rail
Guiding the corexy cables
Guiding the cooling fan cables
Fijando el bed-stop
Connecting the cooling fans cables
Connecting the corexy cables
Momento Haribo
Listo
6. Montaje Nextruder
7. Bodywork & Electronics
8. Trim, Door & xLCD
9. Calibration & First run
Lista de cambios del manual
Comentarios
Inicia sesión
para publicar un comentario
Sin comentarios