English
Login
3D printers
Materials
Parts & Accessories
Software
3D Models
Applications
Community
Help
Academy
Blog
Company
Support
Original Prusa XL
Prusa Connect & PrusaLink
Adding the printer to Prusa Connect (XL firmware up to 4.7.5) | Begin assembly
1. Begin assembly
Step 1 of 8 (Chapter 5 of 9)
Fullscreen mode
Contents
Comments
Difficulty
Moderate
Available languages
Begin assembly
Contents
Prusa Connect & PrusaLink
Wi-Fi and PrusaLink setup (MK4, MK3.9, MK3.5, XL, MINI/+)
Wi-Fi and PrusaLink setup (XL firmware up to 4.7.5)
Prusa Connect - Telegram notifications setup
Adding the printer to Prusa Connect (MK4/S, MK3.9/S, MK3.5/S, XL, MINI/+)
Adding the printer to Prusa Connect (XL firmware up to 4.7.5)
Begin assembly
Introduction
Turn on Prusa Connect
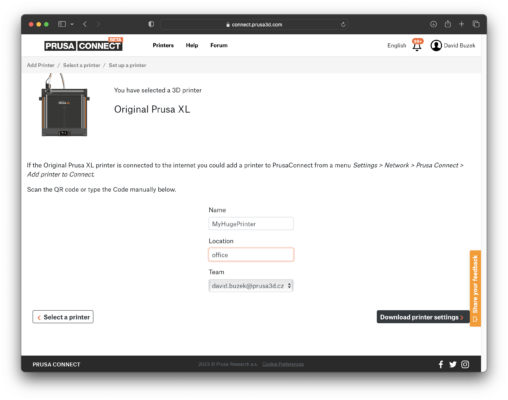
Adding the printer to Prusa Connect
Preparing the printer
Uploading G-code to Prusa Connect
Printing from Prusa Connect
Prusa Connect file management
Camera setup for PrusaLink / Prusa Connect
Prusa Connect - Discord notifications setup
Prusa Connect - Slack notifications setup
ESP Camera for Prusa Connect
Comments
Log in
to post a comment
Hanselcj
•
over 1 year ago
This isn't correct anymore. You need a code from the printer first, you can't just use a name and location to download something from the website to put on your printer. You need a code generated by the printer itself. Please update accordingly.
Reply
David B.
•
over 1 year ago
Fixed. Thanks for notice.
Reply