EN
  • Čeština
  • Italiano
  • Deutsch
  • Polski
  • Français
Login

How to replace the Prusa Nozzle (MK4S/MK3.9S)

How to replace the Prusa Nozzle (MK4S/MK3.9S)

How to replace the Prusa Nozzle (MK4S/MK3.9S)
Relevant for:
Last updated 17 days ago
How to replace the Prusa Nozzle (MK4S/MK3.9S)
 Difficulty
Very easy
 Steps
19
 Available languages
CSPLDEITFR
Introduction
Introduction
This guide will take you through the replacement of the Prusa Nozzle on the Original Prusa MK4S and MK3.9S.
The following instructions are compatible with all Prusa Nozzle diameters.
All necessary parts are available in our eshop prusa3d.com.
Note that you have to be logged in to have access to the spare parts section.
Nozzle Replacement Tool
Recommendation: There is an alternative nozzle replacement method that requires using a printed replacement tool. This approach is quicker and simpler, allowing you to replace the nozzle directly on the printer.
This method requires printing the Nozzle Replacement Tool. If you do not have the possibility to print the tool, follow the instructions in the next steps.
The Nozzle Replacement Tool part is available for download on Printables.com.
Tools necessary for this chapter
For this chapter, please prepare:
Wrench 13-16
Universal wrench
Cloth or piece of fabric 15x15 cm to protect the heatbed
Small brass brush for cleaning the nozzle
Preparing the printer
Unload the filament from the printer.
It's recommended to take off the spool holder from the printer.
Move the Z-axis to the center position to easily access the extruder from the top and bottom.
Cleaning the hotend
Cleaning the hotend
Cleaning the hotend
Cleaning the hotend
WARNING: The hotend and heatbed are very HOT. Do not touch these parts!!!
For the following steps, it is necessary to have the heaterblock and the hotend clean from the remains of the filament. Otherwise, it can be difficult to release the nozzle.
If you have a Prusa hotend sock on the hotend, remove it.
On the printer screen, go to Control -> Temperature -> Nozzle Temperature and using the knob set 250°C.
Wait at least 5 minutes. The remains of the filament must be warmed up slightly so that they can be removed more easily.
Using the brass brush, carefully clean the heaterblock and the hotend from the filament residue. Avoid contact of the brush with the hotend cables, as this could cause a short circuit.
When the heaterblock and the hotend are perfectly clean, cool down the printer. On the screen, navigate to Preheat -> Cooldown.
Wait until the hot parts are cooled down to ambient temperature. It takes approximately 10 minutes.
Protecting the heatbed
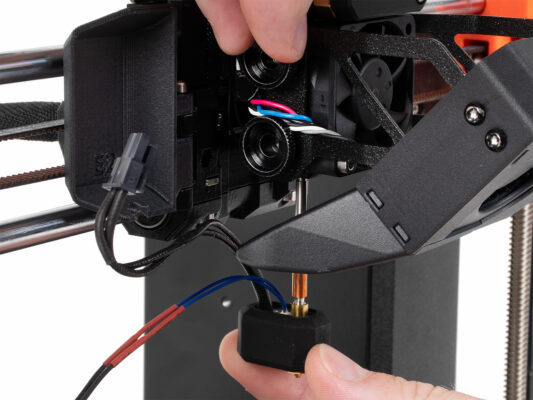
Turn the printer OFF and unplug the power cable from the PSU (Power Supply Unit).
Make sure the printer parts - print head and heatbed are cooled down at room temperature.
Before proceeding any further, it is recommended to protect the heatbed first!
Take off the flexible steel sheet.
Use any cloth or piece of fabric, which is thick enough and cover the heatbed. This will ensure you won't damage (scratch) the surface during the disassembly.
Disconnecting the hotend cables
Each connector has a safety latch. It is necessary to press the latch before disconnecting. Otherwise, the connector may get damaged.
Disconnect the hotend heater cable.
Disconnect the hotend thermistor cable.
Removing the hotend
Removing the hotend
Removing the hotend
Remove the hotend cables from the cable channel.
Grasp the hotend with your hand.
Use your other hand to loosen the two thumb screws. There is no need to remove them completely, a few turns are enough.
Slide out the hotend assembly from the heatsink.
Removing the Prusa Nozzle
If you have the silicone sock on the heaterblock, remove it.
Using the wrench 13-16 grasp the heaterblock.
Using the 7mm cutout in the universal wrench, grasp the nozzle and loosen it.
Manually release and remove the Prusa nozzle from the hotend assembly.
Installing the Prusa Nozzle
Screw the new nozzle all the way into the heaterblock until the nozzle touches the heaterblock surface.
Grasp the heaterblock with  the wrench 13-16.
Using the 7mm cutout in the universal wrench, tighten the nozzle against the heaterblock. Do not use any extra force!
The specified torque value is 1.5 Nm (13.3 lb-in). The use of a torque wrench is recommended.
Put the silicone sock back on the heaterblock. This is optional.
Inserting the hotend
Look closely at the underside of the heatsink and find the hole for the hotend assembly.
Insert the hotend assembly tube in the hole and slide the whole thing into the heatsink. Guide the hotend cables loosely outside the Nextruder on the left side.
Push the hotend assembly all the way into the heatsink. There should be approximately a 2 mm gap between the heatsink and the brass part of the nozzle.
While pushing the hotend assembly in, firmly tighten the lower thumb screw and the upper thumb screw.
Avoid pinching any cable between the screws and the heatsink!
From the underside, check that the hotend is oriented correctly. It must fit between the cutouts in the X-carriage.
Guiding the hotend cables
Locate the cable channel behind the thumb screws. Guide the hotend thermistor cable through the channel first. Then insert the hotend heater cable.
Guide the hotend fan cable as seen in the picture. Push it in the cable channel.
Connecting the hotend
Connect the hotend thermistor to the top left slot on the LoveBoard.
Connect the hotend heater to the black slot on the upper part of the LoveBoard.
Arranging the cables
Arrange all the cables according to the picture (view from above). All cables must be squeezed as close to the extruder body as possible.
Close the Fan-door-cover.
Slide the Loveboard-cover on the extruder. And push it down.
Be careful not to pinch any cables!
When the cover is properly and completely inserted, you will feel a slight "click" of the rear latch.
Setting up the nozzle diameter
This step is important only if you changed your nozzle diameter or type.
Visit the Settings > Hardware menu
Select the Nozzle diameter you are using (e.g. 0.25 / 0.3 / 0.4 / 0.5 / 0.6 / 0.8)
On MK4S, the 0.40mm is the stock nozzle diameter.
Turn on the silicone sock option if you are using one.
Final check
Final check
Final check
To check if everything is connected correctly go to Control > Temperature > Nozzle Temperature and set it to a temperature above 200°C.
Go back to the main screen and check the bottom bar to see if the temperature rises.
That's it!
That's it!
Great job! You just successfully replaced the Prusa Nozzle on your Original Prusa MK4.
Was this guide helpful?

Comments

Still have questions?

Still have questions?

If you have a question about something that isn't covered here, check out our additional resources.
And if that doesn't do the trick, you can send an inquiry to [email protected] or through the button below.

Contact us