3D printers work by laying layer over layer of plastic to create a 3D object. Each new layer must be supported by the one beneath it. If part of your model starts in mid-air and is not supported by anything below, you need to add an additional support structure to ensure a successful print.
PrusaSlicer can both detect areas that need supports and generate them in these places automatically.
You can also set supports manually using:
Supports can be turned on from the right panel or in the Print settings - Support material - Generate support material.
There are 3 different Support styles in PrusaSlicer
- Grid
- Snug
- Organic
When the print finishes, depending on the model geometry and material used, the support structure is often easily removable with bare hands. You can use pliers to get a better grip in otherwise hard-to-reach places. A scalpel or a utility knife can also be used to cleanly remove a piece of support that seems to be stuck to the model.
Wipe tower with supports
Note that if you need to use supports when the print has a wipe tower, you can only change the Support material/raft/skirt extruder and the Support material/raft interface extruder if the support layers stay synchronized with the object layers. This can be done in two ways. One is selecting the Soluble or Breakaway profiles on the main plater, and going to Print settings - Support material - Top Z contact distance, and setting it to zero. This will automatically turn on the "Synchronize with object layers". If you need to keep some distance between the support and the parts, another way to synchronize the layers is to go to Print settings - Support material - Style, and select Organic supports. Find more info on wipe towers here: Wipe tower.
Supports everywhere
Supports can grow from both the print bed and any model surface when necessary.
This ensures that every overhang and part starting mid-air will get supported. However, small imperfections may appear on the surface where supports started growing from.
Supports from build plate only
Creates only supports that have their base at the print bed.
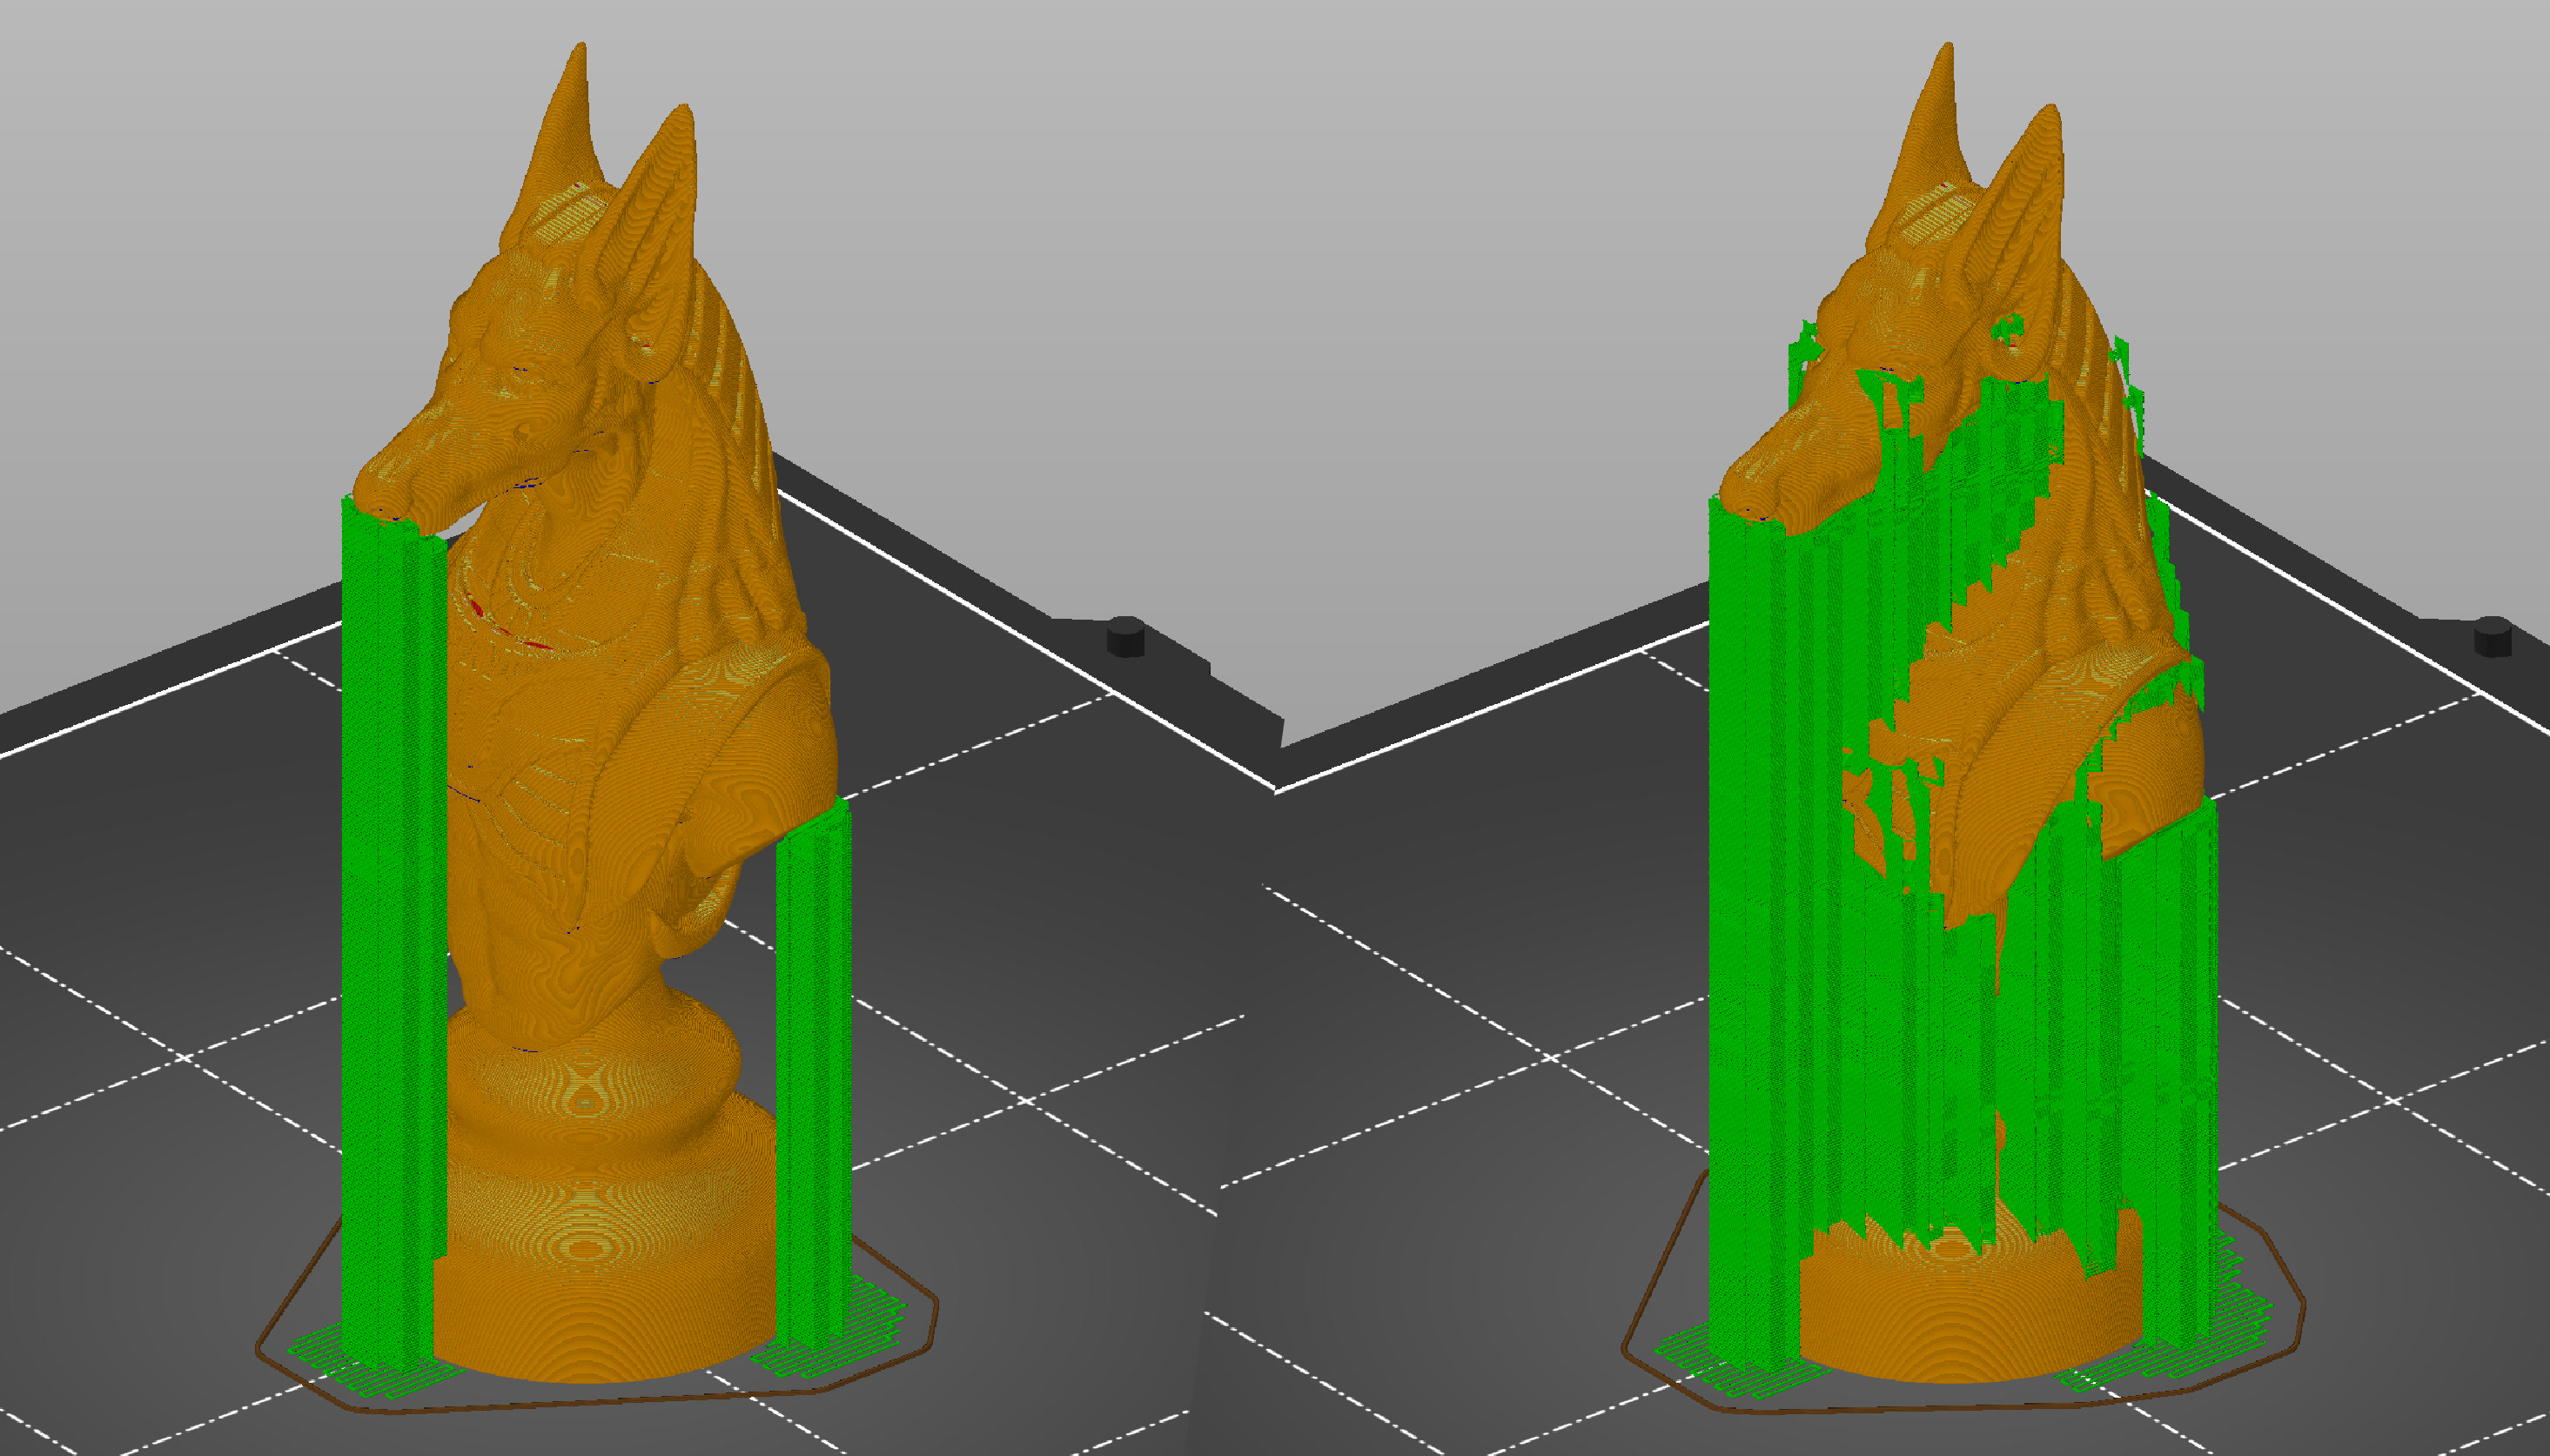
Supports from build plate only (left), supports everywhere (right)
For support enforcers only
Automatic support generation is enabled only for areas marked with a support enforcer. This option is essentially a shortcut that turns Print settings - Support material - Generate support material on, but Print settings - Support material - Auto-generated supports off.
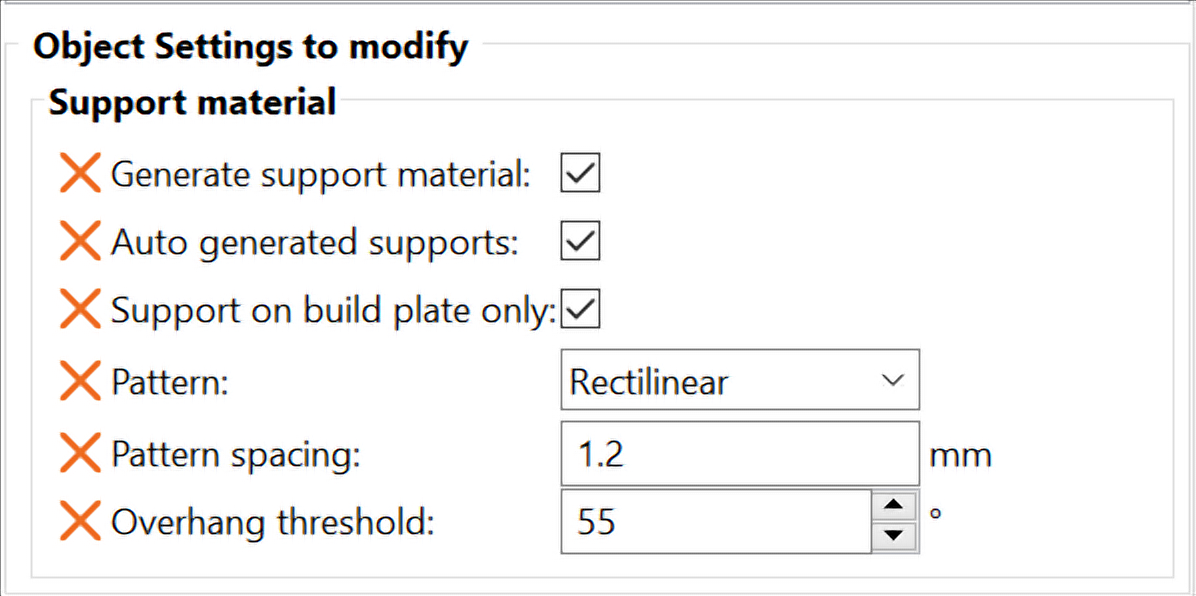
Supports on/off for individual models
It’s possible to print multiple objects at once each with its own support settings. By default, all models are affected by the global settings. You can overwrite them by right-clicking on a model in the 3D view and selecting Support material. Alternatively, you can right-click on the editing icon in the Object list.
A new window will appear in the right panel called Object settings to modify - Support material. Changing these settings will affect only the relevant object and its instances. You can remove the settings overwrite by clicking on the red cross icon. When you do so, the global settings will once again be applied.
Support enforcer/blocker
The automatic supports can sometimes appear in hard-to-reach places, resulting in a tedious removal of support structures. If you think such a part of the model could be printed without supports, but neither the Overhang threshold setting nor selecting Supports on built plate only helped, you can adjust supports manually.
Right-click on a model and choose either a Support blocker or Support enforcer.
Simple mode - Enforcers/blockers are always box-shaped
Advanced mode - Box/Cylinder/Sphere/Slab shapes
Expert mode - Option to load external geometry as a blocker/enforcer
Support blockers and enforcers can be manipulated with the familiar Move, Rotate, and Scale tools. You can also quickly duplicate them with copy&paste.
Support blocker
Support blockers are useful when you’re generally happy with the automatic supports and you simply want to remove some of them. Focus on placing blockers where the supports meet the object, the rest of the support structure below will be removed automatically.
Support enforcers
Support enforcers are great in situations, where only a few parts of the object need to be supported, but the automatic algorithm places supports all over the model. In this situation, don’t forget to switch the support mode to For support enforcers only.
It’s less common, but you can also use support enforcers with the automatic generation on.
Another interesting use of support enforcers is to split long bridges into smaller ones by placing a support in the middle of the bridge. You can repeat this process and print shorter, near-perfect bridges while still making the supports easy to remove.
Generate support material
Supports are disabled unless a model has an overwrite for this setting
Auto-generated supports
When off, the overhang detection is off. Only support enforcers generate supports.
Overhang threshold
The Overhang threshold value represents the most horizontal slope (measured from the horizontal plane) that you can print without support material (90=vertical).
Changing this value is a quick way to adjust the amount of generated supports.
The lower the value, the less support will be generated.
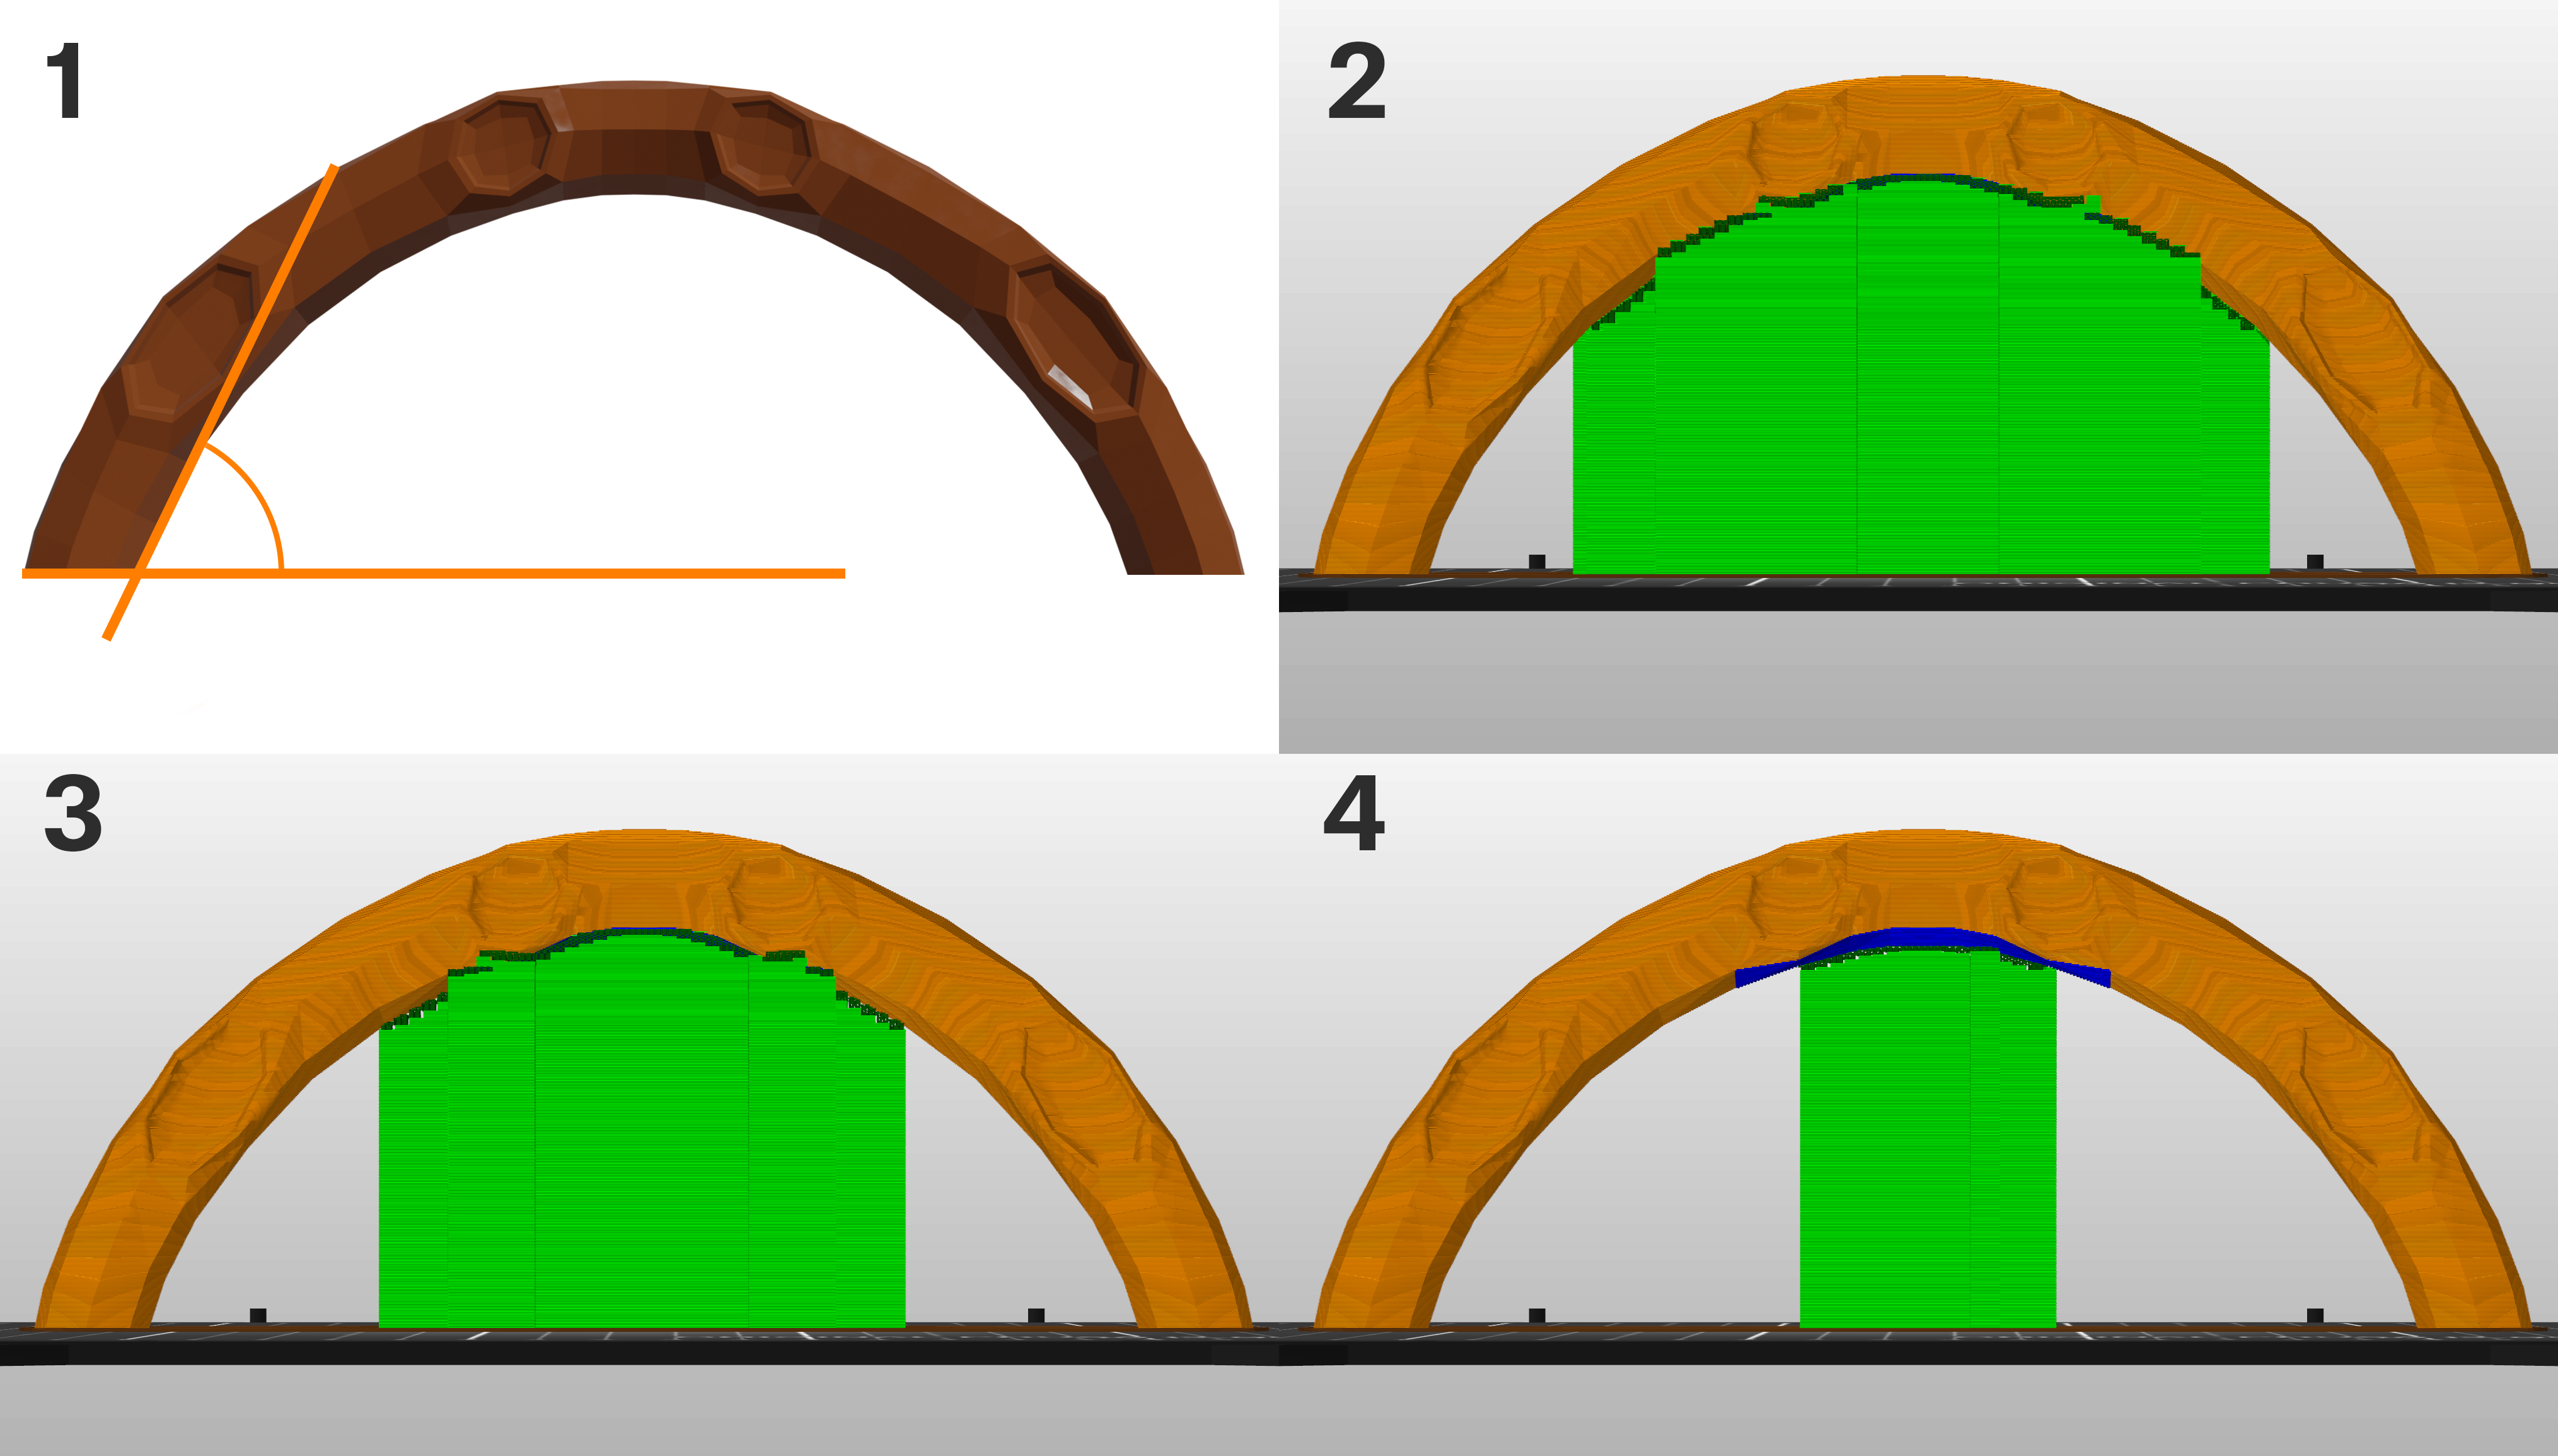
- The Overhang threshold value and how it's measured
- Overhang threshold 55
- Overhang threshold 35
- Overhang threshold 15
Enforce support for the first
Generate support material for the specified number of layers counting from the bottom, regardless of whether normal support material is enabled or not and regardless of any angle threshold. This is useful for getting more adhesion of objects having a very thin or poor footprint on the build plate.
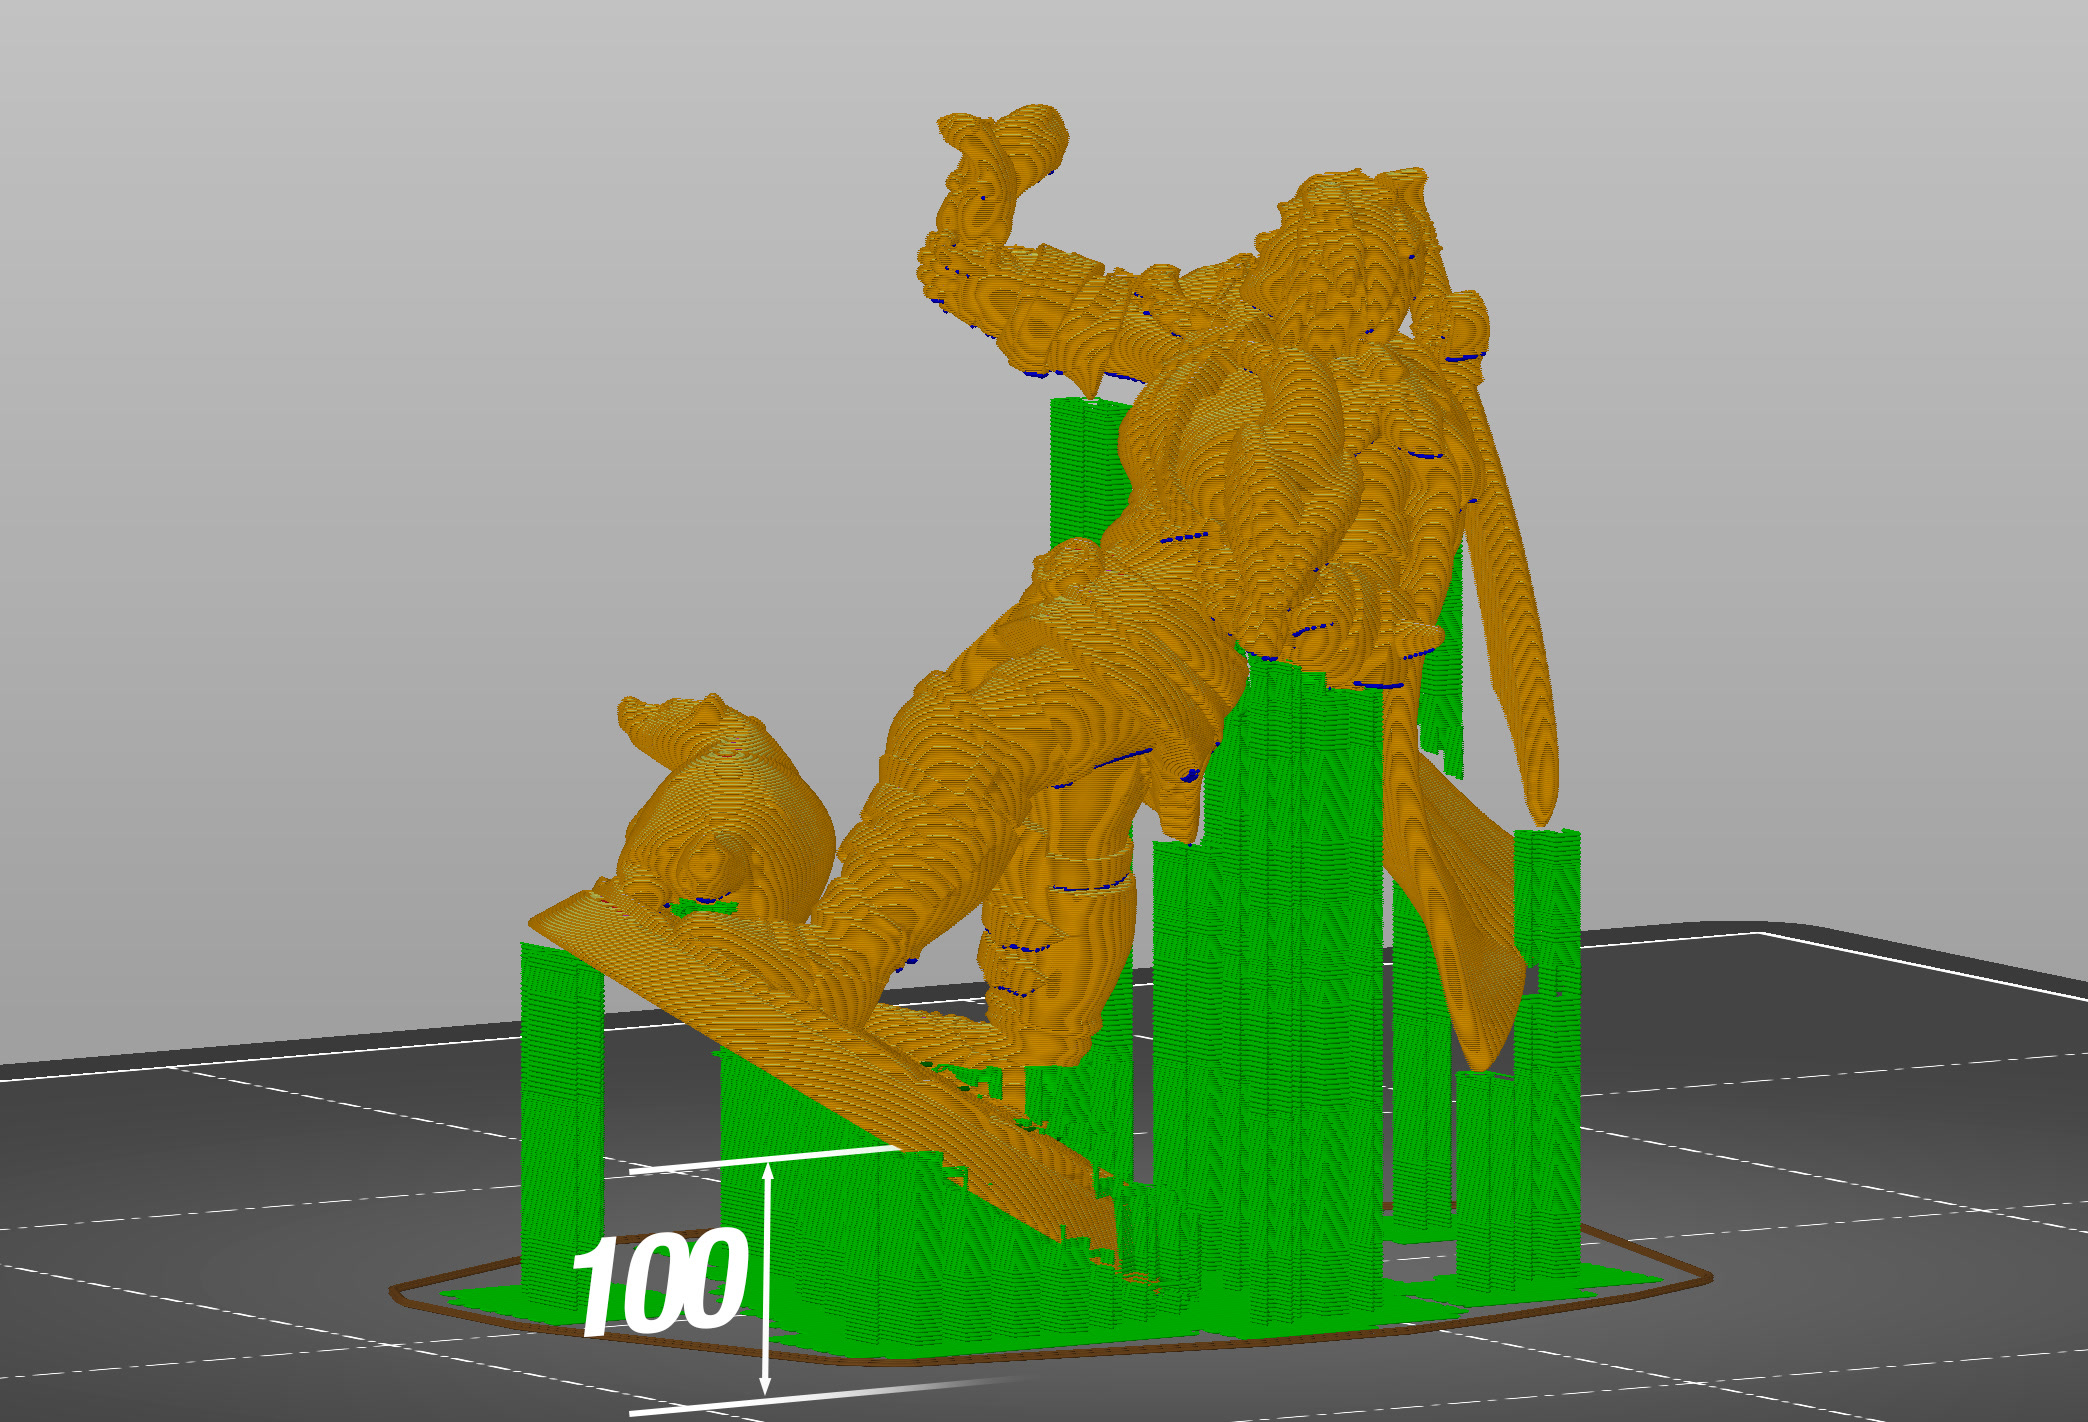 Enforce support for the first 100 layers
Raft layers
The object will be raised by this number of layers and support material will be generated under it. When the print finishes, you can grab the raft and peel it away from the part.
Raft contact Z distance
The vertical distance between the raft and the object. Ignored for soluble interfaces.
Raft expansion
Expansion of the raft in the XY plane for better stability.
Style
Style and shape of supports. The default Grid supports have a very well-defined minimum area, making them very stable. However, they tend to leak out of regions they support along the walls of the object. The Snug supports maintain the shape of the overhang, so they do not leak to the walls. The trade-off is the possibility of lower stability of tall and thin support pillars.
Grid supports (left), Snug supports (right)
Organic supports offer a completely different approach to supporting overhanging areas. Branches of support structures grow from the sides and automatically get denser beneath parts that need the support. The Organic supports are easily removable, do not scar the surface, and are fast and cheap to print.

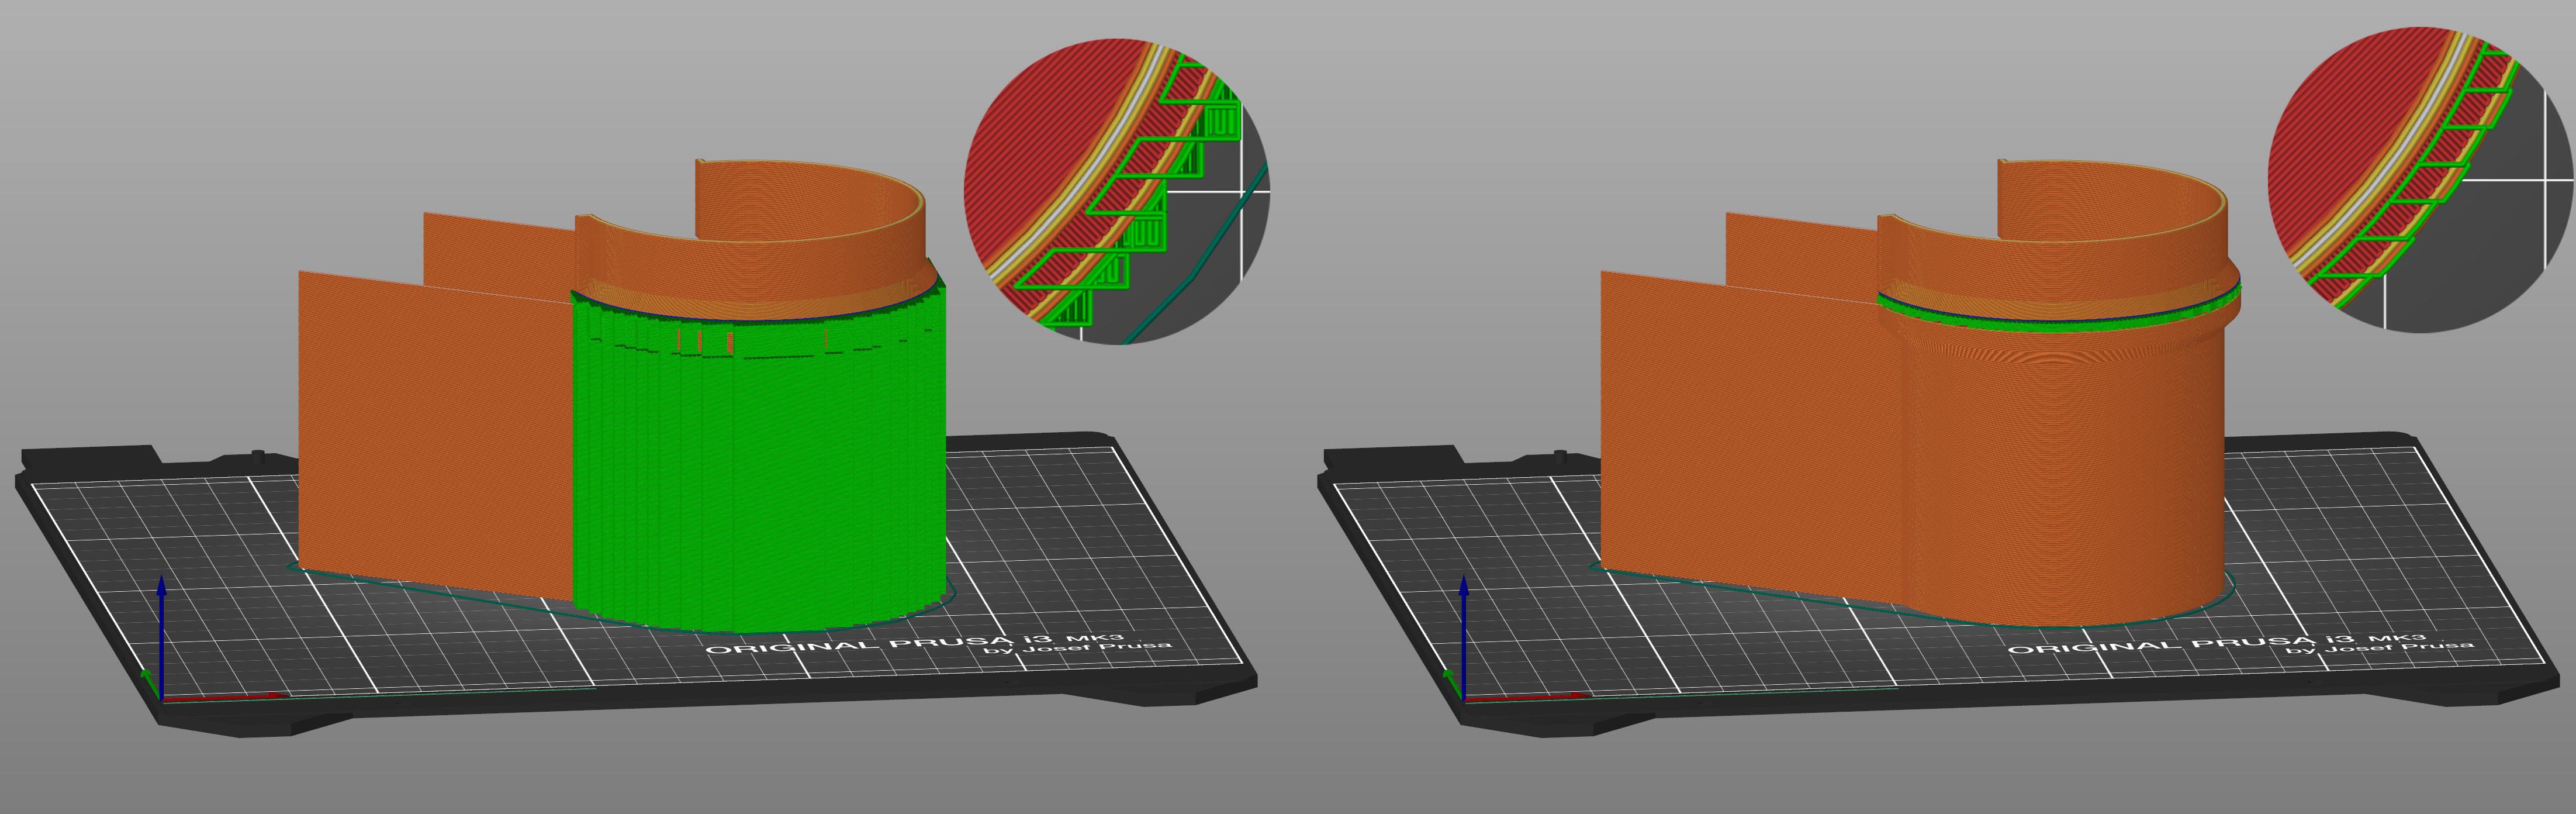
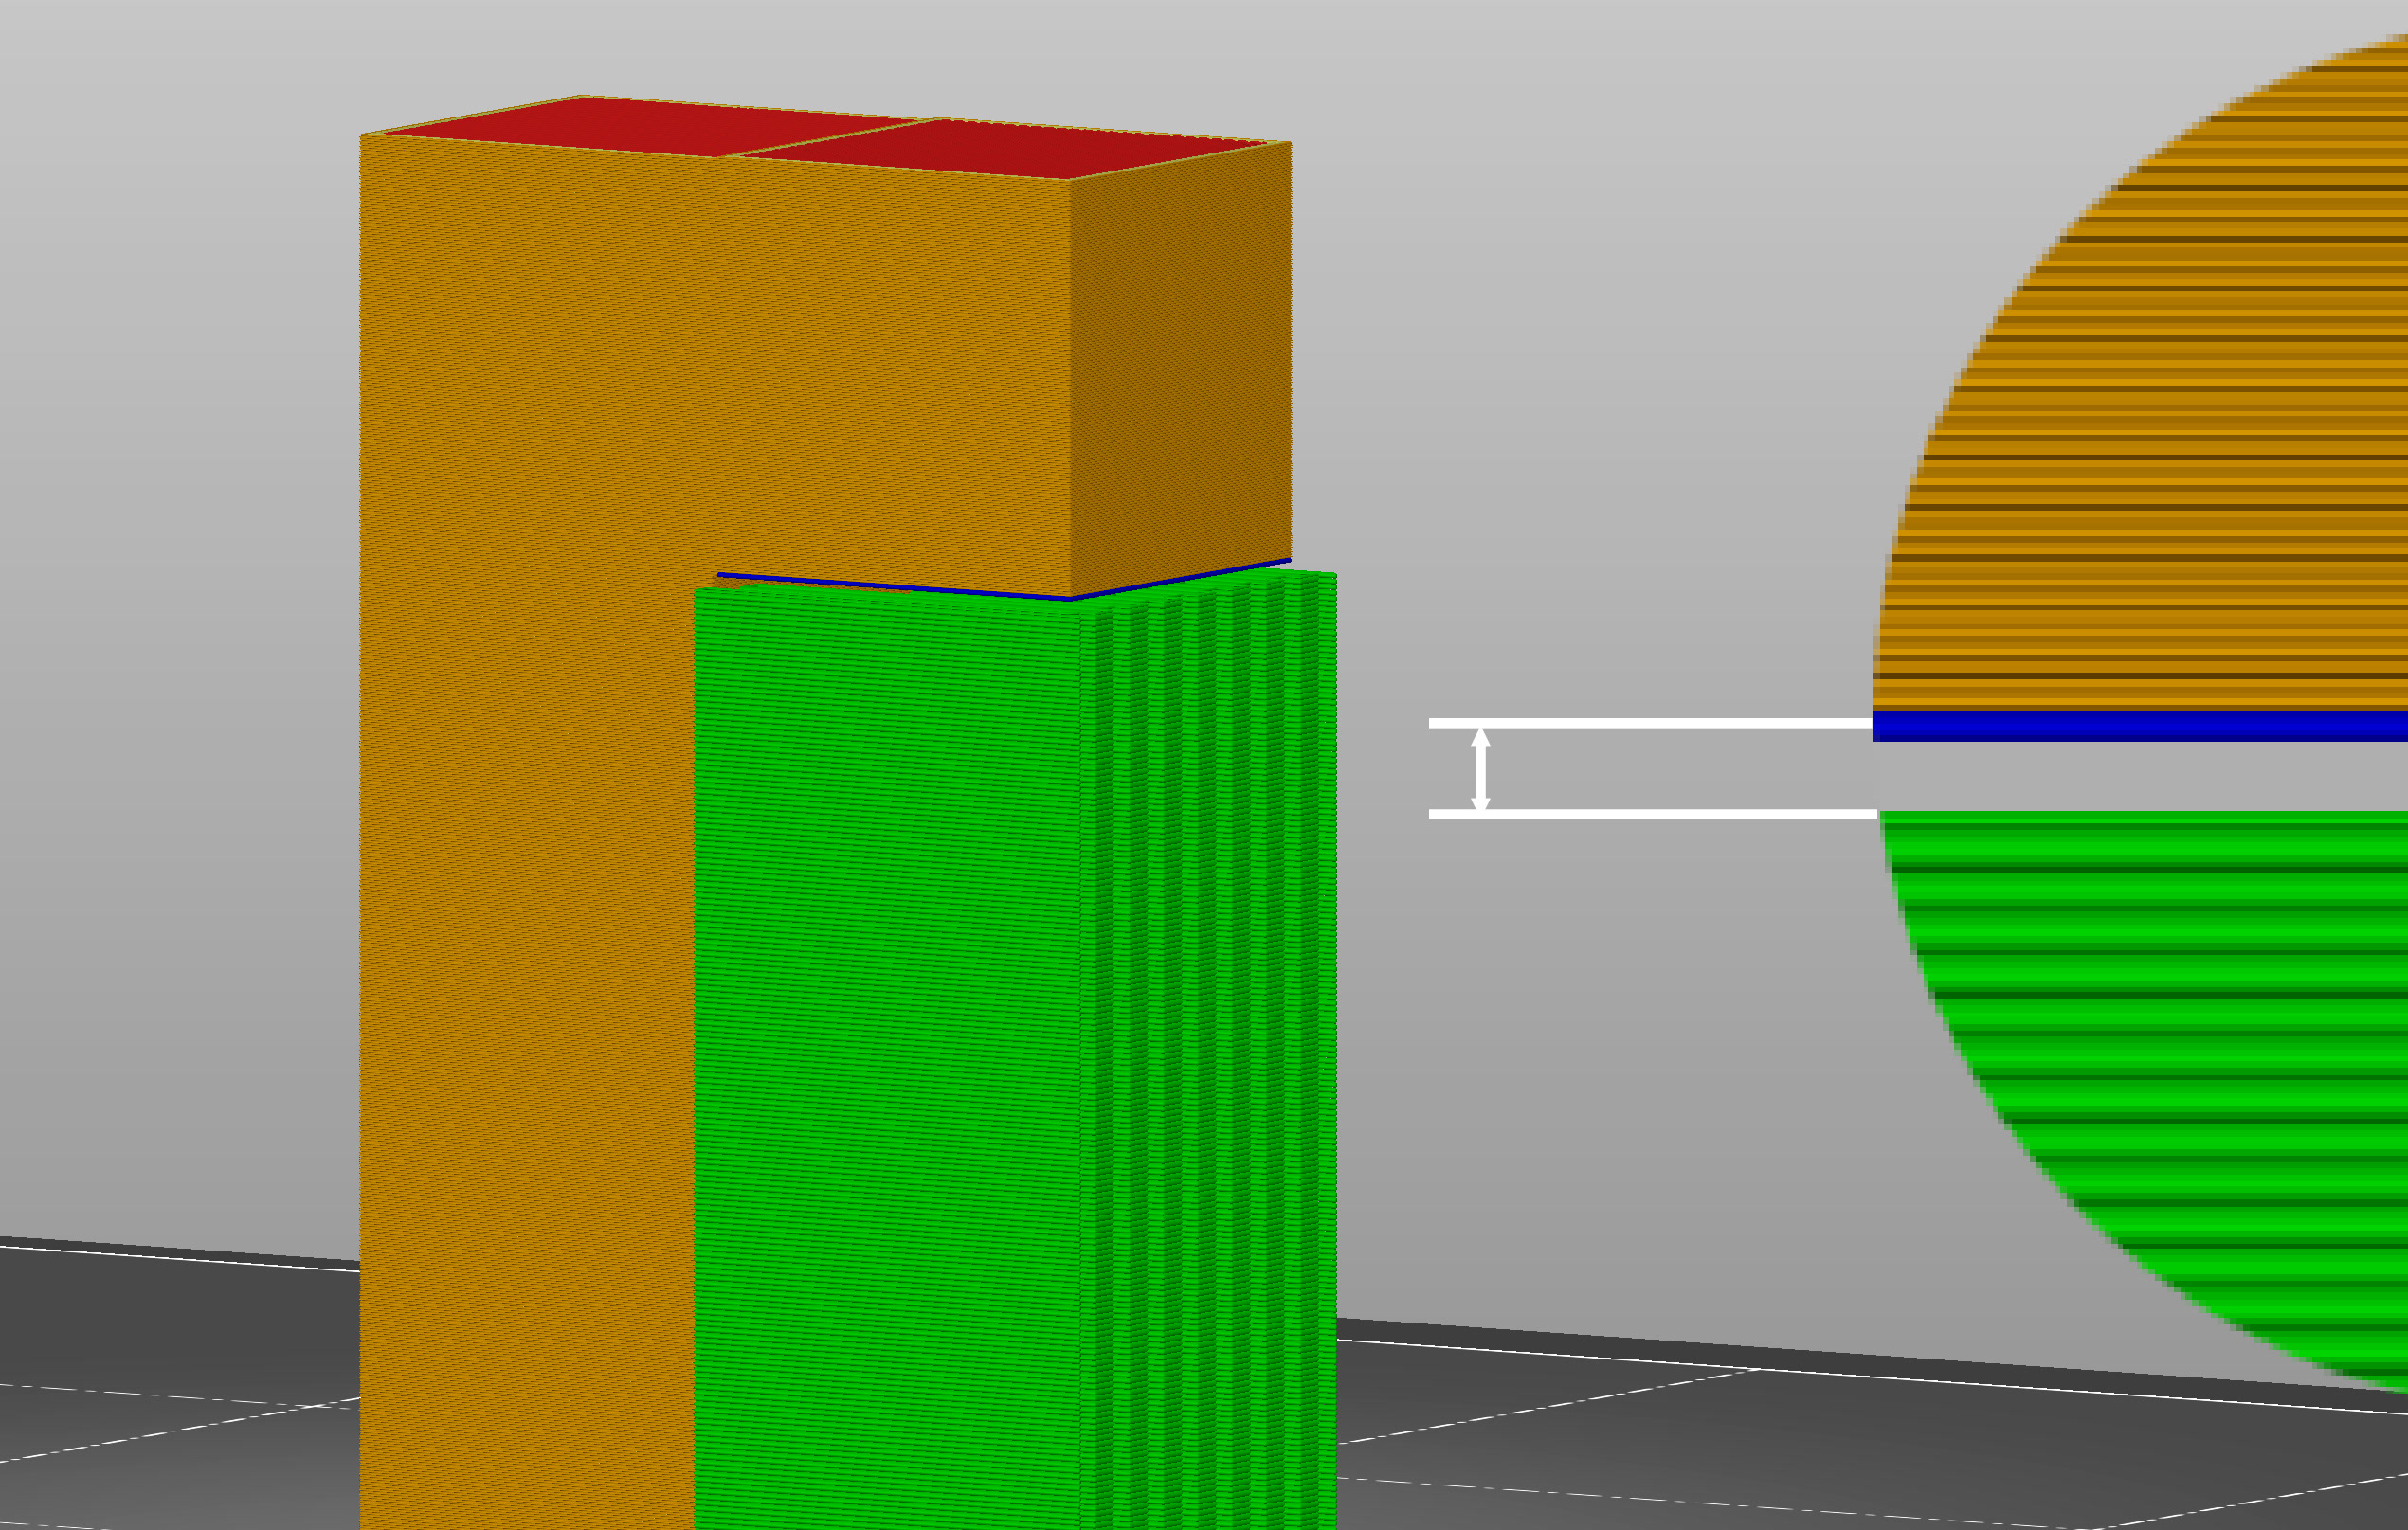
Top contact Z distance
The vertical distance between the object and the support material interface.
Setting this to 0 will prevent PrusaSlicer from using bridge flow and speed for the first object layer.
Values between 50-75% of the layer height seem to work well.
Bottom contact Z distance
Similar to Top contact Z distance, but affecting the gap at the bottom of the support tower (when supports start on top of a model and not on the build plate).
Pattern
Rectilinear - default, usually the easiest to remove
Rectilinear grid - sturdier and less prone to breaking during printing compared to rectilinear infill, harder to remove
Honeycomb - sturdy, somewhat difficult to remove
With sheath around the support
Creates a single perimeter around the supports, which makes them sturdier, but more difficult to remove.
Pattern spacing
Spacing between support material lines. Increase to make support removal easier. Support interface layers bridge over support material lines, if you increase this value too much, these bridges will start to sag and have an imperfect connection with the model.
The pattern spacing also sets the internal resolution of PrusaSlicer's supports grid. If you're using Paint-on supports or Support enforcers and you're unable to force supports exactly where you want them to be, try lowering the pattern spacing to get more resolution.
Pattern angle
Rotates infill pattern angle on the horizontal plane.
Closing radius
For Snug supports only. Gaps smaller than the closing radius will be filled in.
Top interface layers
Interface layers form a more uniform surface between the object and the support material. These are preferably set to a much denser pattern than the non-interface layers so that you can both maximize the surface area of the support in contact with the model to prevent sagging while minimizing print time and material used with a bigger non-interface pattern spacing.
Bottom interface layers
Similar as Top interface layers, but affecting the number of interface layers at the bottom of the support tower (when supports start on top of a model and not on the build plate).
Interface pattern spacing
Spacing between interface lines. Set to 0 to get a solid interface.
Interface loops
When enabled, the top layer of supports is covered with loops - continuous polylines.
Support on build plate only
Supports can start only on the print bed. Enabling this option is a really quick way to get rid of excess supports mostly on organic shapes. Make sure to check the preview and verify that all parts are either supported or at an overhang angle manageable by the printer.

Supports everywhere (left) vs Supports on build plate only (right)
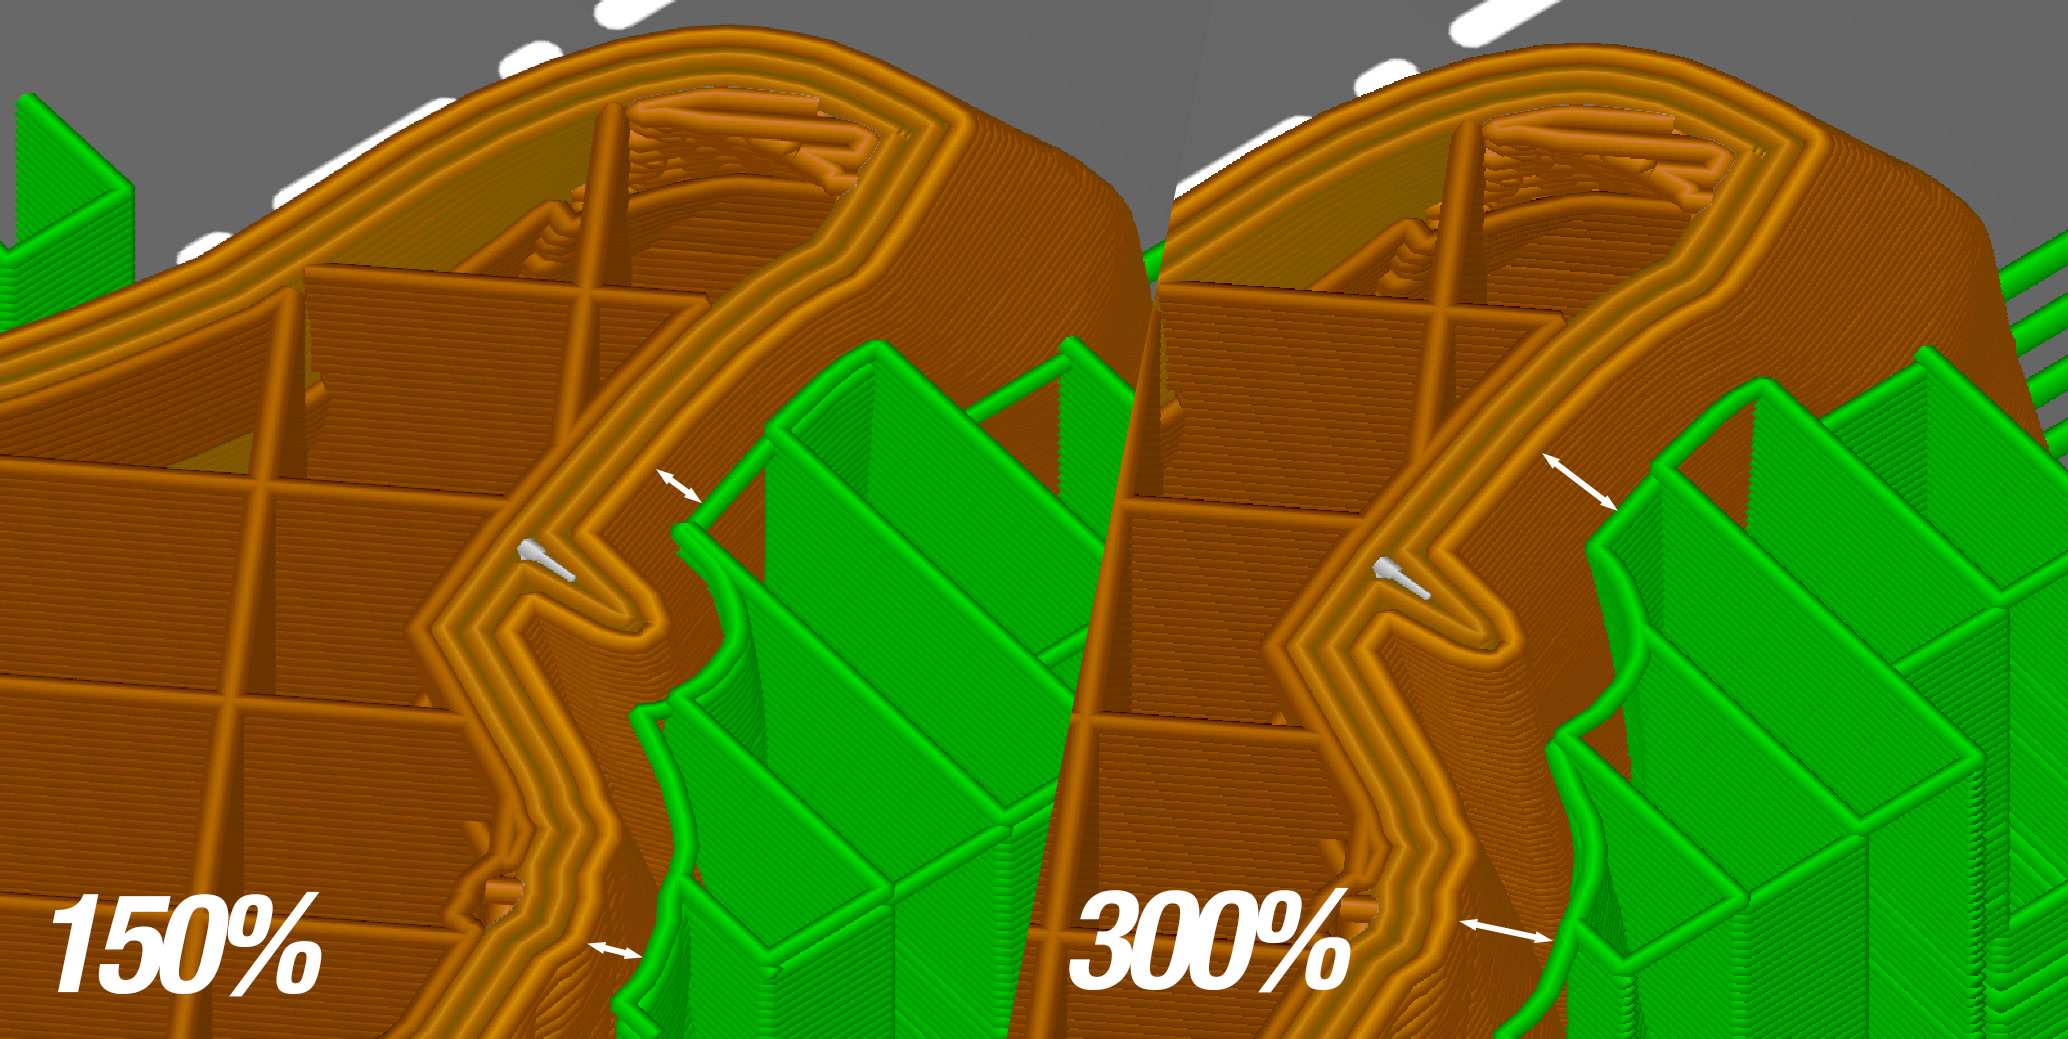
XY separation between an object and its support
Sets the width of a gap between the model and supports. Bigger XY separation decreases the contact area of supports but makes them easier to remove and less prone to fusing to the model.
If expressed as a percentage (for example 150%) it will be calculated over the external perimeter width.
Don’t support bridges
Prevents support material from being generated under bridged areas.
Synchronize with object layers
Supports will be printed at equal layer heights as the model itself. This is useful with multi-material printers, where the extruder switch is expensive.
Synchronize with object layers can only be enabled with soluble supports (contact Z distance 0).
Not synchronizing with object layers allows the support layers to grow faster than the object layers (if not excessively slowed down by the cooling logic) and independent layer height also allows PrusaSlicer to follow the gap between the object and the support top surface precisely. We may consider this to be configurable even for non-soluble supports in the future.
26 comments
So the auto spacing doesn't take into account the wider base/support raft apparently, and thus gets too near other objects. I tried re-auto-arrangingen after enabling supports but that makes no difference.
As I don't have the perimeter warning circles anymore (2.9.4) it's just annoying and hard to figure out where to place the object. Sure I can use the horizontal slider and try to figure out if something hits or not... but come on... this is why we have software!
Next to the Profile Icon you will see a drop down menu. Beginner mode (Green) is the default. Change it to Normal (yellow) or Expert (Red).