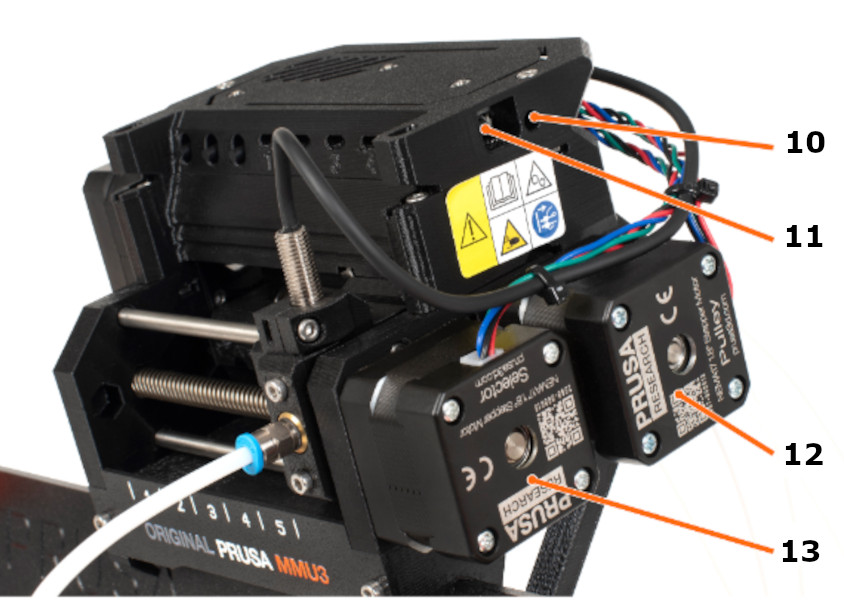
Regular maintenance is recommended for your Original Prusa MMU3 upgrade. Refer to the images below to familiarize yourself with the names of each part of the MMU3 unit.
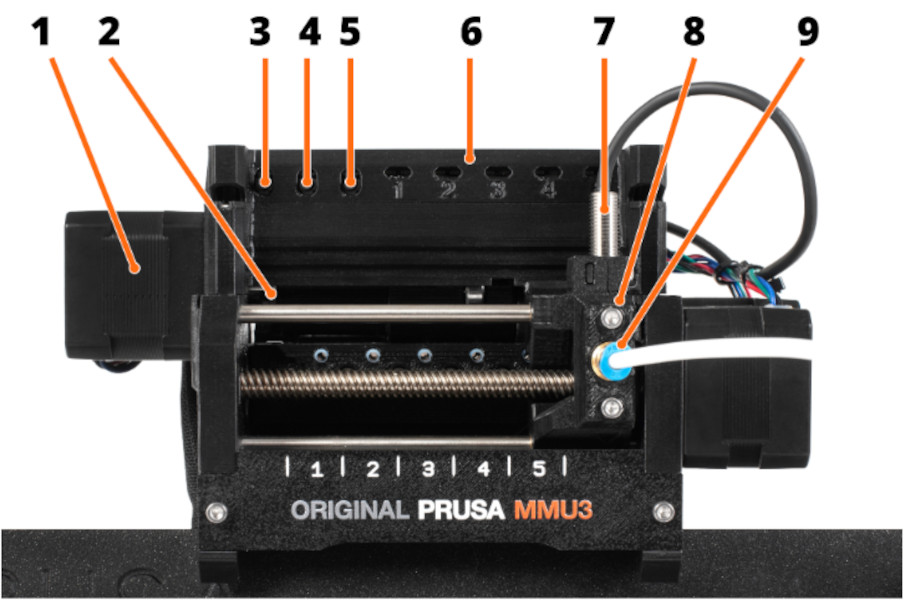 |  |
- Idler motor: rotates the idler.
- Idler: Contains five pulleys. By rotating the idler, a single pulley gets directly in contact with the
filament and applies pressure on it. Then, the pulley motor can push the filament forward into
the selector. - Left hardware button: moves the selector left.
- Middle hardware button: preloads filament into the selected position.
- Right hardware button: moves the selector right.
- LED indicators: indicate the current status of the MMU (selected position, errors, etc.).
- SuperFINDA (or FINDA for short) - MMU3 filament sensor built into the selector.
- Selector: selects a filament slot by moving to the requested position. The filament is then pushed
through the Selector into the nozzle by the Pulley Motor. - Festo fitting: there are two Festo fittings on the front PTFE tube, the other one is mounted to
the top of the extruder. - Reset button: triggers reset of the MMU3 unit only.
- MicroUSB port: for flashing MMU3 firmware via PC.
- Pulley motor: rotates the pulleys that move the filament inside the MMU3 unit.
- Selector motor: moves the Selector left and right.
Useful tools
Besides the usual tools, such as Allen keys, needle-nose pliers, and IPA + paper towels, you might need:
- Compressed air, also known as canned air, should not be held upside down while spraying. Otherwise, you could damage any electronic components while trying to clean them.
- Brush: a small brass brush is ideal for cleaning the pulleys. If you don't have a brass brush any brush with hard bristles will do the job. Alternative: You can use the acupuncture needle that comes with the printer or a toothpick.
MMU unit
When carrying out maintenance on your printer, extend it also to your MMU unit.
- Regular maintenance CORE One
- Regular maintenance MK4/S, MK3.9/S
- Regular maintenance MK3.5/S
- Regular maintenance MK3/S/+
Pulleys
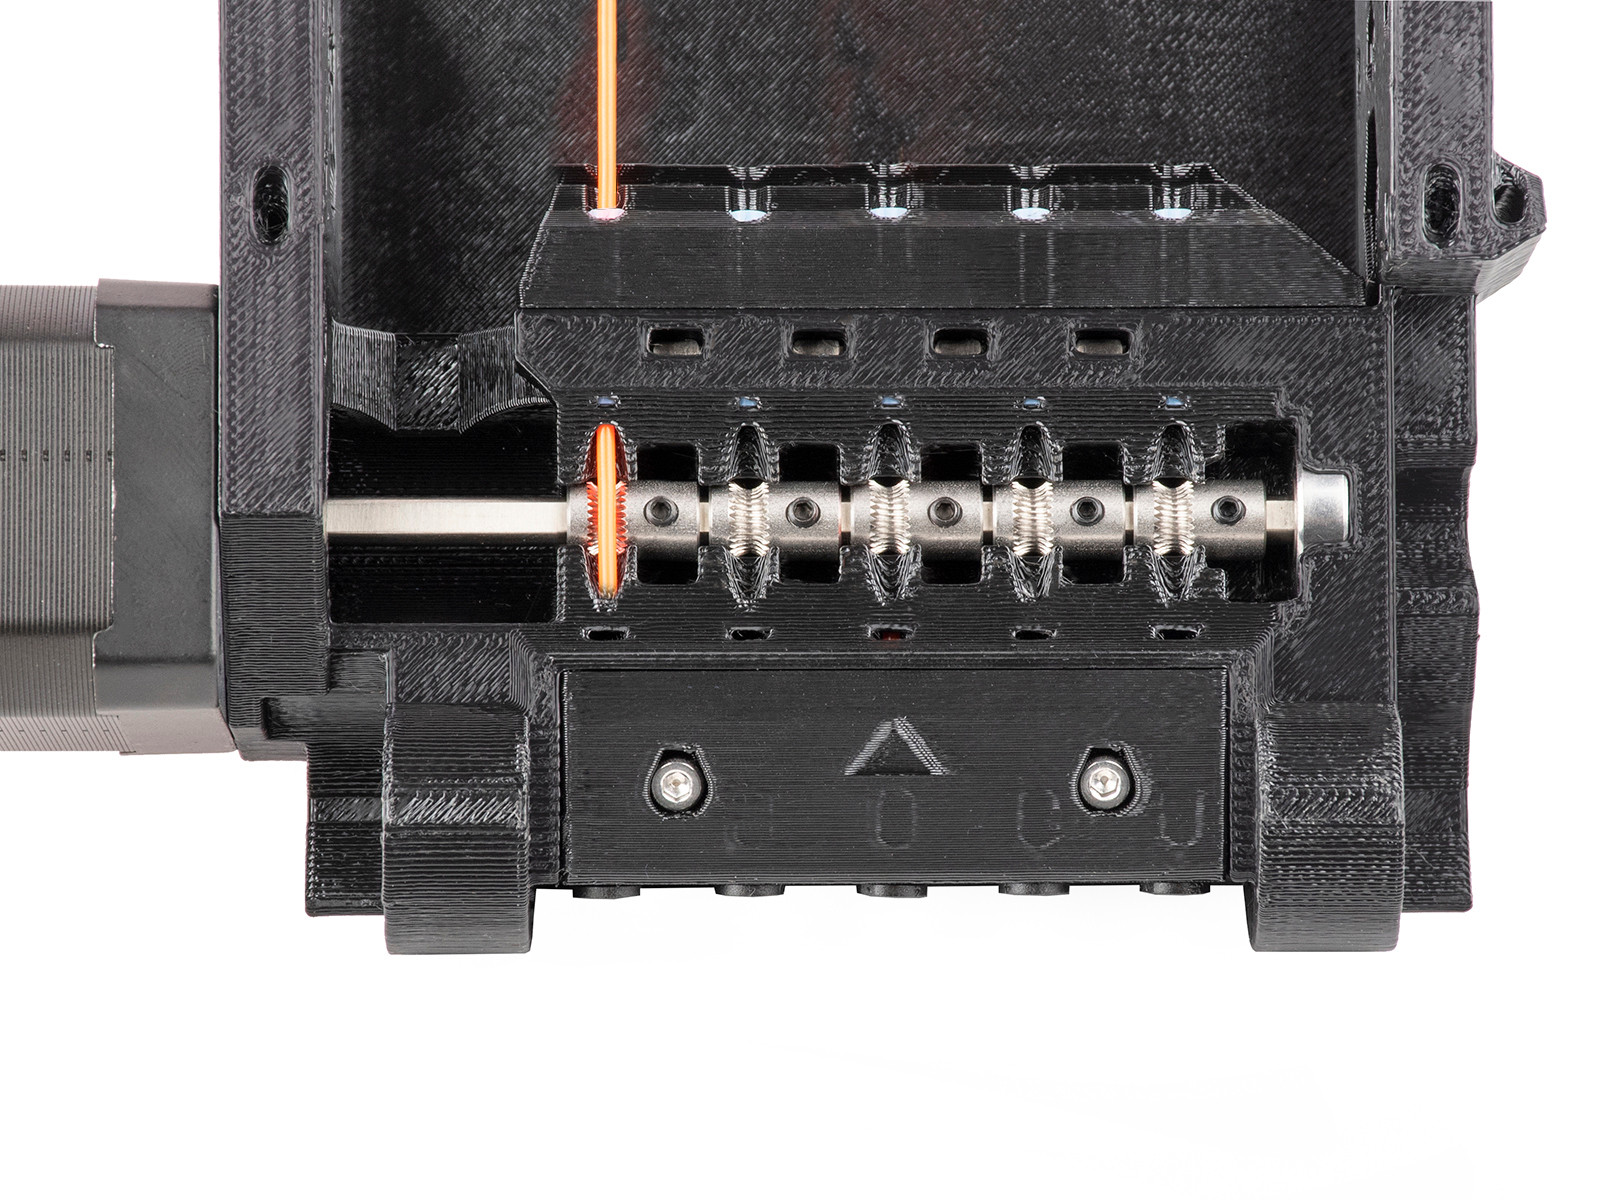
The pulleys may be grinding the filament, and their dust may accumulate around them. The best practice is to clean the pulleys with a mini-brush or a similar tool every time you run the maintenance. The pulleys also must be perfectly aligned with the filament holes as shown in the photo below, and well-tightened by the small black grub screw against the flat part of the Pulley motor axis.
Selector
Even a properly calibrated selector can be occasionally blocked with filament strings or dust or by a broken piece of filament. By pushing the right MMU button, move the selector fully to the right. Use an interdental brush or any thin wire (⌀ 1.5mm/0.06”) to push the waste through (still in service position). Use compressed air to clean any leftovers.
Extruder parts
The parts installed on the printer extruder when adding the MMU also need maintenance.
Nextruder main plate (CORE One, MK4/S, MK3.9/S)
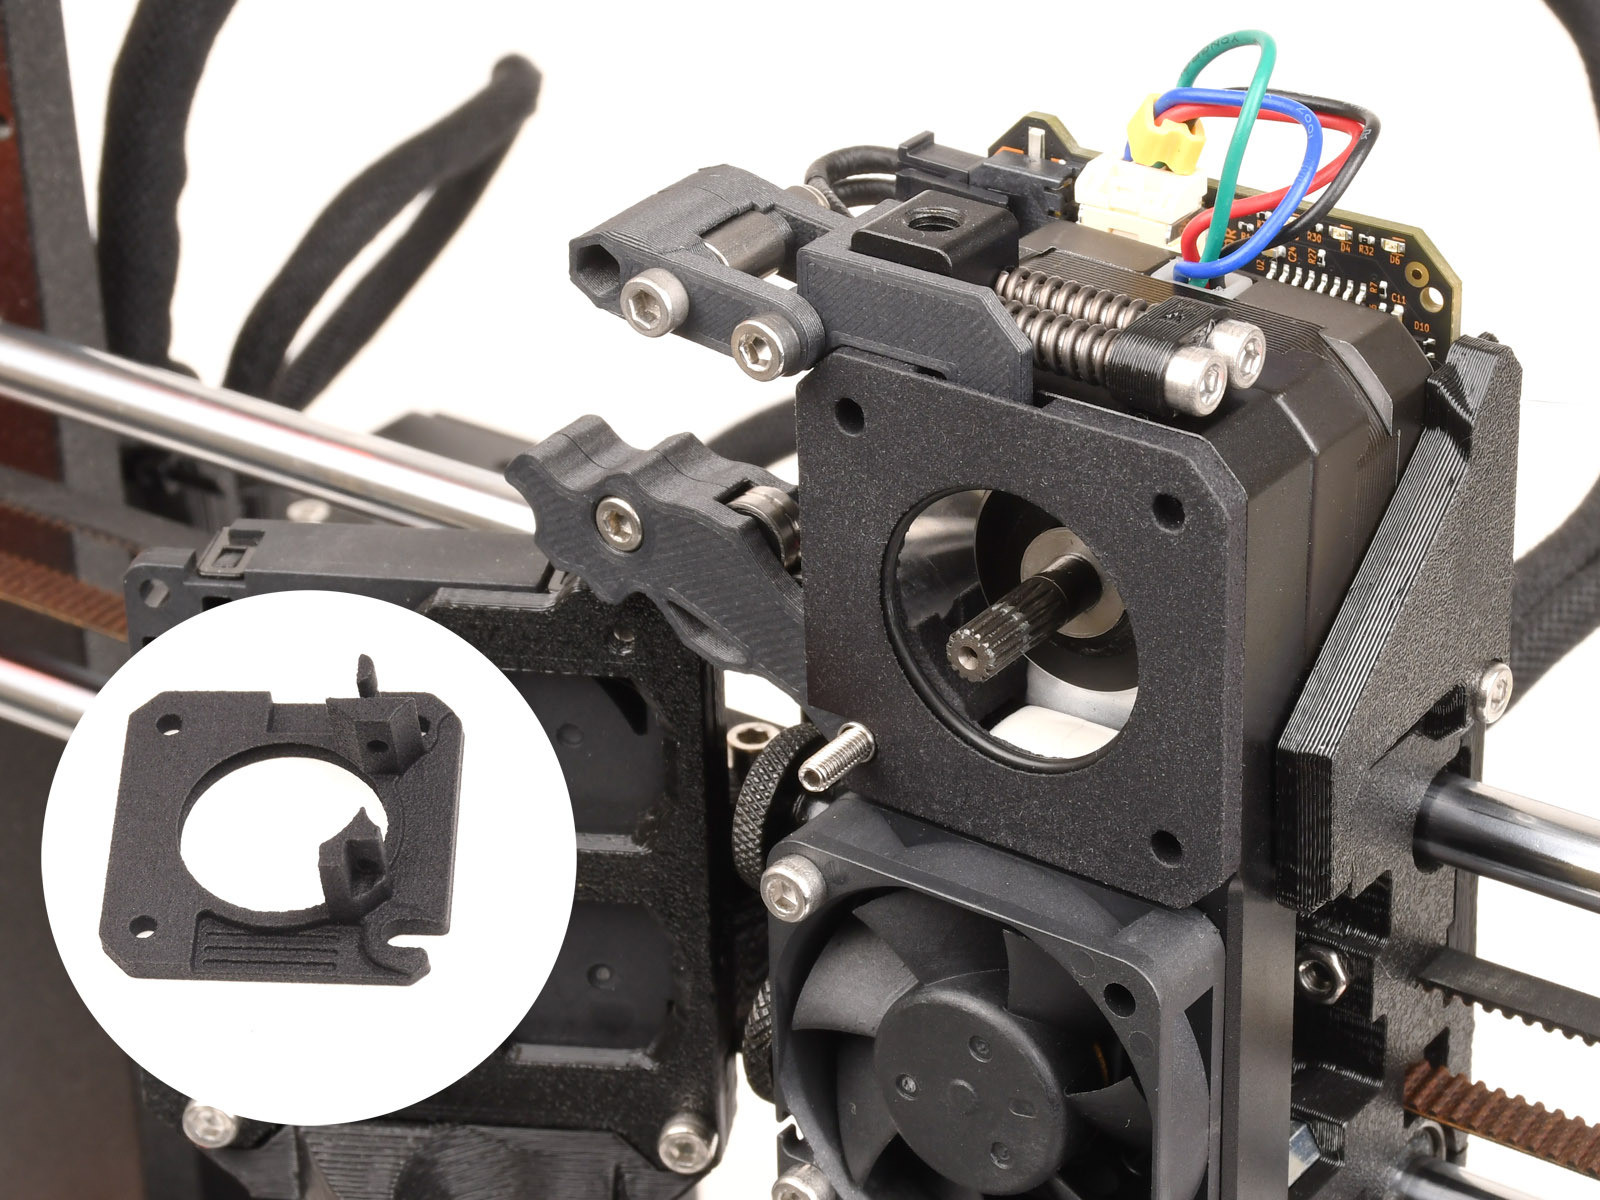
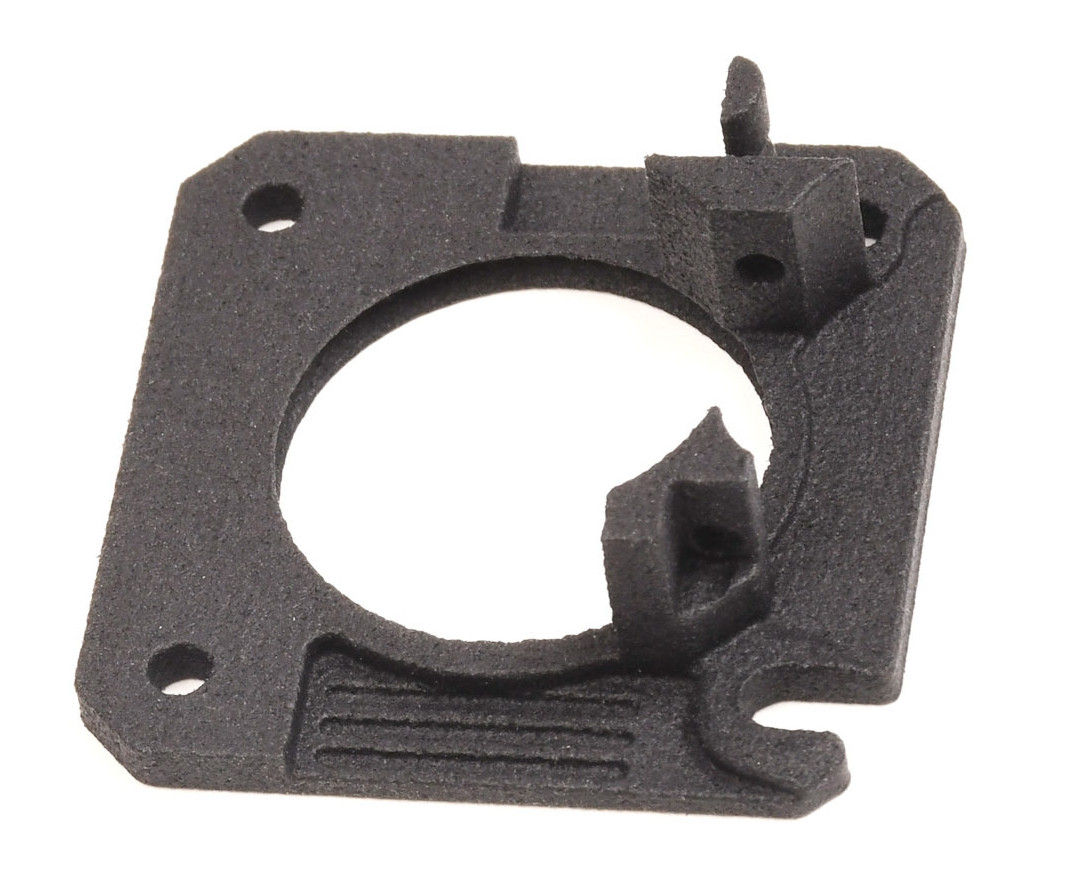
This part guides the filament from the drive gears into the nozzle tube. Repeated loads and unloads of filament cause wear. Without the MMU, this wear is insignificant. However, a single MMU print can have thousands of filament loads and unloads, increasing the wear rate. Once this part wears out, the printer cannot properly push filament into the nozzle. Unlike the rest of the MMU parts, this is printed with Multi Jet Fusion so that the part lasts longer.
The main plate is expected to last for 30k filament changes. After that, the printer will show the message "Maintenance Reminder. Filament changes have reached main-plate lifespan. Inspect the part and ensure you have a spare plate available." The MMU3 upgrade kit should have one spare main plate, or it can be purchased in our e-shop.
If the printer has 50 failed loads within 1000 successful filament changes, the screen will show the message "Printer has detected multiple consecutive filament loading errors. In this case, you can also check the main place for damage."
Alternatively, it is possible to clear it in Settings -> Hardware -> Nextruder maintenance.
 |  |
Filament sensor calibration (MK3.5/S)
If you see the message "Printer has detected multiple consecutive filament loading errors. We recommend checking the extruder." on your MK3.5/S printer, the printer has detected multiple loading errors in a small amount of time. Use the IR filament sensor calibration to adjust the filament sensor.
If your MMU reaches 30k loads to the extruder, the message "Maintenance Reminder. Filament changes have reached 30k. Inspect and clean the extruder." will show, reminding you to perform the Printer Regular Maintenance.