Español
Login
Impresoras 3D
Materiales
Piezas y accesorios
Software
Modelos 3D
Aplicaciones
Comunidad
Ayuda
Academy
Blog
Empresa
Soporte
Original Prusa MMU3
Ensamblaje Original Prusa MMU3
10A. MK4/S, MK3.9/S Setup and Calibration | Attaching the MMU unit (part 1)
1. Attaching the MMU unit (part 1)
Step 1 of 25 (Chapter 12 of 15)
Modo pantalla completa
Contenidos
Comentarios
⬢
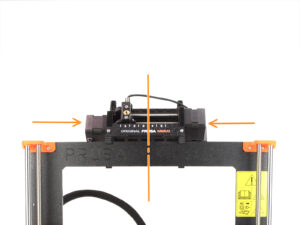
The MMU3 unit should be placed onto the top part of the printer's frame.
⬢
Place the MMU3 unit onto the frame.
Attach it just by the top hooks.
⬢
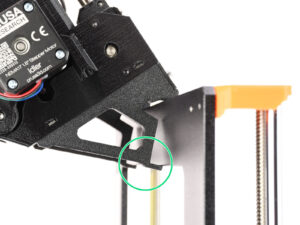
Look from behind, there are "clamps", which will be used to lock the unit to the frame in the next step.
Loading...
Siguiente
Contenidos
Ensamblaje Original Prusa MMU3
1. Introducción
2. Desmontaje MMU2S (UPG)
3. Desmontaje Buffer MMU2S (UPG)
4. Montaje del cuerpo del tensor
5. Montaje del selector
6. Montaje del cuerpo de polea
7. Montaje del Casete del buffer
8. Montaje Porta bobinas
9A. MK4/S, MK3.9/S Nextruder mod
9B. Mod extrusor MK3S+ / MK3.5 (KIT)
9C. Extrusor MK3S+ (UPG)
10A. Configuración y Calibración MK4/S, MK3.9/S
Attaching the MMU unit (part 1)
Attaching the MMU unit (part 2)
xBuddy preparation
Guiding the cable
Closing the electronics box
Software Download
PrusaSlicer setup for MMU3
Descarga de archivos de firmware
Firmware Upgrade: Printer
Encendido de la MMU
MMU3 Firmware flashing (part 1)
MMU3 Firmware flashing (part 2)
Gears calibration
Gearbox Alignment
MMU Filament sensor calibration
Footer adjustment
SuperFINDA sensor calibration info
SuperFINDA calibration
Error code details (Part 1)
Detalles del código de error (Parte 2)
Fittings INFO
MMU-to-Extruder PTFE tube parts preparation
MMU-to-Extruder PTFE tube
Spoolholders setup
Spoolholder-to-Buffer PTFE tube
10B. Configuración y Calibración MK3S+
10C. MK3.5 Setup and Calibration
11. Primer comienzo
Comentarios
Inicia sesión
para publicar un comentario
Sin comentarios