Español
Login
Impresoras 3D
Materiales
Piezas y accesorios
Para Empresas
Software
Modelos 3D
Comunidad
Ayuda
Cursos
Blog
Empresa
Soporte
Original Prusa MINI
Original Prusa MINI Enclosure (1.0)
2. Assembling the Enclosure | Herramientas necesarias para este capitulo
1. Herramientas necesarias para este capitulo
Paso 1 de 82 (Capítulo 2 de 4)
Contenidos
Comentarios
⬢
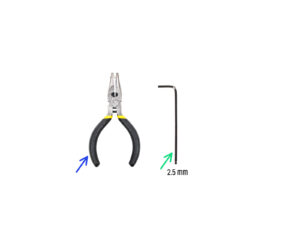
Para este capítulo, prepara por favor:
⬢
Needle-nose pliers
for mechanical lock add-on only
⬢
2.5mm Allen key
Loading...
Siguiente
Contenidos
Original Prusa MINI Enclosure
1. Introduction
2. Assembling the Enclosure [Traducción en desarrollo]
Herramientas necesarias para este capitulo
Base & feet: parts preparation
Preparing the foot-brackets
Colocando las almohadillas antivibratorias
Attaching the foot-brackets
Mounting the foot-brackets
Anti-slip dampers: parts preparation
Preparando los amortiguadores antideslizantes
Montando los amortiguadores antideslizantes
Profiles: parts preparation
Installing the profiles
Top panel: parts preparation
Fire Suppression System (add-on): parts preparation
Preparing the Fire suppression system tube (add-on)
Attaching the Fire suppression system tube (add-on)
Securing the Fire suppression system tube (add-on): right side
Securing the Fire suppression system tube (add-on): left side
Instalando el panel superior
Preparing the top window panel
Mounting the top window panel
MINI Back panel: parts preparation
Installing the back panel
Advanced filtration system (add-on): parts preparation
Assembling the filtration: parts preparation (add-on)
Assembling the filtration (add-on)
Assembling the filtration (add-on)
Assembling the filtration (add-on)
Installing the blower (add-on)
Inserting the HEPA filter (add-on)
Inserting the HEPA filter (add-on)
Installing the filtration (add-on)
Side panels: parts preparation
Installing the side panel
Asa de transporte (opcional): preparación de las piezas
Instalando el asa de transporte (opcional)
Mounting the transport handle (optional)
White LED strip (add-on): parts preparation
Assembling the LED strip (add-on)
Assembling the LED strip (add-on)
Mounting the LED strip (add-on)
LED cable: parts preparation (add-on)
Guiding the LED cable (add-on)
Guiding the filtration cable: parts preparation (add-on)
Guiding the add-on cables: filtration cable (add-on)
Cable USB: preparación de las piezas
Insertando el cable USB
PSU: parts preparation (add-on)
Guiding the PSU cable (add-on)
Releasing the front foot (add-on)
Securing the PSU cable (add-on)
Printer PSU preparing
Inserting the printer PSU cable
Securing the printer PSU cable
Basic Board: parts preparation (add-on)
Installing the Basic Board (add-on)
Installing the Basic Board (add-on)
Assembling the Basic Board (add-on)
Mounting the Basic Board (add-on)
Connecting the Basic Board (add-on)
PSU holder clarification (optional)
PSU holder: parts preparation (optional)
PSU holder nut preparation (optional)
PSU holder preparation (optional)
Attaching the PSU holder (optional)
Securing the PSUs (optional)
Bisagras de la puerta: preparación de las piezas
Assembling the hinges
Mounting the hinges
Mechanical lock (add-on): parts preparation
Assembling the lock insert (add-on): parts preparation
Assembling the lock housing (add-on)
Securing the lock housing (add-on)
Assembling the lock mechanism (add-on): parts preparation
Assembling the lock mechanism (add-on)
Securing the lock mechanism (add-on)
Installing the door panel (add-on): parts preparation
Installing the door panel (add-on)
Door assembly: parts preparation
Installing the door panel
Montando el asa de la puerta
Haribo time!
Good job!
3. Installing the printer
Registro de cambios del Manual del kit de MINI Enclosure
Comentarios
Inicia sesión
para publicar un comentario
Sin comentarios