Español
Login
Impresoras 3D
Materiales
Piezas y accesorios
Para Empresas
Software
Modelos 3D
Comunidad
Ayuda
Cursos
Blog
Empresa
Soporte
Prusa CORE One+
Kit conversión Prusa CORE One+ (1.00)
3. Back assembly | Herramientas necesarias para este capitulo
1. Herramientas necesarias para este capitulo
Paso 1 de 55 (Capítulo 6 de 13)
Contenidos
Comentarios
⬢
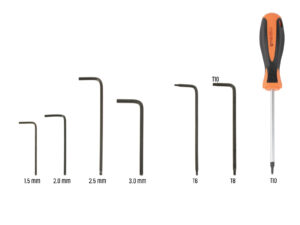
For this chapter, please prepare:
⬢
Philips (PH2) screwdriver
⬢
Needle-nose pliers
⬢
2.5mm Allen key
⬢
T10 torx key / T10 torx screwdriver
Loading...
Siguiente
Contenidos
Kit conversión Prusa CORE One+
1A. Introducción
1B. Inspección MK4S
1C. Desmontaje de la Impresora
1D. Preparación componentes
2. Montaje de la base
3. Montaje trasera
Herramientas necesarias para este capitulo
xBuddy: preparación de piezas I.
xBuddy: preparación de piezas II.
Applying the thermal pads
Installing the xBuddy
Installing the xBuddy extension
Instalando las bridas
Connecting the xBuddy extension board
Inserting grommets: xBuddy box
Wi-Fi: parts preparation
Assembling the Wi-Fi
Installing the Wi-Fi assembly
PSU assembly: parts preparation
Preparing the PSU
Power cables info
Conectando la fuente de alimentación
Back panel: parts preparation
Installing grommets: back panel top
Installing grommets: sides
Aligning the PSU
Mounting the PSU
Aligning the xBuddy box assembly
Mounting the xBuddy box
PSU-cable-cover: preparación de las piezas
Preparing the PSU-cable-cover
PSU-cable-cover installation
Chamber fans: parts preparation
Assembling the fan grid
Colocando los ventiladores
Covering the cooling fans
Rear profiles: parts preparation
Installing the rear profiles
Mounting the back panel
Securing the Back panel
Power Terminal Screws Preparation
Connecting the power cables
Stepper splitter: parts preparation
Guiding the Stepper splitter cable
Connecting the Stepper splitter
Mounting the Stepper Splitter
LCD cable: parts preparation
Guiding the LCD cable
Main FE cable INFO
Connecting the FE cable (no 3.)
Guiding the FE cable (no. 2)
Guiding the FE cable (no. 1)
Guiding the FE cable (no. 4 and 5)
Cable Bundle Cleanup
FE cable - xBuddy: parts preparation
Connecting the FE cable: xBuddy
Plugging the xLCD cable
PSU-cover: parts preparation
Connecting the FE cable: PSU
Momento Haribo
Listo
4. Heatbed assembly
5. CoreXY assembly
6. Nextruder assembly
7. Bodywork & Electronics
8. Trim, Door & xLCD
9. Calibration & First run
Lista de cambios del manual
Comentarios
Inicia sesión
para publicar un comentario
Sin comentarios