Español
Login
Impresoras 3D
Materiales
Piezas y accesorios
Para Empresas
Software
Modelos 3D
Comunidad
Ayuda
Cursos
Blog
Empresa
Soporte
Prusa CORE One+
Ensamblaje del Kit de Prusa CORE One+ (1.00)
4. Heatbed assembly | Tools necessary for this chapter
1. Tools necessary for this chapter
Paso 1 de 40 (Capítulo 4 de 10)
Contenidos
Comentarios
⬢
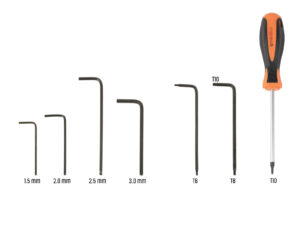
For this chapter, please prepare:
⬢
Needle-nose pliers
⬢
Universal wrench
⬢
Wrench 13-16
⬢
Philips (PH2) screwdriver
⬢
2.5mm Allen key
⬢
2.0mm Allen key
⬢
T10 torx key / T10 torx screwdriver
Loading...
Siguiente
Contenidos
Ensamblaje del Kit de Prusa CORE One+
1. Introduction
2. Base assembly
3. Back assembly
4. Heatbed assembly [Traducción en desarrollo]
Tools necessary for this chapter
Heatbed: parts preparation
Heatbed cable assembly (part 1)
Heatbed cable assembly (part 2)
Bed-cable-cover-bottom: parts preparation
Attaching the cable cover
Heatbed carriage: parts preparation
Preparing the heatbed carriage
Installing the expansion joints
RGB LED strip: parts preparation
Installing the LED strip
Attaching the LED strip diffuser
Covering the RGB LED strip
Guiding the RGB LED strip cable
Bed mounts: parts preparation
Assembling the bed mounts
Securing the bed mounts
Bed mounts: inserting the nuts
Assembling the CORE-One-bed-spacer-rear
Installing the bed-mount-right
Installing the bed-mount-left
Mounting the heatbed: parts preparation
Mounting the heatbed
Tightening the heatbed
Covering the cables: parts preparation
Guiding the heatbed cables
Covering the heatbed cables
Mounting the heatbed: parts preparation
Attaching the heatbed assembly
Mounting the heatbed assembly: rear motor
Mounting the heatbed assembly: front motor left
Mounting the heatbed assembly: front motor right
Attaching the heatbed cables I.
Attaching the heatbed cables II.
Securing the heatbed cables: parts preparation
Securing the textile sleeve
Guiding the heatbed assembly cables
Connecting the heatbed power cables
Haribo time
Done
5. CoreXY assembly
6. Nextruder assembly
7. Bodywork & Electronics
8. Trim, Door & xLCD
9. Calibration & First run
Lista de cambios del manual
Comentarios
Inicia sesión
para publicar un comentario
Sin comentarios