Español
Login
Impresoras 3D
Materiales
Piezas y accesorios
Para Empresas
Software
Modelos 3D
Comunidad
Ayuda
Cursos
Blog
Empresa
Soporte
Prusa CORE One+
Kit conversión Prusa CORE One+ (1.00)
8. Trim, Door & xLCD | Tools necessary for this chapter
1. Tools necessary for this chapter
Paso 1 de 41 (Capítulo 11 de 13)
Contenidos
Comentarios
⬢
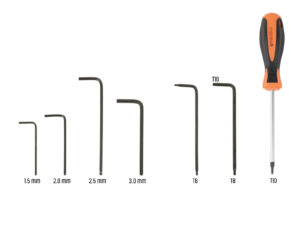
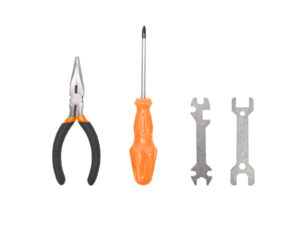
For the following steps, prepare:
⬢
Llave Allen de 2.5mm
⬢
Llave Torx T10
⬢
Alicates de punta fina
Loading...
Siguiente
Contenidos
Kit conversión Prusa CORE One+
1A. Introducción
1B. Inspección MK4S
1C. Desmontaje de la Impresora
1D. Preparación componentes
2. Montaje de la base
3. Montaje trasera
4. Heatbed assembly
5. CoreXY assembly
6. Nextruder assembly
7. Bodywork & Electronics
8. Trim, Door & xLCD [Traducción en desarrollo]
Tools necessary for this chapter
Top cover: parts preparation
Retirando la película
Test-fitting the top cover
Assembling the top cover I.
Assembling the top cover II.
Probando la ventilación
Installing the top cover
Side covers: parts preparation
Retirando la película
Covering the left side
Covering the right side
xLCD: preparación de las piezas
Assembling the xLCD I.
Assembling the xLCD II.
Installing the FE Faston connector
Installing the LCD knob
xLCD bezel: parts preparation
Mounting the xLCD I.
Mounting the xLCD II.
Installing the xLCD assembly
Securing the xLCD assembly
Door seal: parts preparation
Attaching the top seal
Attaching the side seals
Magnet holders: parts preparation
Assembling the magnet holders
Installing the magnet holders
Bisagras: preparación de las piezas
Installing the door-hinge-in parts
Installing the door-hinge-out I.
Installing the door-hinge-out II.
Door panel: parts preparation
Door panel: removing the protective film
Instalando el panel de la puerta
Assembling the door handle
Securing the door handle
Colocando la pegatina: preparación de las piezas
Colocando la pegatina
Momento Haribo
Hecho
9. Calibration & First run
Lista de cambios del manual
Comentarios
Inicia sesión
para publicar un comentario
Sin comentarios