Français
Login
Imprimantes 3D
Matériaux
Pièces & accessoires
Pour les Entreprises
Logiciel
Modèles 3D
Communauté
Aide
Cours
Blog
Entreprise
Support
Prusa CORE One+
Kit de conversion de la Prusa CORE One+ (1.00)
3. Back assembly | Tools necessary for this chapter
1. Tools necessary for this chapter
Étape 1 sur 55 (Chapitre 6 sur 13)
Contenu
Commentaires
⬢
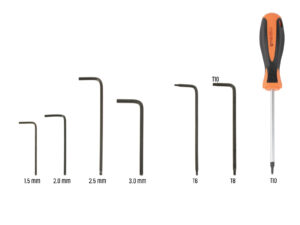
Pour ce chapitre, veuillez préparer :
⬢
Tournevis Philips (PH2)
⬢
Pince à bec fin
⬢
Clé Allen de 2,5 mm
⬢
T10 torx key / T10 torx screwdriver
Loading...
Suivant
Contenu
Kit de conversion de la Prusa CORE One+
1A. Introduction
1B. Inspection de la MK4S
1C. Démontage de l'imprimante
1D. Préparation des composants
2. Assemblage de la base
3. Assemblage de l'arrière
Tools necessary for this chapter
xBuddy: parts preparation I.
xBuddy: parts preparation II.
Applying the thermal pads
Installation de la xBuddy
Installing the xBuddy extension
Installation des colliers de serrage
Connecting the xBuddy extension board
Inserting grommets: xBuddy box
Wi-Fi : préparation des pièces
Assemblage du Wi-Fi
Installing the Wi-Fi assembly
PSU assembly: parts preparation
Préparation du bloc d'alimentation
Informations sur les câbles d'alimentation
Connexion de l'alimentation
Back panel: parts preparation
Installing grommets: back panel top
Installation des œillets : côtés
Alignement du bloc d'alimentation
Montage du bloc d'alimentation
Aligning the xBuddy box assembly
Mounting the xBuddy box
PSU-cable-cover : préparation des pièces
Préparation du PSU-cable-cover
Installation du PSU-cable-cover
Chamber fans: parts preparation
Assembling the fan grid
Fixation des ventilateurs
Covering the cooling fans
Rear profiles: parts preparation
Installing the rear profiles
Mounting the back panel
Securing the Back panel
Power Terminal Screws Preparation
Connecting the power cables
Stepper splitter: parts preparation
Guiding the Stepper splitter cable
Connecting the Stepper splitter
Mounting the Stepper Splitter
LCD cable: parts preparation
Guiding the LCD cable
Main FE cable INFO
Connecting the FE cable (no 3.)
Guiding the FE cable (no. 2)
Guiding the FE cable (no. 1)
Guiding the FE cable (no. 4 and 5)
Nettoyage du faisceau de câbles
FE cable - xBuddy: parts preparation
Connecting the FE cable: xBuddy
Plugging the xLCD cable
PSU-cover : préparation des pièces
Connecting the FE cable: PSU
C'est l'heure des Haribo
Fini
4. Assemblage du plateau chauffant
5. Assemblage du CoreXY
6. Assemblage du Nextruder
7. Bodywork & Electronics
8. Trim, Door & xLCD
9. Calibration & First run
Journal des modifications
Commentaires
Se connecter
pour poster un commentaire
Aucun commentaire