Français
Login
Imprimantes 3D
Matériaux
Pièces & accessoires
Pour les Entreprises
Logiciel
Modèles 3D
Communauté
Aide
Cours
Blog
Entreprise
Support
Prusa CORE One+
Assemblage du kit Prusa CORE One+ (1.00)
8. Trim, Door & xLCD | Tools necessary for this chapter
1. Tools necessary for this chapter
Étape 1 sur 41 (Chapitre 8 sur 10)
Contenu
Commentaires
⬢
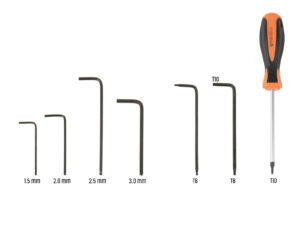
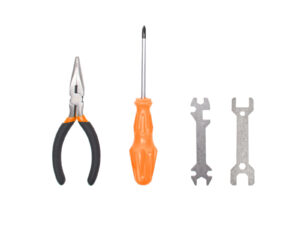
For the following steps, prepare:
⬢
Clé Allen de 2,5 mm
⬢
Clé Torx T10
⬢
Pince à bec fin
Loading...
Suivant
Contenu
Assemblage du kit Prusa CORE One+
1. Introduction
2. Assemblage de la base
3. Assemblage de l'arrière
4. Assemblage du plateau chauffant
5. Assemblage du CoreXY
6. Assemblage du Nextruder
7. Bodywork & Electronics
8. Trim, Door & xLCD [Traduction en cours]
Tools necessary for this chapter
Top cover: parts preparation
Retrait du film
Test-fitting the top cover
Assembling the top cover I.
Assembling the top cover II.
Test de la ventilation
Installing the top cover
Side covers: parts preparation
Retrait du film
Covering the left side
Covering the right side
xLCD : préparation des pièces
Assembling the xLCD I.
Assembling the xLCD II.
Installing the FE Faston connector
Installing the LCD knob
xLCD bezel: parts preparation
Mounting the xLCD I.
Mounting the xLCD II.
Installing the xLCD assembly
Securing the xLCD assembly
Door seal: parts preparation
Attaching the top seal
Attaching the side seals
Magnet holders: parts preparation
Assembling the magnet holders
Installing the magnet holders
Charnières : préparation des pièces
Installing the door-hinge-in parts
Installing the door-hinge-out I.
Installing the door-hinge-out II.
Door panel: parts preparation
Door panel: removing the protective film
Installing the door panel
Assembling the door handle
Securing the door handle
Pose de l'autocollant : Préparation des pièces
Pose de l'autocollant
C'est l'heure des Haribo
Fini
9. Calibration & First run
Journal des modifications
Commentaires
Se connecter
pour poster un commentaire
Aucun commentaire