Original Prusa i3 MK2S is the successor to Original Prusa i3 MK2 with small hardware tweaks for an easier assembly and improved reliability.
⬢
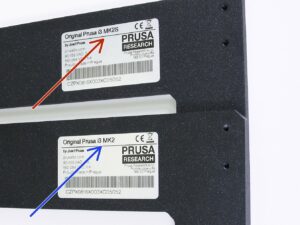
Take a look at the aluminium frame (Z-axis), there is a sticker with the name of the printer. In case of a text "Original Prusa i3 MK2 you need to use another version of this manual - Prusa i3 MK2 kit assembly.
⬢If your sticker contains "Original Prusa i3 MK2S" you can continue using this manual.
Totally agree with all above. Follow the instructions carefully and double or triple check the critical steps. Did this and had no major problems at any stages. I’ve had my printer now in use for one week and it has produced nothing but successful, high quality prints from first try on.
I recommend reading all the comments, keep a small round “rat-tail “ file to trim, bore out or correct some of the received parts may have left over filament “hairs” that may be blocking the holes or where the part face was extruded a bit over leaving filament strands affixed. Go through all the part bags and get familiar with all the parts before starting. Compare some of the pictures with yours, (take them as you go along). The support group is GREAT, take your time, no rush, as those pesky right angle allan tools can be a pain ( I made a straight one) and small hardware can tire out your fingers frustrating you if you drop or make a mistake along the way.
DITTO to read and review. One more add: Not all the parts you receive will be perfect. I used a small round “rat-tail” file to fix some of the holes and to remove some of the extra filament strands left over from the printing of the received parts. The KIT is well labeled and all the comments should be read so you can correct those steps as others have had to contend with.
Best pieces of advice: Read all assembly instructions before you even get the kit and again while building; watch ALL videos as well and BEFORE to start steps/while completing steps (use pause button); READ ALL INSTRUCTIONS CAREFULLY; use on line manual to blow up each picture as you do each step; prestage and lay out required parts BEFORE starting sectional assembly; have all tools you are provided and comments say you may need; have large area to complete assembly (I had a 4 ft x 4 ft area); use level area if possible; and be patient-don't rush. I spent about 20 hours completing the assembly but many did it much quicker, I just checked and double checked all my steps (and still missed some information; be alert and awake..do not assemble while in a rush or fog/tired. I have been running the printer almost constantly since I completed assembly except for food and sleep. Good luck and enjoy.
Hi Merrill, thank for sharing your experience. I completely agree you need to read the instructions carefully and take your time for the assembly. Rushing to the finish and skipping reading will most probably result in issues later.