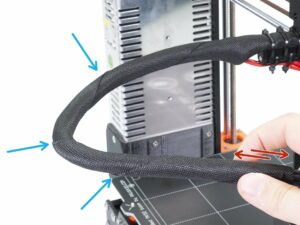
EN
  • Čeština
  • Español
  • Italiano
  • Deutsch
  • Polski
  • Français
  • 日本語
Login

4. Electronics assembly

4. Electronics assembly

4. Electronics assembly
Relevant for:
Last updated 4 years ago
4. Electronics assembly
 Difficulty
Moderate
 Steps
5
 Available languages
CSPLESDEITFRJA
Wrapping the cable bundle
Before we proceed further, we need to twist the textile sleeve. This will prevent the cables inside to slip out during the print.
Using your fingers gently twist the sleeve (not the cables) and create several wraps.
Twisting the sleeve will effectively shorten its length. In the next steps you might need to twist the sleeve slightly back to prolong it.
Connecting the extruder cable bundle
Slide the NYLON filament in the hole.
Make sure the filament isn't pushing into the motor cables, which would indicate it is too long and you need to slightly unwrap the sleeve and push the filament back.
Slide the sleeve in the holder at least 3/4 of the holder's height.
Again, ensure the filament isn't pushing the motor cables and if needed slightly unwrap the sleeve and push the filament up.
Use the Extruder-cable-clip and two M3x10 screws to fix the cable bundle in place.
Connecting the extruder cable bundle
Connect the cables from the extruder to the RAMBo board:
P.I.N.D.A. probe (v-cable, 4 wires)
Left hotend fan (v-cable, 3 wires)
Extruder motor (yellow label with "E")
Extruder heater
Extruder thermistor (yellow/green heat shrink, orientation does not matter)
Front print fan (red heat shrink, ensure that the red wire is closer to the extruder thermistor connector)
Filament sensor cable (use the correct row of pins in the connector and ensure the red and blue wires are facing the outside of the board) In the third picture, the RAMBo board is facing with the USB port towards you.
Finalizing the Einsy-case
For this step, please prepare:
M3x40 screw (1x)
Close the Einsy-door.
Make sure that no wire is pinched!
Tighten the M3x40 screw.
Hooray!
Hooray!
Congratulations, you've just upgraded the Original Prusa i3 MK2.5S 3D printer!
You're almost there... Just finish the chapter 5. Preflight check
Was this guide helpful?

Comments

Still have questions?

Still have questions?

If you have a question about something that isn't covered here, check out our additional resources.
And if that doesn't do the trick, you can send an inquiry to [email protected] or through the button below.

Contact us