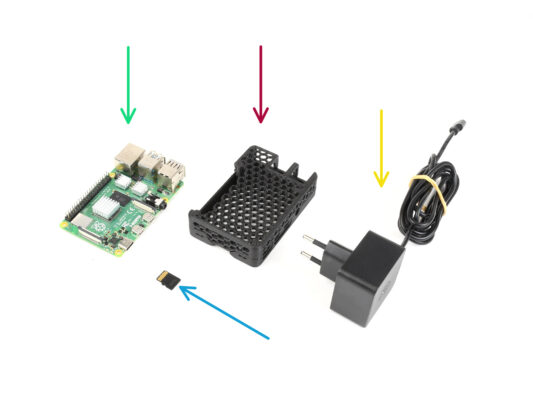
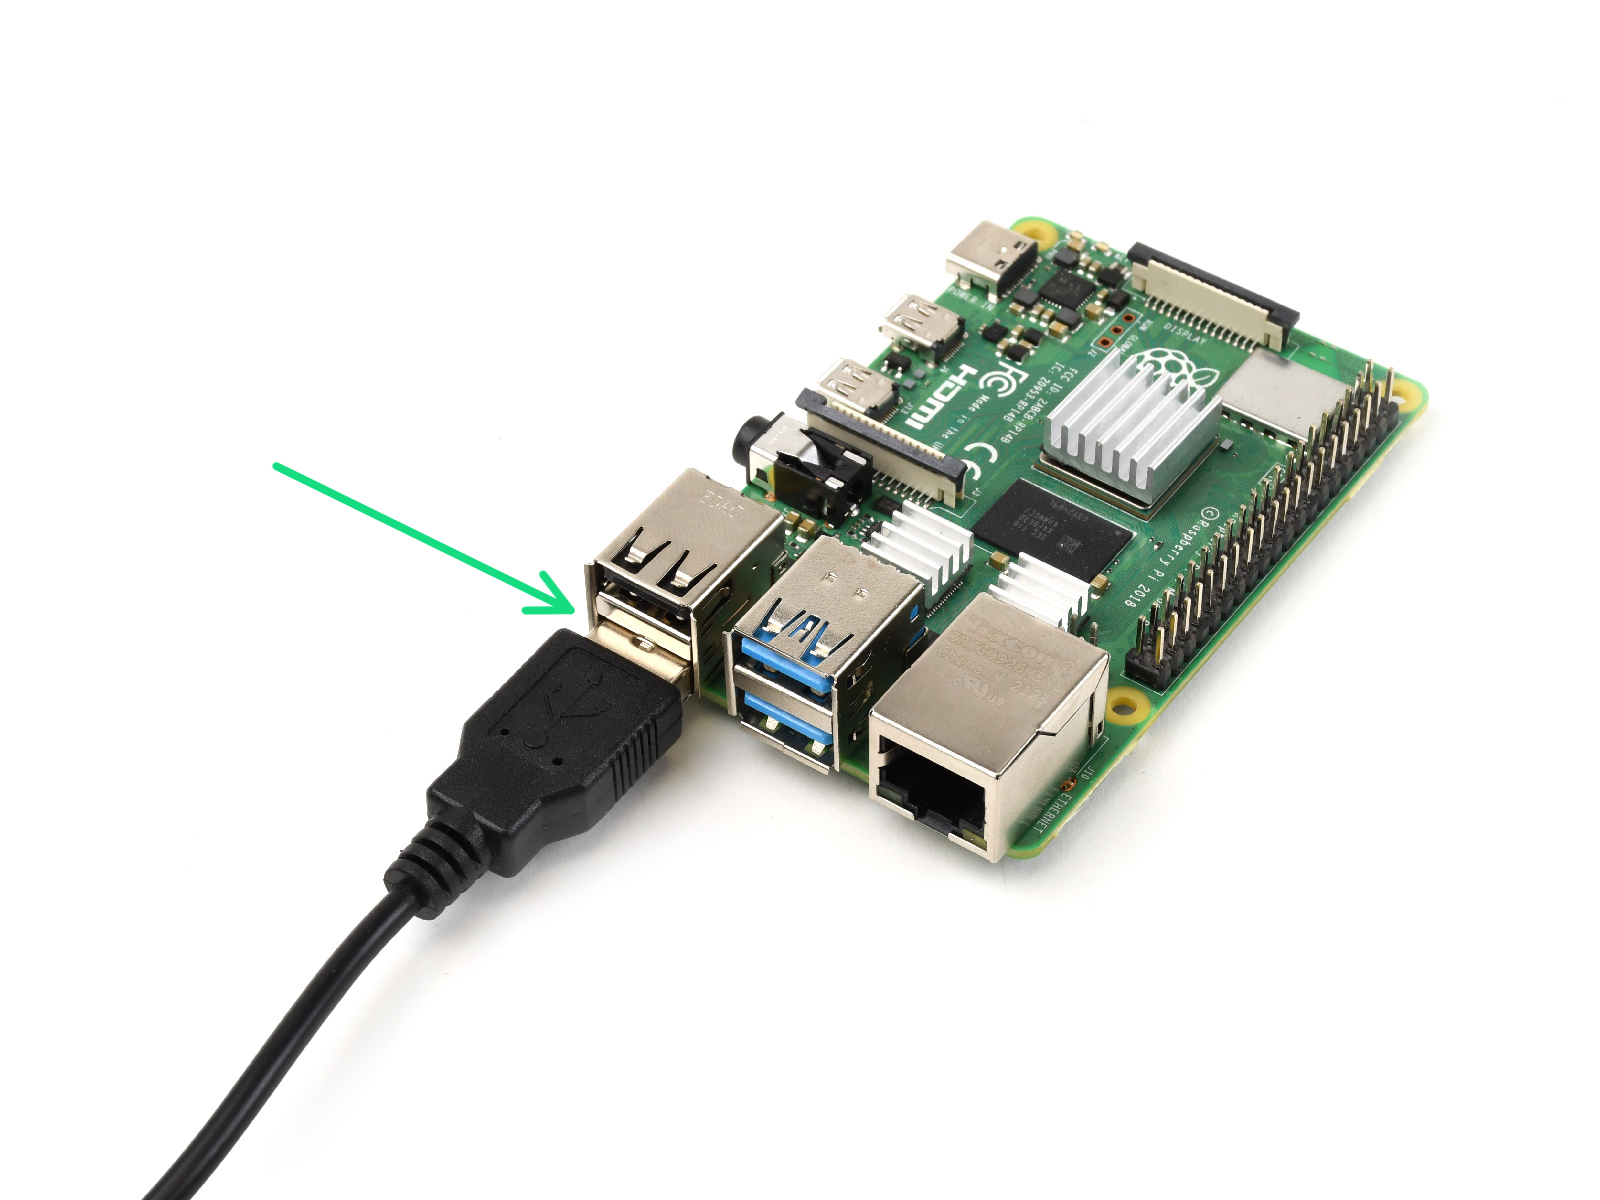
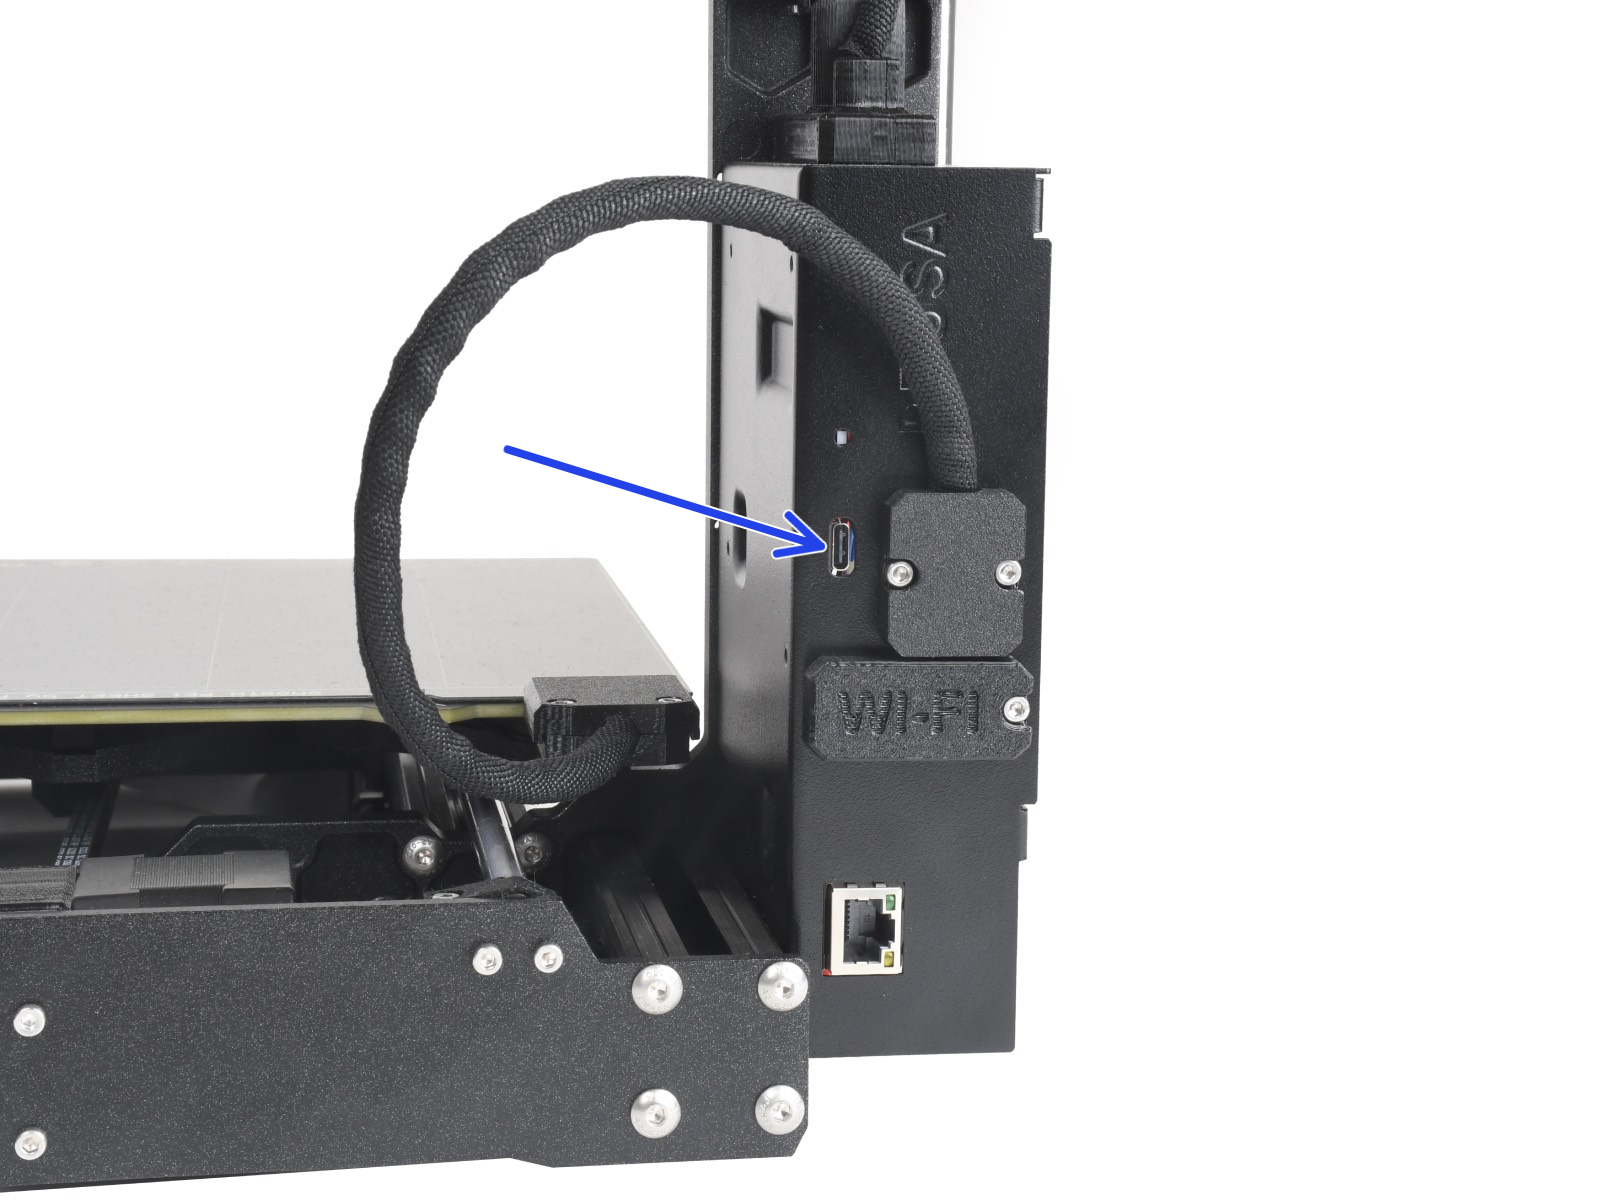
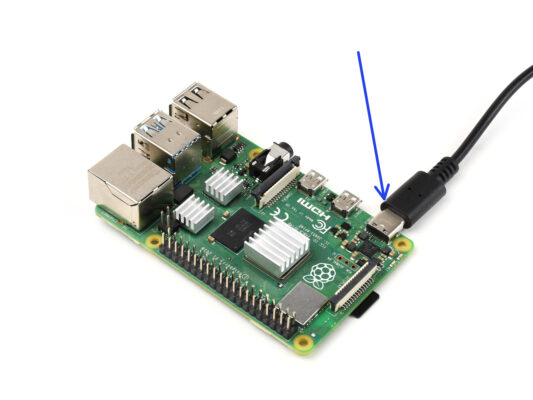
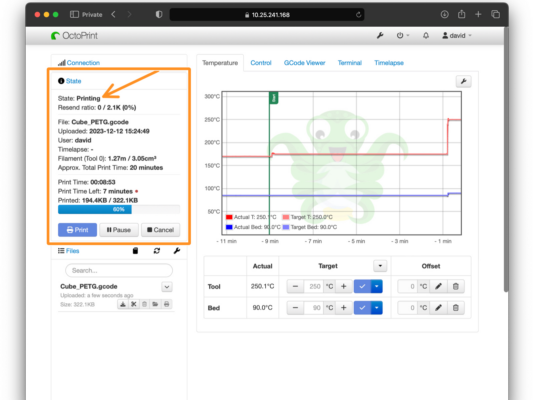
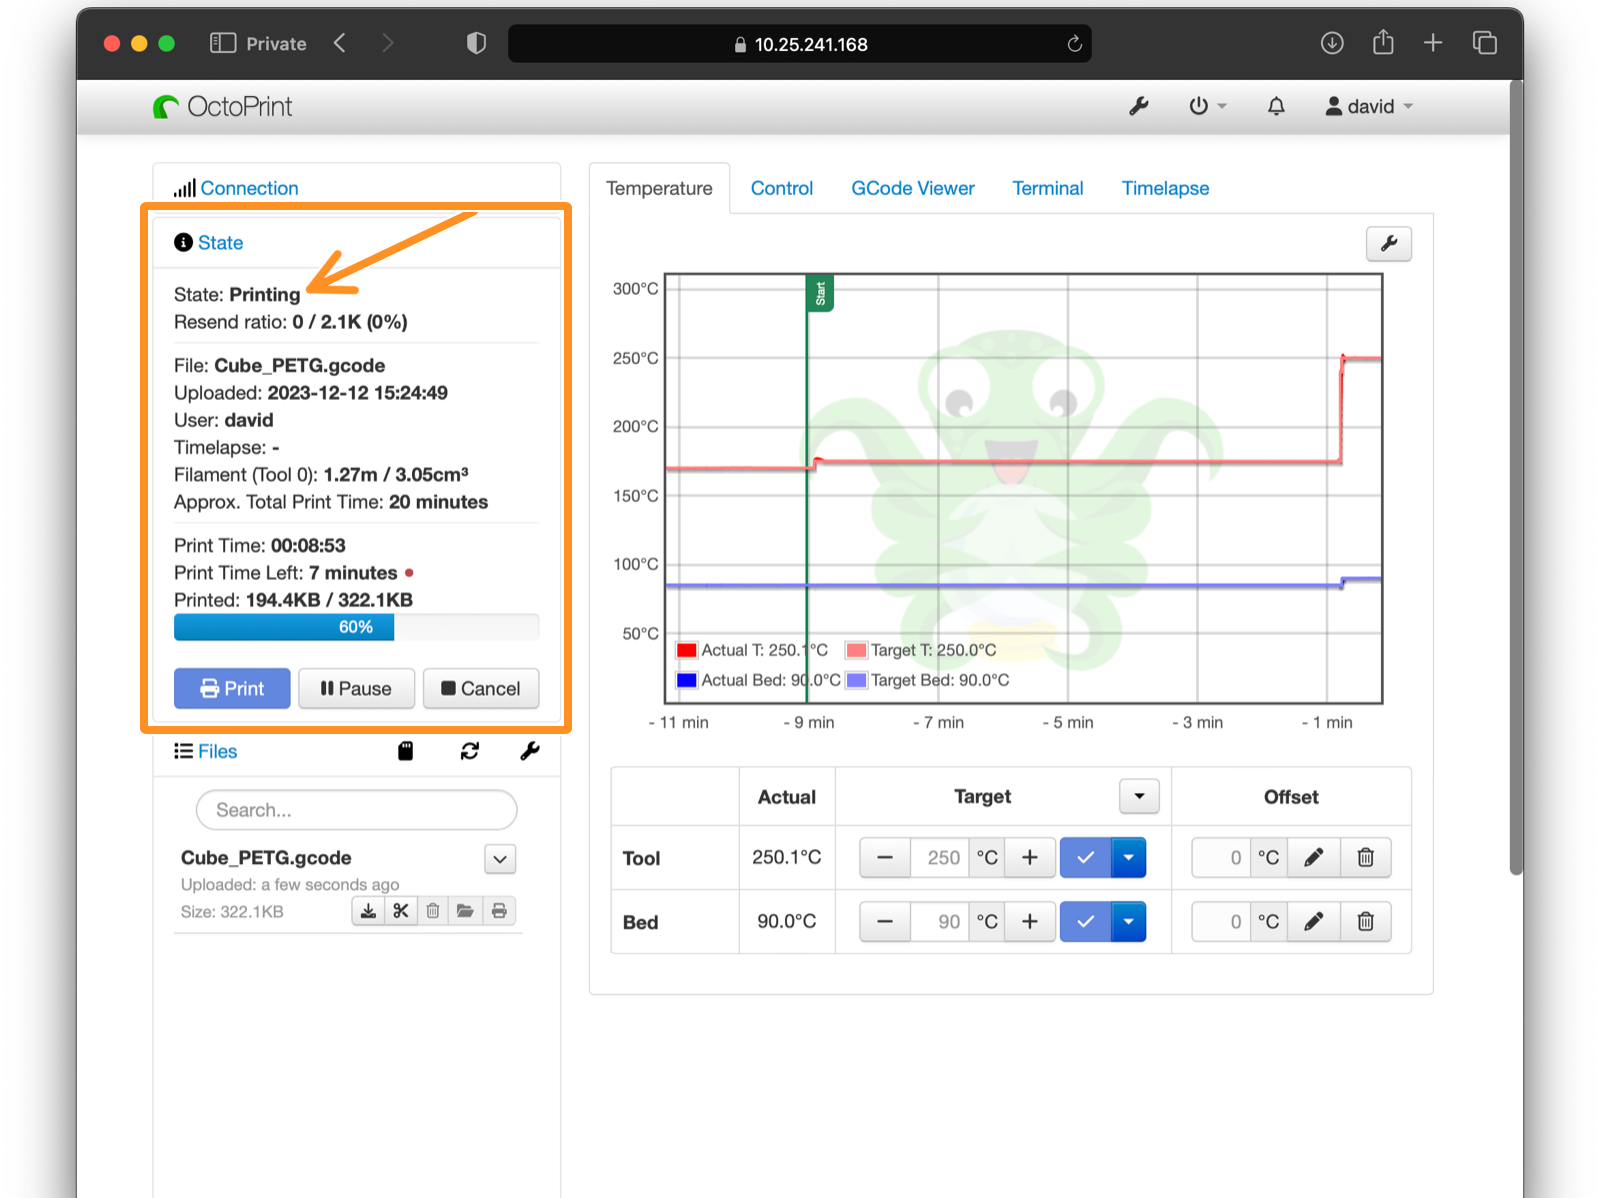
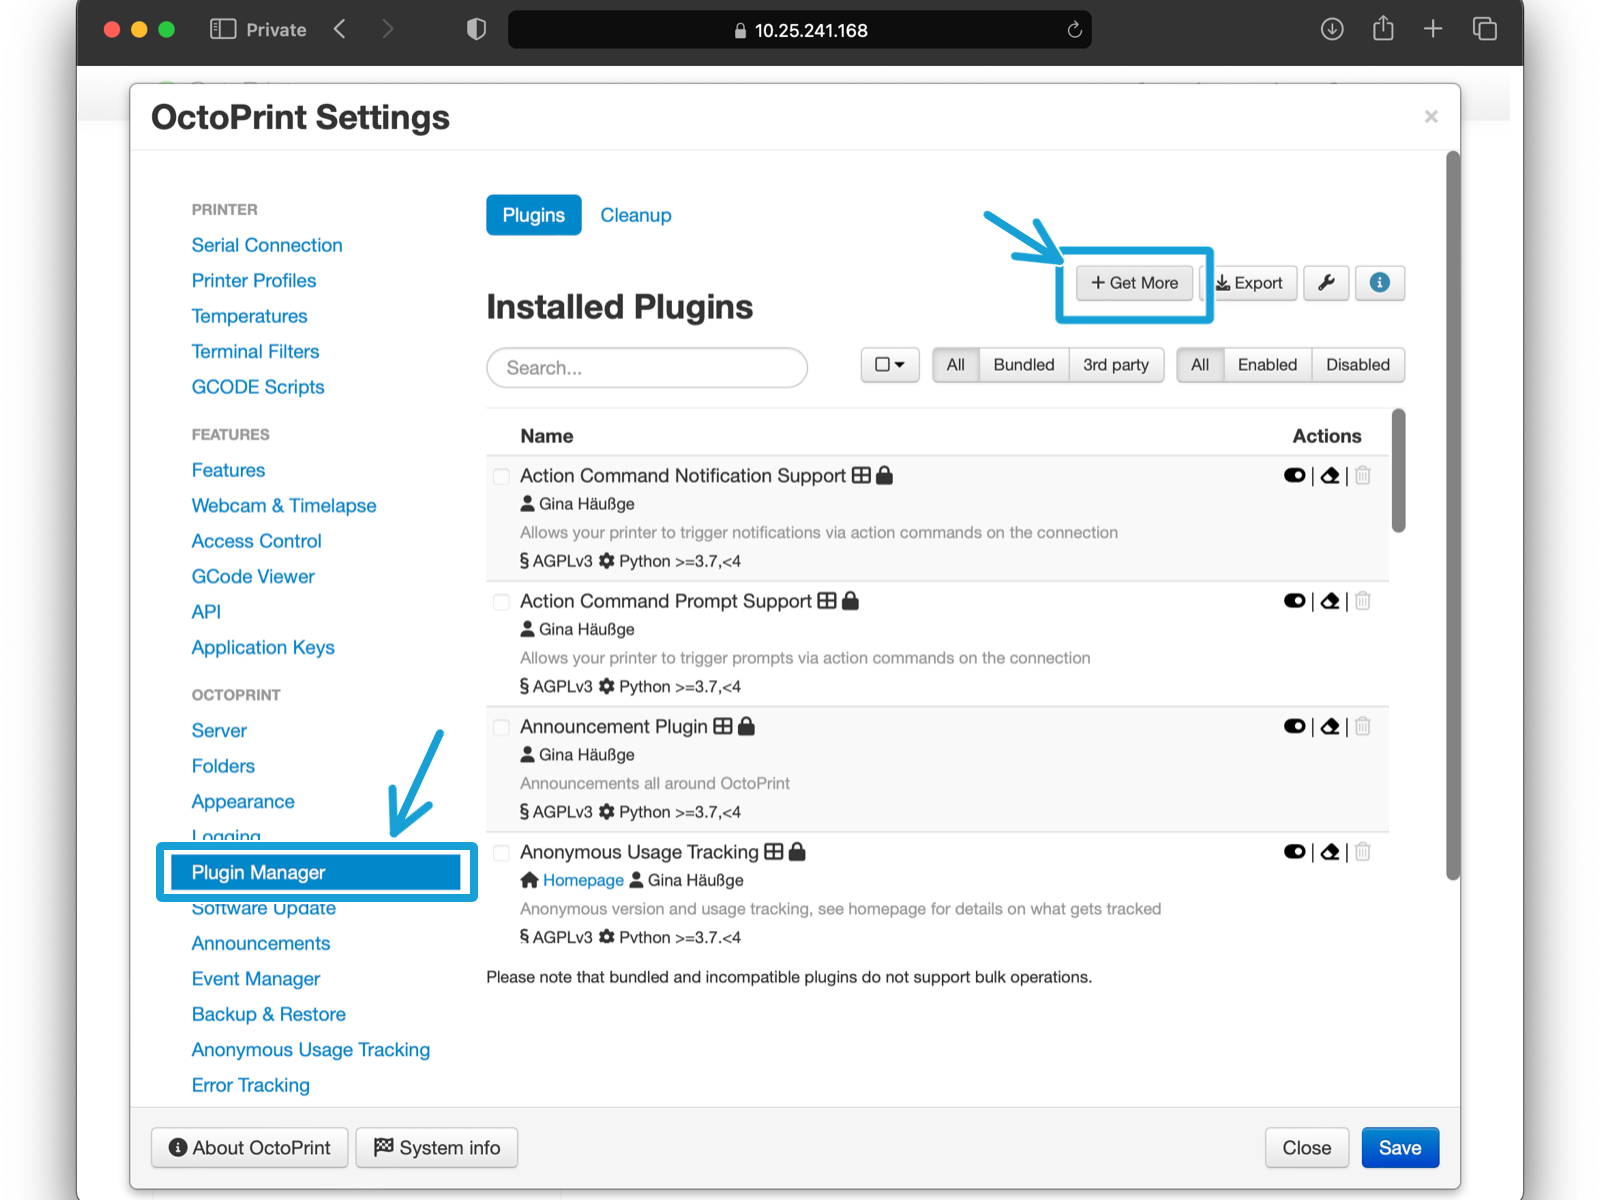
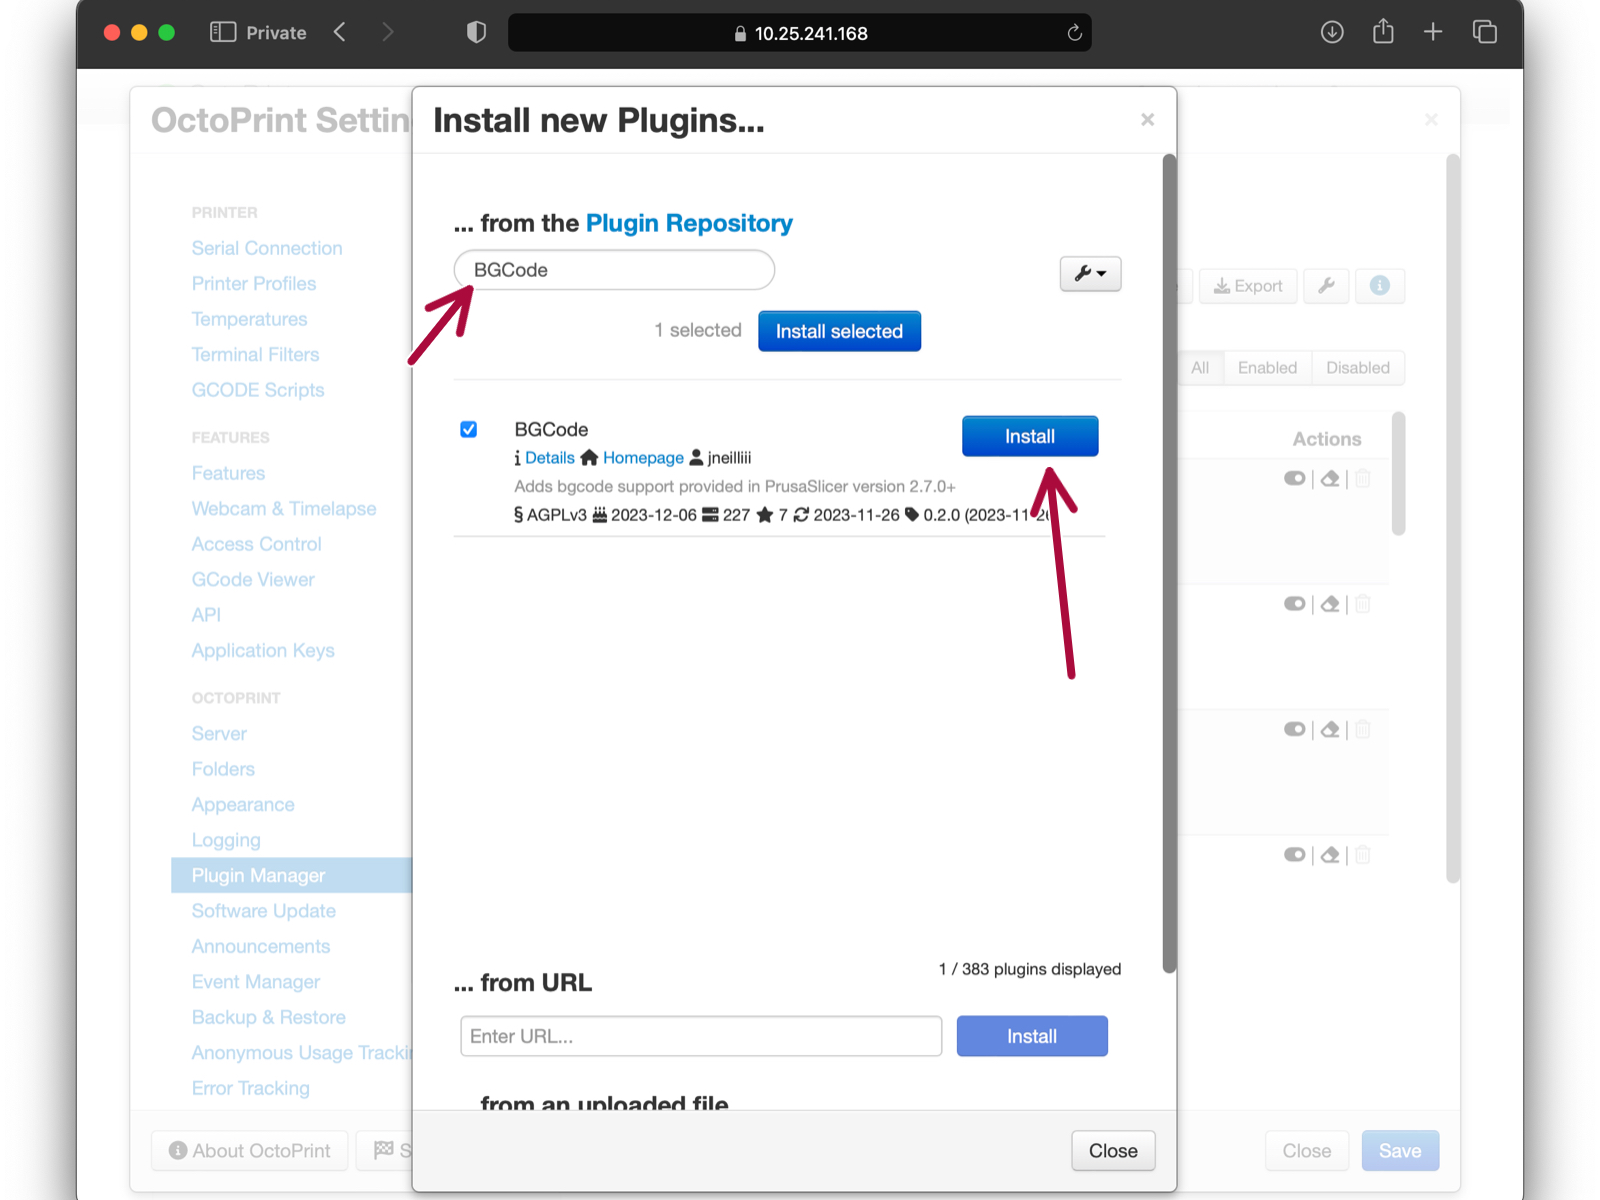
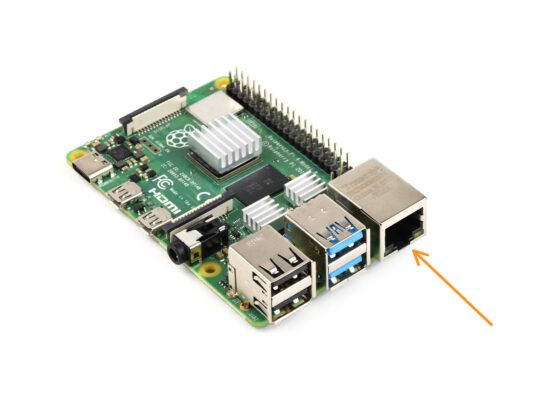
EN
  • Čeština
  • Español
  • Italiano
  • Deutsch
  • Polski
  • Français
Login

Octoprint setup on MK4/ MK3.9 / MK3.5 / XL

Octoprint setup on MK4/ MK3.9 / MK3.5 / XL

Octoprint setup on MK4/ MK3.9 / MK3.5 / XL
Relevant for:
Last updated 4 months ago
Octoprint setup on MK4/ MK3.9 / MK3.5 / XL
 Difficulty
Very difficult
 Steps
18
 Available languages
CSPLDEESITFR
Introduction
Introduction
Introduction
In this guide, we will get Octoprint running on the Raspberry Pi 4 board and connect it to your MK4 / MK3.9 / XL printer using USB.
Octoprint is a 3rd-party alternative to PrusaLink, the wireless printing solution.

Starting with Octoprint on other machines such as the MK2.5/S, MK3/S/+ or MINI/MINI+ is fairly similar with only a few minor differences such as the USB cable type required. (USB-B for i3 series and microUSB for MINI/+)

If you plan to use one of these printers instead, consider visiting the Octoprint configuration and install article instead.

This guide is intended for experienced users. Check About Octoprint article to learn more about the software.

Since we develop neither Raspberry Pi nor Octoprint, we are only able to provide limited support on its use. Also, connection-issues is more likely a configuration-error with your PI or home-router, which unfortunately is also not our field.
Parts preparation: Raspberry Pi
For the following steps, please get:
Raspberry Pi (RPi) model 3, 3+ or 4 board.
Raspberry Pi case of your choice. (you can for example print one from Printables.com)
Corresponding Raspberry Pi power supply (available on our e-shop). (Pi model 3 uses microUSB while the model 4 uses USB-C plug)
MicroSD card. (8GB or larger SDHC card, Class10, preferably a name brand one)
Preparing necessary software
Download and install Raspberry Pi Imager from raspberrypi.org/software
Open the Raspberry Pi Imager. Hit the CHOOSE OS.
Navigate to Other specific-purpose OS > 3D Printing
Click OctoPi and select a version. We recommend using the latest stable version.
Setting up the SD card in Pi Imager
Insert an empty micro SD Card into your computer.

Note that any data that might be present on the SD-card will be deleted.

Click CHOOSE STORAGE and select the micro SD card.
Setting up the SD card in Pi Imager 2
Hit the cog icon or press Ctrl+Shift+X (or Cmd+shift+X) to open the Advanced options menu.
You might be prompted to prefill the wifi password from the system keychain. Click Yes if you plan to use the same wifi network on your Pi.
You can set a hostname. Preferably, use a unique hostname for the given printer. - Use just plain text with no special characters.
A hostname will allow you to access the printer more easily by typing just http://OctoMK4.local into your browser instead of the printer's IP address.

Depending on your local network settings, the hostname might not work and you might need to use the IP Address instead.
Enable SSH and set the device username and password for additional security.
Setting up the SD card in Pi Imager 3
Scroll down to Configure wireless LAN ( Wi-Fi ) if you plan to use the wireless network.
Set the SSID (the name of the local Wi-Fi network you are using) and Password, if necessary.
Save the settings, hit WRITE and confirm formatting of the micro SD card.
Follow the instructions in the Pi Imager app only. Don't follow your operating system's notifications about the microSD Card and its formatting if there are any.
Inserting the SD card
After the Octoprint image has been successfully written onto the SD card, remove it from the computer.
Insert the microSD card with the image into the Raspberry Pi.
Install the Raspberry Pi into a protective cover.
Connecting the RPi to the printer
Take the USB-A to USB-C cable.
Connect the USB-A part into one of the USB ports on the Raspberry Pi.
Connect the USB-C part into the back of the electronics box on the printer.
Note that there is the MK4 printer shown in the picture. On the Original Prusa XL, there is a USB-C plug too, in the middle of the electronics box.
Powering up the Raspberry Pi
Turn on the printer.
Connect the Raspberry Pi power supply.
The RPi / Octoprint should now power on and connect to your local network.
The first start can take a while. Wait until it boots up.
Finding out the IP Address
In order to connect to Octoprint, we need to know either a Hostname you set earlier or know an IP address.
Since, the Hostnames ( <hostname>.local ) might not work on all local networks, you might need to find out an IP address using one of the following techniques:
Access you router’s control / setup page and find the IP address there.
Use a network scanner app such as Fing.

Plug in a monitor and a keyboard to the RPi.

Since, the OctoPi is essentially a Raspbian Linux distribution, you can log in and use the ifconfig command to find out the network details.

Without an SD card, the RPi will open up a BIOS-like screen on the monitor and show you the Ethernet MAC address. The MAC address can be used to find out the IP address of the device.
Octoprint Wizard setup
Insert the Hostname (<hostname>.local) or the IP address into your web browser and open it up as a webpage.
The Octoprint Wizard will show up.
Hit Next and continue to configure the required settings.
In the Access Control part, set up the Octoprint Username and Password.
Printer profile setup
In the Default Printer Profile part, set a name of your printer.
Proceed to Print bed & build volume tab.
Set the X, Y, Z build volume parameters to the corresponding values:
250, 210 and 220mm for the Original Prusa MK4 printer
360, 360, 360mm for Original Prusa XL
Select the Custom Bounding Box option.
Set the Y Coordinates Min. value to:
-5 for the Original Prusa MK4 printer
-8 for the Original Prusa XL printer
Finish the wizard.
Setting up special G-codes
Once you finish the Wizard and get to the Octoprint dashboard, open up the Settings by clicking the wrench icon on top.
Navigate to the GCODE Scripts section.
Edit these three items:
After print job is cancelled: M604
Note that this used to be M603 for MK3 (This used to be our custom gcode command). Meanwhile, Marlin introduced its own M603 that serves a completely different function. So, now the print job-cancelling gcode is M604 to avoid colision with the marlin's gcode.
After print job is paused: M601
Before print job is resumed: M602
Save the entered settings.
Connecting the Octoprint to the printer
Once back on the Octoprint dashboard, navigate to the Connection column. Select the Serial port your printer has been detected on.
Select a Baud rate (communication speed). The default value is 115200.
Hit Connect so that the Octoprint initialies a communication with the printer.
Uploading a G-code and starting a print
Navigate to the Files column.
Upload a G-code file you wish to print either by selecting or drag-and-dropping it.
Note that the space-efficient binary G-codes (.bgcode files) aren’t yet supported by the Octoprint without an extra plugin.
Find the G-code file on the list above and select Load and print icon to start printing it.
Printing using Octoprint
The printer should now start printing the file. The process can be monitored on the Octoprint dashboard.
The ongoing print manifests itself via this cute octopus image on the printer’s LCD and the corresponding SERIAL PRINTING screen offering you a basic control.
A few extra notes
A few extra notes

Please note that some of the printer’s functions might not work while using it with Octoprint: 

- Crash detection
- Power Panic functionality
- Info about Heat Absorbing process on the XL is not displayed; and its not possible to skip it.
- Multitool printing via octoprint.
- bgcode format
Octoprint is available on your local network only. Also, the IP Address is being assigned to it by your local router and might be changing in the future.
If you have suggestions you would like to share with fellow users such as tip for a useful plugin; feel free to leave a comment below, or start a discussion thread on Prusa forum at forum.prusa3D.com.

If Octoprint doesn’t suit your needs, feel free to check out the other solutions to wireless printing and printer control; PrusaLink and Prusa Connect.

Optional: Installing Plugins
You may want to install some plugins in order to fully utilise the Octoprint’s capability.
Open Settings > Plugin Manager and select + Get More
Search for a plugin and select Install.
Plugins that users frequently recommend:
- BGCode by jneilliii
Was this guide helpful?

Comments

Still have questions?

Still have questions?

If you have a question about something that isn't covered here, check out our additional resources.
And if that doesn't do the trick, you can send an inquiry to [email protected] or through the button below.

Contact us