Comment remplacer les pièces en plastique du CoreXY
Comment installer l'adaptateur de buse Nextruder V6 (XL mono-outil)
Comment remplacer la Prusa Nozzle (buse) (XL mono-outil)
Comment remplacer l'assemblage de la hotend (XL mono-outil)
Emballage de l'imprimante pour le transport - Matériel d'emballage d'origine (XL)
Comment remplacer la Prusa Nozzle (XL multi-outils)
Comment remplacer un moteur de l'axe Z (XL)
Emballage de la XL multi-outils pour le retour - Matériel d'emballage d'origine
Comment remplacer une tuile du plateau chauffant et un câble de tuile du plateau chauffant (XL)
Comment remplacer un ventilateur d’impression (XL mono-outil)
Comment réparer l'erreur du plateau modulaire (solution HW)
Comment remplacer les écrous trapézoïdaux (XL)
Comment nettoyer le capteur de filament latéral (XL)
Comment changer le xLCD et câble du xLCD (XL mono-outil)
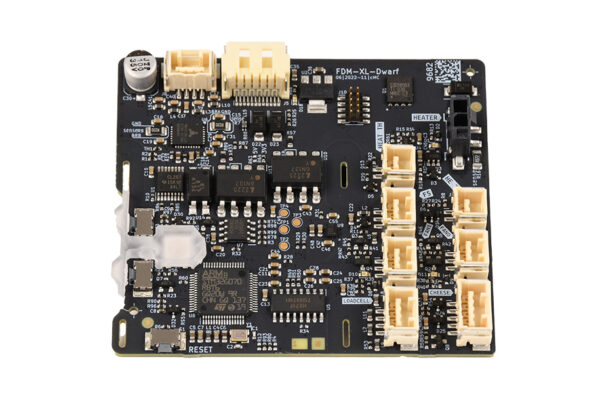
Comment remplacer une carte Dwarf (XL multi-outils)
Comment remplacer le dissipateur thermique du Nextruder (XL Multi-Outils)
Comment remplacer une carte Dwarf (XL mono-outil)
- Commencer l'assemblage
- Introduction
- Outils nécessaires
- Déchargement du filament
- Protection du plateau chauffant
- Retrait des caches
- Déconnexion des câbles
- Retrait de la carte Dwarf
- Assemblage de la nouvelle carte Dwarf
- Connexion des câbles
- Connexion des câbles
- Connexion du câble principal
- Remontage des caches
- Vérification finale
- C'est fini
Comment remplacer l'assemblage de la Hotend (XL multi-outils)
Comment remplacer une thermistance de hotend (XL mono-outil)
Comment remplacer un rail linéaire sur l'axe Z (XL)
Comment remplacer un insert de profilé (XL)
Comment remplacer le ventilateur de la hotend (XL Multi-Outils)
Comment remplacer un bloc d'alimentation (XL)
Comment remplacer un élément chauffant de hotend (XL mono-outil)
Comment lubrifier les broches du coupleur sur Original Prusa XL (Multi-Tool)
Comment remplacer le tch-profile-insert (XL)
Comment remplacer la Carte Sandwich (XL)
Comment remplacer la bande de caoutchouc sur l'Original Prusa XL (Multi-Outils)
Comment remplacer le CoreXY Cover Rear (Original Prusa XL)
Comment installer l'adaptateur de buse Nextruder V6 (XL Multi-Outils)
Comment remplacer un moteur de l'axe XY (XL)
Emballage de l'Enclosure XL pour le retour - Matériel d'emballage d'origine
Comment changer la courroie (XL)
Comment remplacer le cache du connecteur du câble principal (XL)
Comment remplacer le PDU splitter (XL)
Comment remplacer le ventilateur d'impression (XL multi-outils)
Comment remplacer les écrous trapézoïdaux (XL)
Comment lubrifier les rails des roulements linéaires (XL)
Comment changer le xLCD (XL)
Comment installer une caméra Buddy3D
Comment remplacer le dissipateur thermique du Nextruder (XL Mono-outil)
Comment remplacer un Nextruder (XL mono-outil)