EN
  • Čeština
  • Español
  • Italiano
  • Deutsch
  • Polski
  • Français
Login

7. Preflight check

7. Preflight check
Relevant for:
Last updated 2 years ago
7. Preflight check
 Difficulty
Very easy
 Steps
8
 Available languages
CSPLDEESITFR
SuperPINDA sensor height adjustment
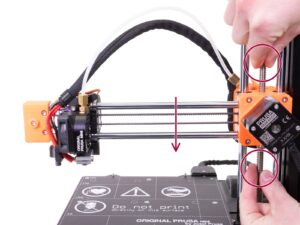
Using your fingers turn the lead screw and move the entire X-axis down. Stop when the hotend touches the heatbed! Avoid bending the heatbed!
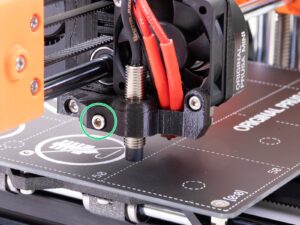
Release slightly the screw on the MINI-minda-holder so you are able to adjust the position of the SuperPINDA sensor.
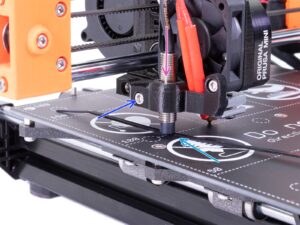
Take a zip tie from the package and place it under the SuperPINDA sensor. Use the middle part of the zip tie, not the tip.
Gently press the SuperPINDA sensor down against the zip tie.
Tighten the screw on the MINI-minda-holder. Do not use excessive force. Otherwise, you can break the printed part!
Rotate the lead screw manually in the opposite direction to move the axis at least 5 mm up.
Finalising the assembly
For the following step, please prepare:
PEI MINI+ sheet (1x)
MINI+ power supply (1x)
Older units may have a slightly different look of the PSU. However, the functionality is the same.
Connecting the power supply
Connect the MINI+ power supply to the printer. Keep in mind the connector isn't symmetrical.
Remove the protective film from the display.
Place the PEI MINI sheet on the heatbed. Double-check it is oriented correctly.
Finalizing
Finalizing
Now, please read the 3D Printing Handbook, which is tailor-made for your printer and follow the instructions to set up the printer properly. The latest version is always available at prusa3d.com/3dhandbookMINI
Use the bundled test prints on USB flash drive to ensure your printer works correctly.
Printable 3D models
Printable 3D models
Read the chapter Printing in 3D Printing Handbook.
Congratulations! You should be ready to print by now ;-)
You can start by printing some of our test objects bundled on the included USB stick - you can check them out here prusa3d.com/printable-3d-models
It works! Reward yourself.
You did a great job! Now you can relax, take your last dose of sweets and plunge into the endless fun of 3D printing :).
Eat the remaining gummy bears.
Join Printables!
Join Printables!
Join Printables!
Join Printables!
Don't forget to join the biggest Prusa community! Download the latest models in STL or G-code tailored for your printer. Register at Printables.com
Looking for an inspiration on new projects? Check our blog with weekly updates.
If you need help with the build, check out our forum with great community :-)
All services share one account.
Was this guide helpful?

Comments

Still have questions?

Still have questions?

If you have a question about something that isn't covered here, check out our additional resources.
And if that doesn't do the trick, you can send an inquiry to [email protected] or through the button below.

Contact us