Starting from firmware 3.12.0, the Original Prusa MK3/S/+ has Thermal model protection. This results in better operation when dealing with thermal errors.
How it works
During the print, the printer is constantly comparing the temperature measured by the thermistors to a thermal model of what is expected from the printer. In case the measured temperature does not follow the model, the printer will beep and show the warning THERMAL ANOMALY, but the print will continue. If the anomaly disappears the warning goes away after 20 seconds. In case the anomaly continues, the printer will turn off the heating and activate an error. If you choose to continue the print after it stops, it is recommended to stay near the printer.
This will help in cases where the temperature issue is temporary, like when a window is opened near the printer. Also, in case the printer has a blob that wraps around the hotend, the thermal model should be able to stop the print before any damage is done to the hotend cables.
If you're interested in further details of how the thermal model works, check the Dev diary blog.
Calibration
When installing the new firmware, the printer will start the calibration. In case it does not go in the printer menu to Calibration -> Temp Model cal. It takes around 12 minutes, after which your printer profile is automatically saved.
The Thermal model also works for third-party components. Note that if you switch components in your printer often, the Thermal Anomaly error might start to appear more often. If this happens, run the calibration again.
Troubleshooting
In case the Thermal anomaly message keeps showing, try the following steps.
A visual inspection
- Make sure that the hotend is perfectly inserted in the extruder. Make sure the heatsink is slotted into both slots, the short side of the heaterblock is facing forward, with its wires running back alongside the left side of the heaterblock.
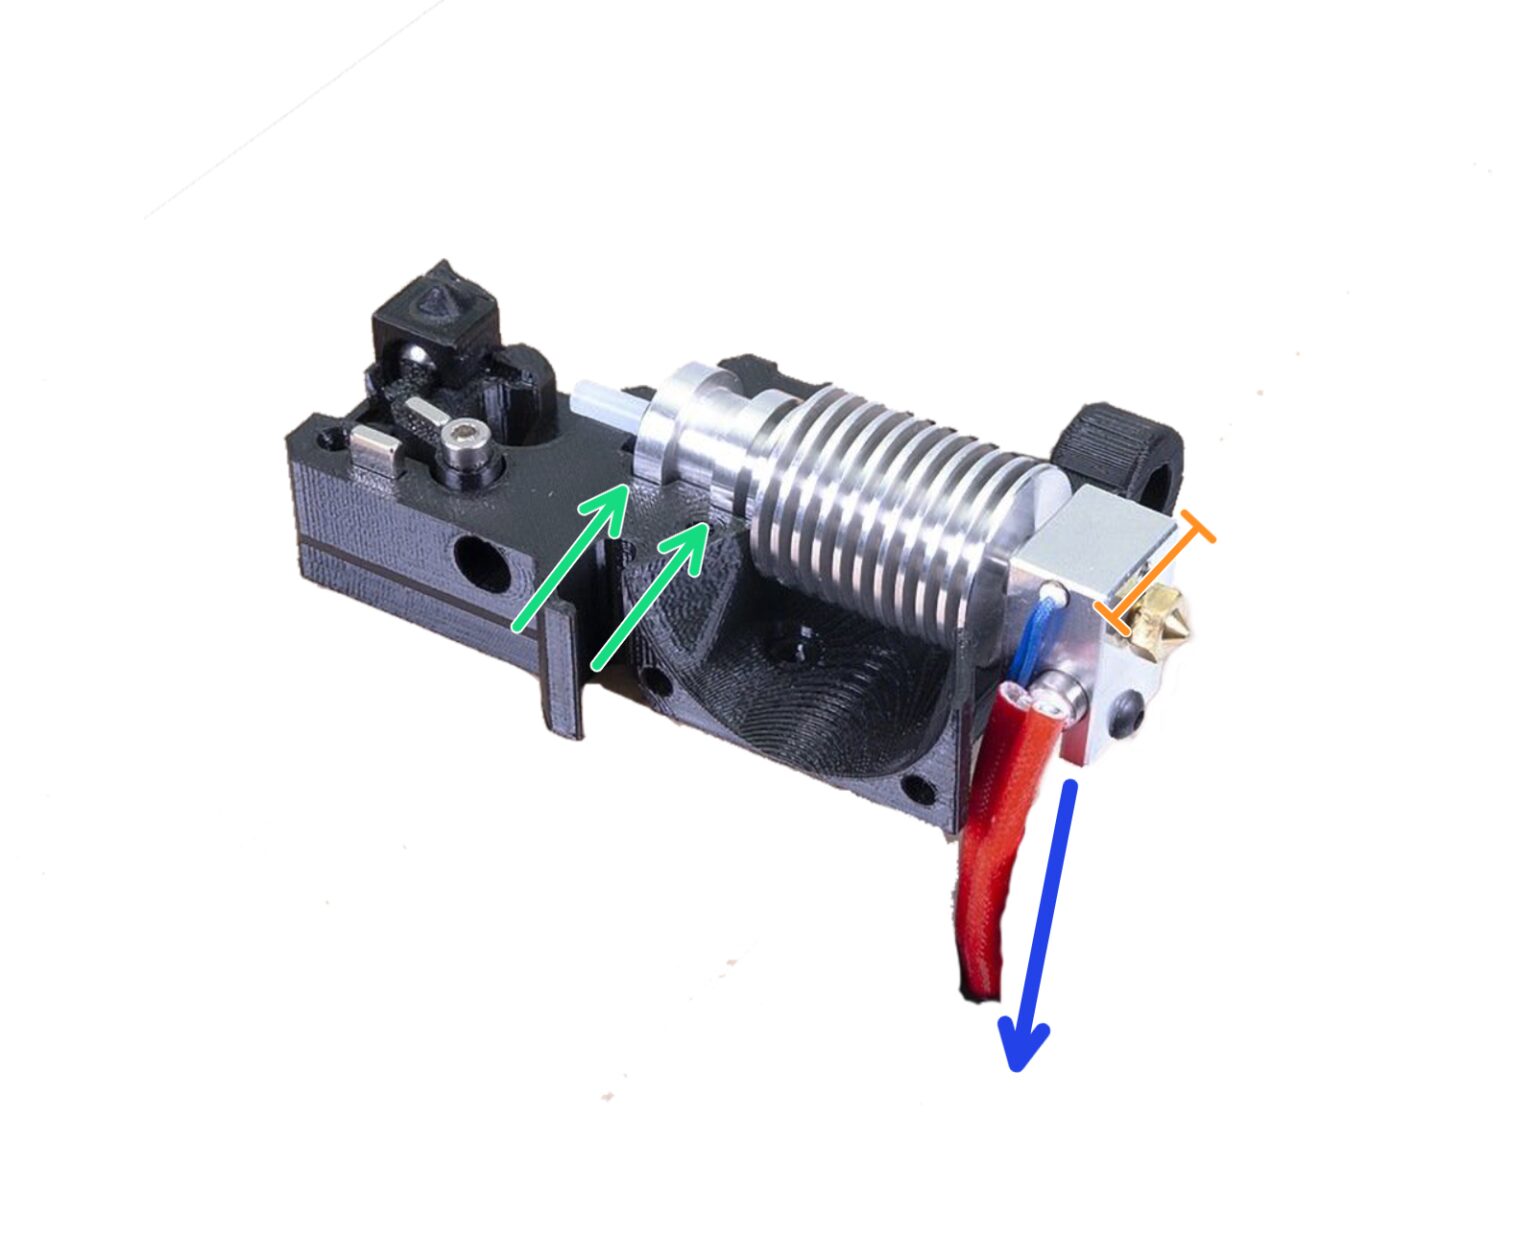
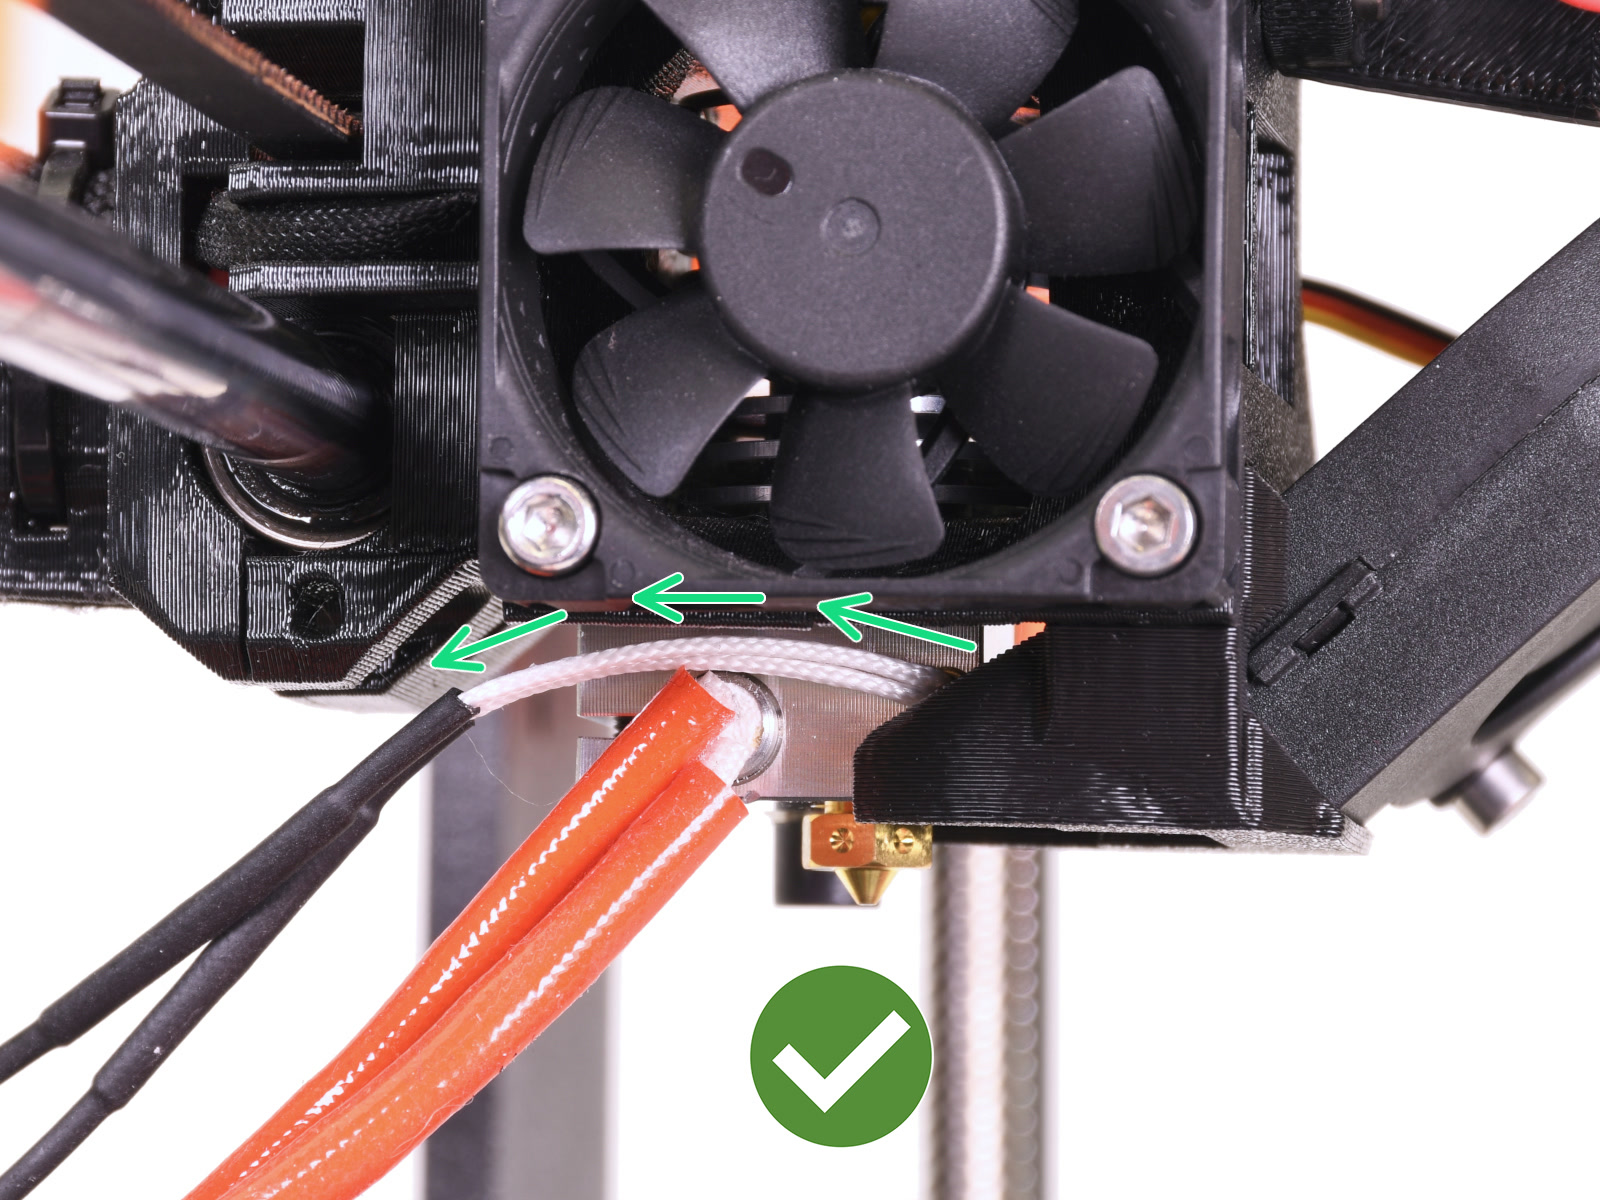
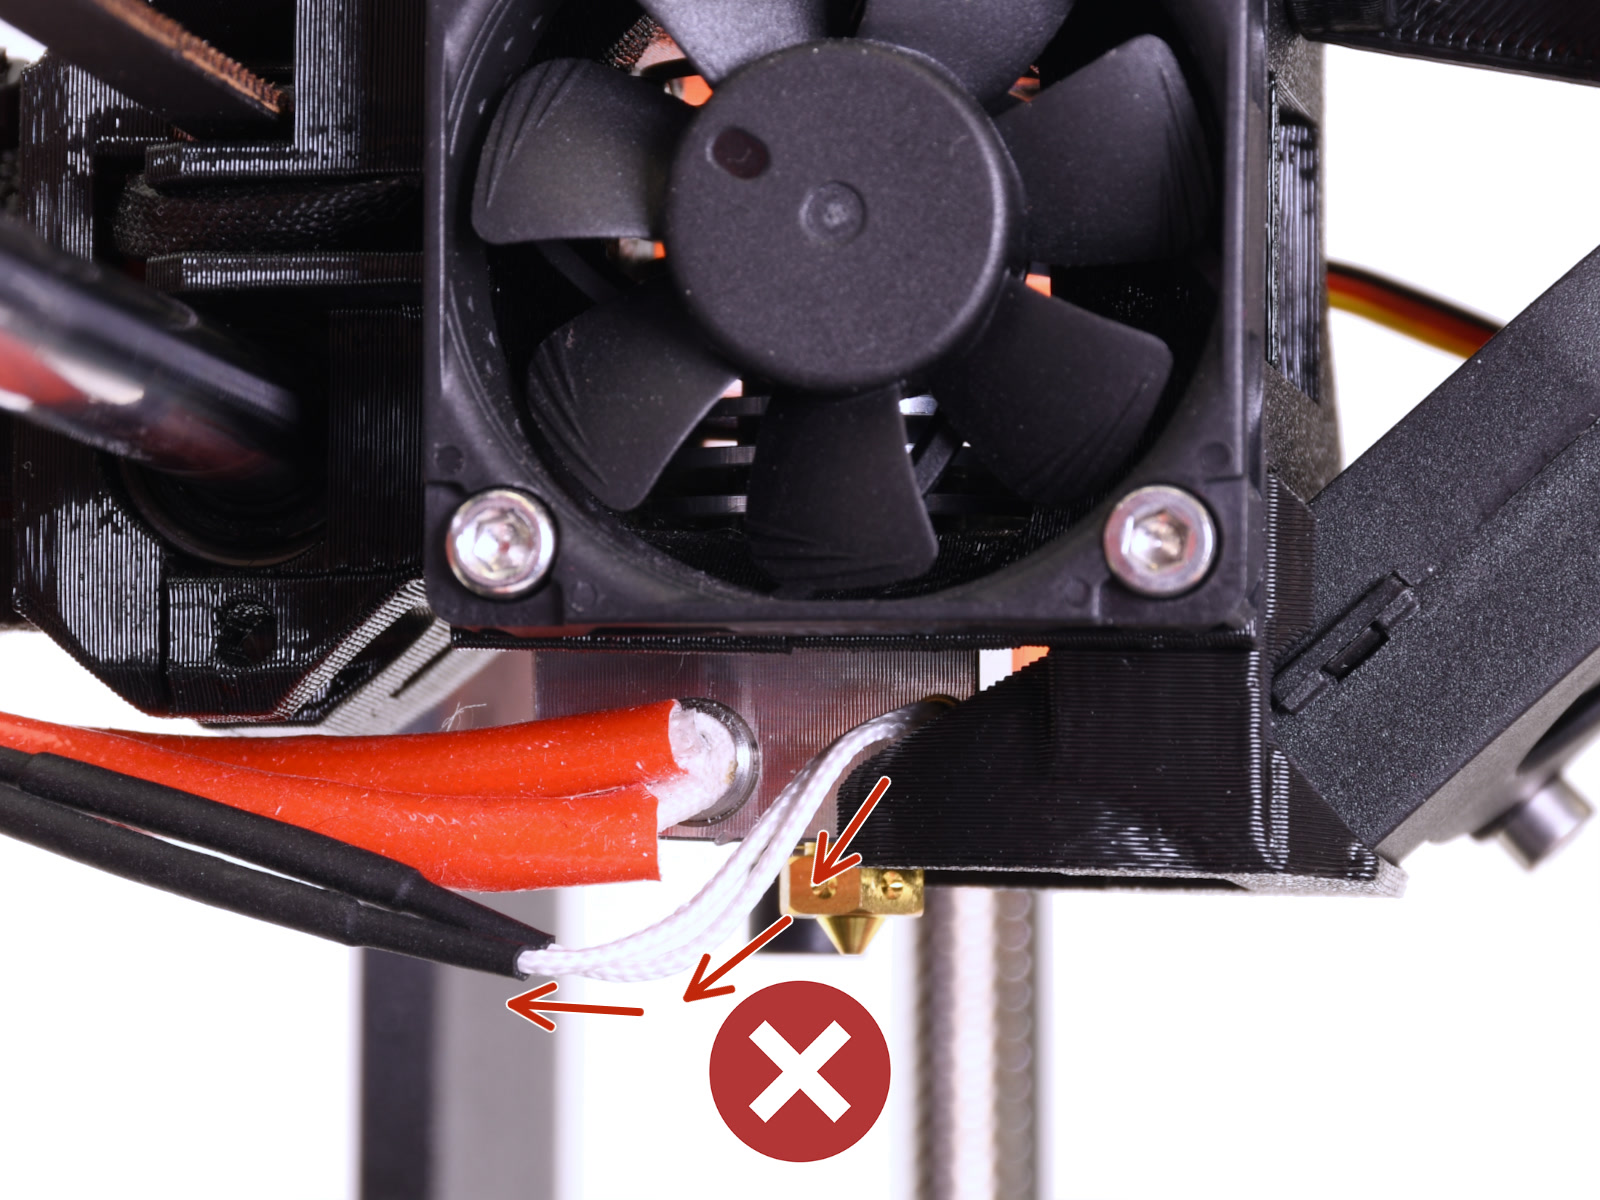
- Inspect the hotend thermistor and hotend heater for any visible damage, especially on the part closest to the heaterblock. Make sure the hotend thermistor cables are going above the heater cables.
- Inspect the nozzle position compared to the rest of the hotend. There must always be a gap (~0.5 mm) between the nozzle and the heater block. The nozzle must be tightened and secured in the heater block, and is locked against the heatbreak while heated. Among other issues, such as filament leaking, an incorrectly positioned nozzle can cause thermal anomalies. For more details on nozzle installation, please check the dedicated nozzle replacement article.
- Inspect the heaterblock, especially its lower part. To raise the print head, navigate to LCD Menu -> Settings -> Move axis -> Z. Filament residue on the heaterblock is a cause for thermal anomalies. To clean it, heat the nozzle for 5 minutes, then disable heating by pressing the Reset button. Immediately after that, use a small brass brush to clear away any old plastic stuck on the nozzle and heater block. Be extra careful around the hotend heater and thermistor wires, avoid touching them with metal tools, as there is a risk of damaging them irreversibly.
PID tuning followed by another temp model calibration
- Perform a PID tuning, using the temperature you use most often for printing.
- In the printer menu, navigate to Calibration -> Temp Model cal., and perform the calibration again.
Measuring resistance with a multimeter
It is possible to test the hotend thermistor, and hotend heater resistance values using a multimeter. Please check the dedicated guide for multimeter usage.
At room temperature, the hotend thermistor should have a resistance in the range of 80 kΩ - 125 kΩ.The hotend heater has an expected resistance in the range of 12.3 Ω - 15.1Ω.
Limitations
Since the thermal model was developed on a model of a factory-assembled extruder, it may not work correctly on some modified or after-market extruders.
If you experience issues during the calibration process, start the process described in Crash dump (MK3/S/+, MK2.5/S), and after the logging starts, reset the printer and enter the sequence:
In case you run into issues during the printing process, use the process described in Crash dump (MK3/S/+, MK2.5/S), and after the logging starts run the sequence:
Disabling the Thermal model protection
The thermal model protection can be disabled by connecting the printer to your computer (Octoprint, PuTTY...), and sending M310 S0. An additional M500 will save the setting and the Thermal model protection will remain disabled after the next restart.
31 comments
I have changed multiple hotends and thermistors even heads I know to be good. All give the same problem.
When I preheat to 215 (anything above 170 will give the problem) then at about 170 to 180 degrees the preheating aborts with a thermal anomaly.
At room temperature the thermistor indicates a temperature corresponding with room temperature so that seems fine.
However, if I turn of the thermal model with M310, then I CAN get the head to heat up to 215 degrees. BUT the temperature in fact is much higher because the filament is liquid and smoking.
Clearly the thermal model is indeed detecting something is not correct and it appears as though at higher temperatures the thermistor is reporting lower temperatures than the hoteind is in fact at.
I have no idea why, all plugs, cables connections in heaterblock and so on have been checked and some of the complete hotends were working just fine.
What caused the problem to start off with was a failed print that made a blob I had to remove using a soldering iron. I damaged the thermistor during removal (electrically or mechanically) and since then have been having this issue.
Is my einsy board damaged? Does anyone have any tips?
I ordered a new hot end assembly, and it turned up quickly. Fitted it and the machine recalibrated first go. Did a couple of test prints and a 36 hour print. I have noticed that the back part of the extruder surround has melted slightly, so the pid sensor is not sitting parallel to the print plate. Also the hot end when printing does not hold a steady temp as well as it did, occasionally going 15C out of range. The print still looks good.
Ik heb de PID op verschillende temperaturen gezet maat ook dat help niet. Ik kan niet meer verder. Ja zolang ik niet boven de 220 graden ga kan ik nog printen.
I think Prusa deliberately put a bug in it so that you can't go any further and have to buy a new one????? I have renewed everything and still a THERMAL ANOMALY.
I have set the PID to different temperatures but that doesn't help either. I can't go any further. Yes, as long as I don't go above 220 degrees I can still print.
I am going to make more test with different high temperature fillaments and will get back to you with new results
Hello, thank you for your comment and for the detailed feedback. With this aspect of print fan speed, it's also possible that there might be a very slight issue with the positioning of hotend components, or it's possible that the fan shroud might be pointing too much toward the heater block (the cool air should point towards the print, not the block), which could be also due to a misshape on the fan shroud.
This doesn't fully exclude some other possible hardware causes or at least contributors, for example on hotend thermistor, hotend heater, or the combination of the two, or possible residue on heater block.
I'd recommend checking these aspects in more detail with our Technical Support, that way we can better evaluate it on your specific printer with pictures and videos and tackle the specific cause.
I think you are right, cause I faced error even at 260 degrees during one of the test. But it was only one error during 4 hoursIn the same time I have no any issues with low temperature PETG, its printing well without errors.
Also last time I faced error - temperature was stable, so visually it was really strange
I will contact Technical Support, thanks
Here's a list of things to check + try/consider (MK3S+):
Firmware - Check your firmware version and make sure it's the current one (https://help.prusa3d.com/downloads) --> update firmware to the latest version This seems to have helped some folk. Downgrade to a pre-13.10.X version. This seems to have helped other folk.
Wiring. Check the wiring. Turn on "Preheat" then gently move the wires in textile wrap that run from the hot end to the Einsy door. If the get an error and wild fluctuations in temp, it's probably wiring. -->
Sleeve) Open the textile sleeve and see that all wiring is intact. Try rearranging it and replacing the sleeve.
Hotend wiring) Take off the cable ties, arrange the 4 hotend wires exactly like shown in Step 14 (https://help.prusa3d.com/guide/how-to-replace-a-hotend-mk3s-mk3s_161575). Note especially i) how the wires sit in the groove of the cable holder, ii) length of wire exposed before it is wrapped in the sleeve and iii) spacing of the two red hotend wires on the side of the hotend.
Einsy box wiring) Check that the sleeve bundle is correctly installed as in Step 15 (https://help.prusa3d.com/guide/how-to-replace-a-hotend-mk3s-mk3s_161575). Or try without the holder altogether.
Hotend. Visually inspect the hotend like it matters. Check the hard-to-see spots for anything --> Clean the hot end very thoroughly. Use a microfibe cloth or toothbrush (when cold). Use cardboard or a brass brush (when hot).
Calibrations. Once done, do all the calibrations to jiggle the wires. Self test, belt test, PID calibration, thermal model calibration - do them all.
the way how i try it is just as you discribed. preheat - move the cables - had anomaly. reinstal the sleeve and everything was ok again.