Filament grinding, which is accompanied by a “clicking” or "squeaking " sound coming from the extruder, usually happens when the extruder gears are unable to push the filament further towards the nozzle. Over time, the gears grind away the filament, until they can’t grab it anymore.
The clicking sound means that the stepper motor is having to suddenly exert more force than a specific preset threshold and it's jumping back by one or more steps (skipping) to relieve the pressure. It can be a mechanical issue, electrical issue, software issue, jammed/clogged hotend, or a combination of this.
Possible causes
Slicing
Slice the model again using the latest version of PrusaSlicer and its filament presets. Also, see if the 3D model is not corrupted or incomplete.
Try to increase the hotend temperature (Filament settings -> Filament -> Temperature °C) by 5 - 15 °C. It is important to make sure the temperature is corrected for the filament being printed. You can check our Extensive Material table to confirm your settings.
First Layer calibration
Having the first layer calibration set too close can eventually cause a clogged hotend. Make sure you have it set just right, as instructed in First Layer Calibration (i3) and First Layer Calibration (MINI/MINI+).
Idler tension
Make sure that your extruder idler is properly tightened. If the extruder idler screws are overtightened, the gears will not push the filament properly. Try to loosen (or tighten) the extruder idler screw(s) (with the spring). Their tension must be accurate (neither too tight nor too loose). Please see Idler screw tension for how it should be on your printer.
Drive gears alignment
Double-check the alignment of both extruder gears. Both of them must be aligned with the opening above and with the PTFE tube below so that they can properly feed the filament into the hotend. Make sure the gear on the extruder motor shaft is tightened by its grub screw against the flat part of the motor axis.
Please see Checking/re-aligning the Bondtech gear (MK3.5/S, MK3S/+, MK2.5S) for more information regarding the MK2.5/S and MK3/S/+ or this article for the Original Prusa MINI/MINI+.
Dirty extruder gears
- Make sure that your extruder gears are clear of any leftover plastic. You can clear the plastic with a sharp corner of pliers or with a durable pin.
- Make sure the gears are turning freely
- Check if the motor gear is aligned and tightened with the grub screw against the flat part of the motor axis
Please see Checking/re-aligning the Bondtech gear (MK3.5/S, MK3S/+, MK2.5S) for more information regarding the MK2.5/S and MK3/S/+ or this article for the Original Prusa MINI/MINI+.
Jammed PTFE tube
While checking the extruder gears, take a look at the PTFE tube as well and make sure there is no debris in it that would prevent the filament from being loaded properly. To inspect the PTFE tube, open the extruder idler door. For more information, please see Removing filament from extruder manually.
Hotend assembly
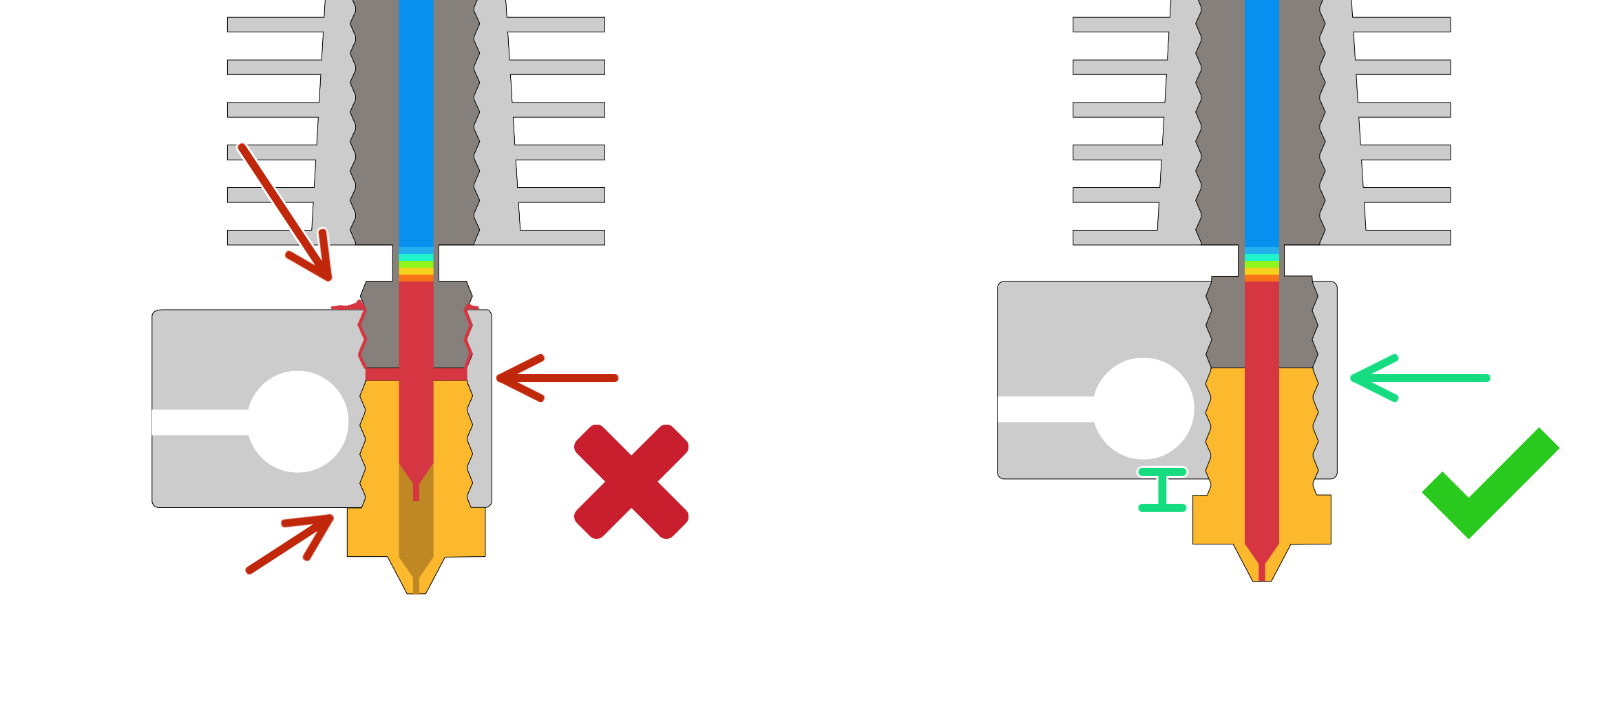
Verify, whether the nozzle is properly assembled into the heater block:
- See if the heater block and the nozzle are not crooked.
- Is there a space of 0.5 mm (0.02 inch) between the nozzle head and the heater block as it should be?
Clogged hotend
Please follow this article to clean your hotend, as the hotend might be clogged. If you don't manage to clean the clog, you would have to take out the hotend from the extruder, disassemble it completely, clean it thoroughly and apply some extra thermal paste on the heatbreak before assembling the hotend back together.
24 comments
I have had the clicking sound start during a recent print of support arms I am designing for an antenna. I have to make several prints as I need 8 supports and they fully use the print bed. The clicking seemed to occur when the print head was quickly shuttling in short runs and when it would change directions while extruding. I followed all the suggestions to the letter. It still did not help. Then while inserting the filament I noticed that the filament seemed prestressed with a lot of twisting energy. This was a brand-new spool of filament of a filament brand and color I have used for many months in the past and expended at least 2 full spools. The filament would unspool and quickly get a twist going. I could not seem to spin the spool enough to relieve the inherent stress. I replaced the spool with another brand of filament, and it printed perfectly with no clicking. I am sure the maintenance and cleaning on the feeder mechanism was not a waste, but I should have started with the easy solution first. A new full spool wasted, but that is OK. My printer is fully operational.
I'm experiencing problems with prints on my MK3S+ after the printer was dormant and relocated for a time.
* Prints generally are fine for the first cm or so before symptoms occur.
* Noises in the Y direction. I can't identify exactly where the noise comes from, but I have a short video recording it as well as a picture of the print quality.
* rough surfaces in the Y direction (Front side of prints)
* printhead continually resets as if it's run into the print. Mode is NORMAL and crash detection is ON.
* I've followed instructions on loosening and retightening screws. No luck.
* Updating firmware did not resolve the issue.
Hello. Please contact our support team, where you can do a live troubleshooting with them.
https://help.prusa3d.com/es/article/comprobacion-realineacion-del-engranaje-bondtech-mk3s-mk2-5s_133176
https://help.prusa3d.com/es/article/boquilla-hotend-atascado-mk3s-mk2-5s_2008
https://help.prusa3d.com/es/article/la-extrusion-se-detuvo-a-mitad-de-la-impresion-por-recalentamiento_1948
Y contáctanos si no encuentras ahí el problema.
https://help.prusa3d.com/es/article/atencion-al-cliente_2287
Un saludo,
I have a mk3s (kit) since last december. I used the printer a lot, mostly for busts and figurines for painting, wih no problems.
Since last monday It began this clicking sound, and the printer doesnt extrude anything but it is only during actual printing, if you change the filament it extrudes the litle lenght it usually did without problems but if you try to print with the new filament you get again the clicking sound and no extrusion.
I did a cold pull and recallibrate the z axis after it but to no avail.
What else could I check?